Note!
After wiring up ensure that the cover is screwed down tightly and that the cable entry
to the housing is air-tight.
4 Operation
This section describes how to operate the FEC 22 in the field. One section of the
display elements as well as the operating elements of the electronic insert are
protected by a cover. This can be raised by inserting a small screwdriver into a
recess in it. The inside of the cover has symbols to serve as a quick guide (see Table 5.1
for explanation)
Note!
U: 10…55 V DC I max 350 mA
PNP
1
2
3
+
-
-
1
1
+
PE
R
-
2
3
2
(+)
3
-
4
5
4
4
5
6
PE
1A
L1
N
789
3
21
4
6
max. 2.5 mm²
(Ground)
U=: 10 V … 55 V
(Ground)
R = external load
U~: 90 V … 253 V
50/60 Hz
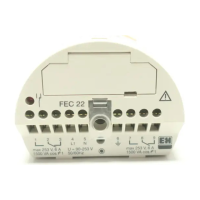
Relay output 1 Relay output 2
DC version AC version
connection
compartment
BA160Y32
Fig. 3.2
Electrical connection in the
T3 aluminium housing with
separate connection area
MIN
MAX
MIN
MAX
∆t∆t
∆
c
∆
c
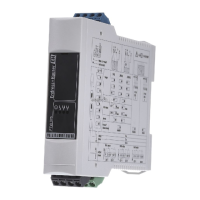
protective cover
with quick guide
Specifications:
power
supply
green LED:
stand-by
red LED:
switching status
left key:
e.g. assigning values
right key:
e.g. calibration
LED chain
rotary switch
terminals
BA160Y40
Fig. 4.1
Operating and display
elements
Elektronic insert FEC 22 4 Operation
Endress+Hauser 29