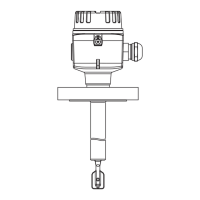
Nivector FTI26 Capacitance Point Level Switch
The Nivector FTI26 is a capacitance point level switch designed for detecting the level of powdery and fine-grained bulk solids, primarily for use in bulk solids vessels such as silos. This device offers reliable point level detection with various configuration and installation options to suit diverse industrial applications.
Function Description
The Nivector FTI26 operates on the principle of capacitance, detecting changes in the dielectric constant when the sensor is covered or uncovered by the medium. It functions as a point level switch, providing a discrete output when a predefined level is reached. The device supports two primary modes of operation:
- Maximum Point Level Detection (MAX): This mode is typically used for overfill prevention. In MAX mode, the electrical switch remains closed as long as the sensor is not yet covered by the medium. When the medium reaches and covers the sensor, the switch opens.
- Minimum Point Level Detection (MIN): This mode is commonly used for dry-running protection. In MIN mode, the electrical switch remains closed as long as the sensor is covered by the medium. When the medium level drops and uncovers the sensor, the switch opens.
Both MAX and MIN modes are designed with a safety-oriented quiescent current principle, meaning the electronic switch opens if the point level is reached, a fault occurs, or the power fails. This ensures a safe state in alarm conditions.
The device can be preconfigured at the factory for most applications, with a factory-set electrical switch point for products with a particle size Ø < 10 mm and a relative dielectric constant ɛr ≥ 1.6. It can be configured for installation with or without a protector and with lock nuts, typically for metal tanks. For other installation types, such as plastic tanks or with weld-in adapters, a customer-specific adjustment (empty and full calibration) is recommended to optimize measurement performance, especially for sensitive media (ɛr < 1.6 DC) or processes with large temperature variations.
Functional monitoring is possible with two-channel evaluation. When both MIN and MAX outputs are connected, they assume opposite states (XOR) during fault-free operation. In the event of an alarm condition or a cable break, both outputs are de-energized, providing an additional layer of safety and diagnostic capability.
Important Technical Specifications
- Supply Voltage: 12 to 30 V DC.
- Circuit Protection: A suitable circuit breaker must be provided in accordance with IEC/EN61010. The device must be operated with a 500 mA fine-wire fuse (slow-blow) suitable for DC current, compliant with IEC 60127-2.
- Process Connection: G 1" is a standard process connection.
- Sensor Projection: For optimal performance, the sensor surface should project ≥ 20 mm (0.79 in) into the silo when installed with a weld-in adapter.
- Silo Wall Thickness: For installations with a welding socket G 1", the silo wall thickness should be < 35 mm (1.38 in) or the welding socket < 50 mm (1.97 in).
- Operating Temperature: The device is designed for operation within specified temperature ranges. Due to heat transfer, the electronics housing temperature may rise to 80 °C (176 °F).
- Storage Temperature: Permitted storage temperature is -25 to +85 °C (-13 to +185 °F).
- Degree of Protection: Depending on the housing cover, options include IP65, IP66/68/69 for plastic and metal housing covers, and IP69 for M12 plugs with LED.
- Load Current: Maximum load current should be below 200 mA.
Usage Features
- Simple Commissioning: The device is largely preconfigured for common applications, minimizing the need for extensive adjustments.
- LED Indicators: The housing cover features Green (gn) and Yellow (ye) LEDs for status indication.
- Green LED (gn): Lit when the measuring device is operational.
- Yellow LED (ye): On M12 plug versions, LED 2a is active only in conjunction with IO-Link communication. LED 2b indicates sensor status (covered/uncovered) and switch status in MAX/MIN modes.
- Red LED (rd): Indicates warnings (flashing for remediable errors like invalid calibration) or faults (lit for non-remediable errors like electronics error).
- Test Magnet Operation: A test magnet is used for commissioning and function tests.
- Full Adjustment: Hold the test magnet against the marking on the housing for 5 to 10 seconds while applying operating voltage. The green and red LEDs flash at 1.5Hz for 5 seconds, then stop flashing.
- Empty Adjustment: Hold the test magnet against the marking for 20 to 25 seconds while applying operating voltage. The green and red LEDs flash at 1.5Hz for 5 seconds, then at 3Hz from 10 to 20 seconds, then stop flashing.
- Function Test: Hold the test magnet for at least 2 seconds to invert the current switch status.
- Reset to Factory Settings: Hold the test magnet for ≥ 30 seconds. The red LED will flash, and the device will return to its current switch status.
- Accessories: A range of accessories is available, including:
- Adapters: Weld-in adapters (G 1", Tri-Clamp 2") made of 316L (1.4404) with VMQ seals, suitable for hygiene and hazardous areas.
- Protectors: G 1½", R 1½", NPT 1½" protectors made of PBT-GF to guard against abrasive products and provide outflow protection.
- Lock Nuts: Made of PA.
- Protection Covers: Made of PC, especially important for hazardous areas to prevent damage from impact.
- Plug-in Jacks/Connection Adapters: M12 IP69 with or without LED, and M12 IP67 versions, with various cable lengths and materials (PVC, PUR).
Maintenance Features
- No Special Maintenance: The Nivector FTI26 is designed to require no special maintenance work.
- Cleaning: The sensor can be cleaned as needed, even while installed. Care must be taken to avoid damaging the sensor during cleaning.
- No Spare Parts: Repair is generally not envisaged for this device, and no specific spare parts are provided. In case of issues requiring repair or factory calibration, the device should be returned to Endress+Hauser.
- Diagnostics via LED: The LED indicators on the housing cover and optional M12 plug provide diagnostic information, helping to identify possible causes of malfunction such as no power supply, overload/short-circuit, ambient temperature issues, calibration errors, incorrect connections, or internal sensor errors. Corrective actions are suggested for each diagnostic message.
- Disposal: The product is marked with the WEEE symbol, indicating it should not be disposed of as unsorted municipal waste. It should be returned to Endress+Hauser for proper disposal under applicable conditions.