20
3.3 Installation procedure
3.3.1 Connect the electric meter to a single-phase AC network with a nominal voltage of 230 V. To do this, remove
the terminal cover and connect the wires by securing them in the terminals of the block according to the wiring
diagram printed on the cover, or given in Annex C.
When installing a meter, the wire (cable) must be stripped of insulation to approximately the amount shown in
Table 3.1. The stripped part of the wire should be smooth, without bends. Insert the wire into the terminal clamp
without tilts. It is not allowed to get a wire with insulation into the terminal, as well as for the stripped area to protrude
outside the block. First, tighten the top screw. Pull the wire lightly to make sure that it has been clamped. Then tighten
the bottom screw. After several minutes, tighten the connection again.
The diameter of the wires connected to the meter is shown in Table 3.1.
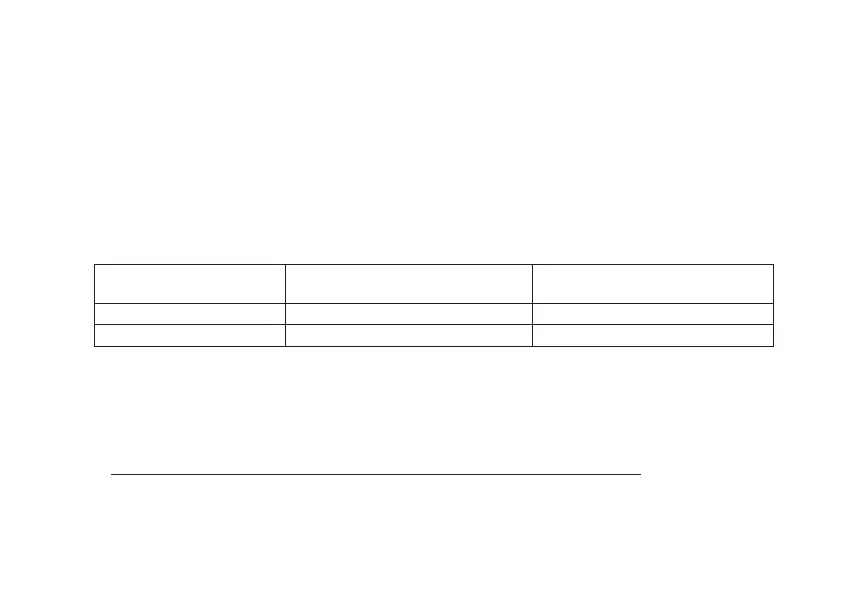
Таблица 3.1
Meter with a current range The length of the stripped wire, mm Wire cross-section diameter
2
, mm
5(60) А 27
(1 ÷ 7)
5(100) А 20
(1 ÷ 8)
If it is necessary to connect the meter into an AMI system, connect the signal wires to the interface outputs
in accordance with the wiring diagram.
Make sure that the time and date readings of the meter correspond to the actual values, otherwise set the date
and time (for details see САНТ.411152.068-05.1 РП).
Seal the covers and the «ACCESS» button.
Initialize the electronic seal of the clamp cover (see САНТ.411152.068-05.1 РП).
2
The range of the wire diameter is specified based on the possibility of its connection to the meter block. The required cross-section
(and therefore the diameter) of the wire is selected depending on the value of the maximum current