JOHNSON CONTROLS
12
FORM ET130.13-NOM3 (708)
Cleaning
1. Disconnect all electrical power to the equipment,
tag and lock out power source.
2. Gain access to motor housing through access
panel.
3. Use soft brush and vacuum to remove loose debris
from motor housing.
4. Replace access panels and restore electrical power
to equipment.
5. Use caution to assure that any contaminated mate-
rial does not contact other areas of the equipment or
building. Properly dispose of all contaminated
materials.
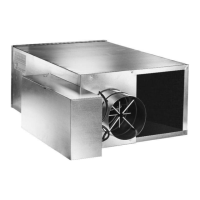
Replacement
1. Disconnect all electrical power to the equipment,
tag and lock out power source.
2. Remove bottoms access doors by removing the
screws from the access door and then remove side
rail screws to access to the motor.
3. Disconnect fan motor wiring.
4. Remove securing fan assembly to discharge
5. Loosen fan wheel set screw.
6. Remove nuts securing motor to housing and re-
move motor.
7. Remove fan cut off.
8. Remove fan wheel and clean as needed.
9. Reinstall wheel, cut off, motor, and housing.
Coil
The frequency of required cleaning is dependent on the
operating hours of the system, fi lter maintenance and
effi ciency as well as dirt load.
Important: Coils may become ex-
ternally fouled as result of normal
operation. Dirt on the surface of the
coil reduces its ability to transfer heat
that can result in reduced performance
and increased operating energy cost.
If the dirt on the surface of the coil
becomes wet, microbial growth (mold)
can result, possibly causing unpleas-
ant odors and serious health related
indoor air quality problems.
Fin edges are sharp. Fins are fragile;
care must be exercised to avoid damag-
ing fi ns. Do not use solutions to clean
coils; drain pans are not present to
remove collected solution.
Cleaning
1. Disconnect all electrical power to the equipment,
tag and lock out power source.
2. Put on appropriate personal protective equip-
ment.
3. Gain access to coil either through ductwork or
optional coil access panel.
4. Use soft brush and vacuum to remove loose debris
from sides of coil.
5. Straighten any coil fi ns that may have been dam-
aged during cleaning process with fi n comb.
6. Replace ductwork or access panel and restore
electrical power to equipment.
7. Use caution to assure that any contaminated mate-
rial does not contact other areas of the equipment or
building. Properly dispose of all contaminated
materials.
Replacement
1. Disconnect all electrical power to the equipment,
tag and lock out power source.
2. Disconnect all ductwork, if applicable.
3. Remove fi lter rails/ fi lter clips, if applicable.
4. Cut or un-braze water connection at coil.
5. Disconnect coil from equipment by removing
screws on the exterior perimeter of the coil. Low
height equipment only has mounting screws lo-
cated on the sides of the equipment.