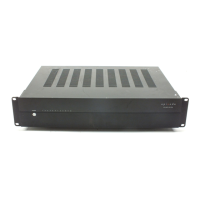
The Episode EA-AMP-SUB-1D-500 is a sophisticated subwoofer amplifier designed to enhance the audio experience in various home theater and audio systems. Engineered by SnapAV, this amplifier is built to deliver powerful and clear bass, making it an excellent choice for both movies and music. Its versatile design allows for installation in cabinetry, on equipment shelves, or within standard 19-inch equipment racks, thanks to its sleek 1U form factor which minimizes space requirements.
Function Description:
The primary function of the EA-AMP-SUB-1D-500 is to amplify low-frequency signals, driving subwoofers to produce deep and impactful bass. It is specifically designed to work seamlessly with almost any type of home theater or audio system, offering advanced technological components that ensure astounding sound effects. The amplifier's Class D design contributes to its efficiency, allowing it to run cool while providing ample power. This design also offers low impedance drive capabilities, which translates to massive headroom and the ability to connect multiple subwoofers, such as the ES-SUB-IW-DUAL8. With two subwoofer output connections, wiring to multiple subwoofer locations is simplified, making it ideal for creating a more immersive and evenly distributed bass experience in larger rooms or complex setups. The amplifier is also built to handle today's sophisticated home theater LFE (Low-Frequency Effects) signals, incorporating features that protect the connected speakers from clipping, ensuring longevity and consistent performance.
Usage Features:
The EA-AMP-SUB-1D-500 offers a range of user-friendly features for precise control and customization of the audio output.
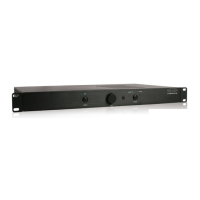
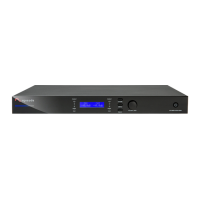
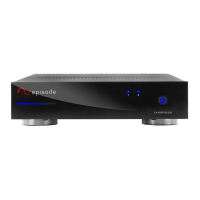
Front Panel Controls:
The front panel provides essential controls for quick adjustments.
- Power Button: Toggles the amplifier between Standby Mode and ON.
- Gain Control: A continuous rotary knob that serves as the master volume control. For fine-tuning, it is recommended to use the gain adjustment on the AV receiver or pre-amplifier. A dB meter can be used to measure the subwoofer output and set it to the desired level for the room and listener.
- EQ Mode Buttons (Music/Movie): These toggle buttons allow users to quickly switch between two distinct EQ curves optimized for different source materials. The "Music" mode provides a flat EQ curve, while the "Movie" mode offers an 8dB boost between 30Hz and 80Hz for added impact in cinematic experiences. LEDs above the "Music" and "Movie" text indicate the currently selected EQ mode.
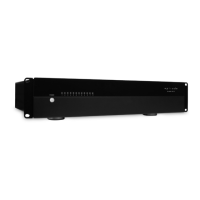
Rear Panel Features:
The rear panel houses a comprehensive set of inputs, outputs, and setup modes for detailed configuration.
- Unbalanced Female RCA Inputs (L/R): These inputs allow connection to a receiver or pre-amp processor. For LFE output connections, connect to the Right Female RCA input. If not using an LFE connection, both inputs are calibrated to the same sensitivity level and should be connected. When connecting to a stereo pre-amp, a Y-Adapter should be used.
Setup Modes:
- Boundary EQ Switch (ON/OFF): This setting helps to remove exaggerated boomy sounds often created by corner loading, large wall surfaces, or installations within custom cabinetry. Selecting "ON" compensates for these less-than-ideal circumstances, resulting in a more natural and tighter bass performance. For installations where exaggerated boomy sound is desired, the switch should be left in the "OFF" position.
- Phase Switch (0°/180°): Factory-set at 0°, this switch allows adjustment of the subwoofer's phase to fine-tune the signal coincidence between the subwoofer and the lower frequencies of the main speakers. Adjusting the phase while listening for an increase in mid-bass in the crossover region helps achieve optimal integration.
- Crossover Frequency Control (40Hz-160Hz): This control sets the crossover frequency for the Low Pass Filter, with a factory default of 80Hz. It allows users to adjust the frequency range from 40Hz to 160Hz, tailoring the subwoofer's output to match the main speakers.
Power Modes:
- ON: The amplifier is always on.
- AUTO: The amplifier turns on when a signal is sensed and enters standby mode approximately 15-20 minutes after the signal ceases.
- TRIGGERED: The amplifier turns on when triggered by a 12 VDC signal (100mA minimum). A 1/8-inch mono mini-jack is provided for connecting a 12-volt trigger wire from other devices, with tip-positive polarity.
- 1/8" Mono Mini-Jack: This jack connects to most IR emitter output connections, allowing the IR signal to be transferred internally to the IR receiver behind the front panel. This eliminates the need for external "stick-on" emitters in many systems. However, due to variations in IR system types, an emitter may still be required over the front panel IR window in some cases.
Speaker Outputs:
- Binding Posts (SUB 1, SUB 2): These connections are used to attach speaker wires to the subwoofer(s). Red terminals are positive, and black terminals are negative. The output is bridged, and it is crucial not to ground it. Users can employ either bare speaker wire or banana plugs for termination.
AC Power:
- Master Power ON/OFF Switch: A physical switch to turn the amplifier's main power on or off.
- Voltage Selector (115V/230V): Allows selection of the appropriate input voltage (115V or 230V) based on the regional power supply.
- IEC Power Cord Inlet: For connecting the standard IEC power cord.
Remote Control:
A supplied hand-held IR remote control provides convenient wireless operation of the amplifier.
- POWER: Toggles between Standby Mode and ON.
- VOL+/-: Adjusts the volume level.
- MUTE: Mutes the subwoofer output; pressing again unmutes it.
- MUSIC/MOVIE: Selects the corresponding EQ mode (Music or Movie). The IR codes for these modes can be integrated into IR learning macros for automated source-specific EQ changes.
Installation and Placement:
The amplifier is designed for optimal performance when properly positioned. If not rack-mounted, it should be placed on a solid, level surface with all feet resting. Adequate ventilation is crucial for cooling and extending the unit's life. A minimum of 5 inches of free air space above the amplifier and 3 inches on each side is recommended. For cabinet installations, a minimum of 2 inches of depth behind the unit is needed for cables and connectors.
For rackmount installations, the amplifier's four feet should be removed, and the included rack-mount ears attached to the front sides of the chassis. It then securely mounts into a 19-inch equipment rack, occupying 1U of space. Even though the amplifier generates minimal heat, leaving ventilation between components in a rack is always advisable.
Subwoofer placement significantly impacts perceived output. Certain areas in a room can sound thin or boomy due to bass waves. If forced to symmetrically install the subwoofer, the phase switch can help. For a single subwoofer, the ideal placement is the room location receiving the highest dB level from the audio source, which can be identified using a dB meter. Dual subwoofer installations are highly recommended for more even bass distribution, as they help cancel standing waves and "quiet" spots, benefiting most home theater rooms. The EA-AMP-SUB-1D-500's design supports multiple subwoofer connections (two paralleled connections for convenience). The boundary and phase switches offer unique placement options not found on ordinary subwoofer amplifiers.
Maintenance Features:
The EA-AMP-SUB-1D-500 is designed for trouble-free operation, with most issues stemming from simple causes.
- Troubleshooting Guide: The manual includes a comprehensive troubleshooting section to address common issues such as no audio output, hum or buzzing sounds, or the amplifier not turning on. This guide directs users to check power connections, audio cables, speaker wire connections, volume levels, and power mode settings.
- Cleaning: For general maintenance, the amplifier can be cleaned with a soft cloth or paper towel.
- Serviceability: In case of persistent problems, users are advised to contact their authorized Episode dealer or Episode technical support. The manual emphasizes that servicing should be referred to qualified service personnel, and users should not remove the cover as there are no user-serviceable parts inside. This ensures safety and proper repair.
- Safety Instructions: The manual provides important safety instructions, including warnings against exposure to rain or moisture, blocking ventilation, installing near heat sources, and overriding safety features of polarized or grounding plugs. It also advises unplugging the apparatus during lightning storms or when unused for long periods.
- Warranty: The product comes with a 2-Year Limited Warranty covering parts and labor for defects in material or workmanship under normal use. This warranty does not cover products that have been abused, modified, or disassembled. For warranty repairs, products must be returned to SnapAV or a designated service center with prior notification and an assigned return authorization number.