23
English
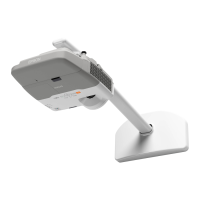
3. Route the cables through the arm unit
Route the projector’s power cord, the USB cable supplied with the interactive module, and any
additional cables connecting to the projector through the arm unit.
4. Attach the wall mount to the wall plate
1. Attach the hook on the arm plate to the bar on the wall plate.
2. Secure the arm plate temporarily using two M8 × 15 mm hexagon socket head cap bolts.
q
Route the included USB cable so that the type B connector emerges on the projector
side. Epson recommends labeling any duplicate cables (ex. USB cables for interactive
module and USB Display, etc.) so that additional connections can be more easily
identified.
Arm unit
USB cable for interactive module
Vertical adjustment
screw
Problems may occur if you use this product without routing the cables through the arm unit.
Caution
Arm unit
Arm plate
Bar on wall plate
Wall plate
M8 × 15 mm
hexagon socket
head cap bolt (×2)
Take care not to trap the cables between the mount arm and wall plate.
Caution
Installation.book Page 23 Monday, February 13, 2012 4:23 PM
 Loading...