25
English
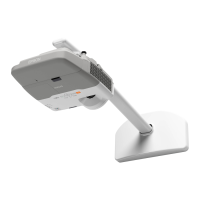
7. Adjust the arm length
1. Loosen the screw on the arm ( ).
2. Adjust the length of the arm using the measure on the bottom to match the projection distance
recommended in “Positioning the Projector” on page 10 ( ).
3. After adjusting the length, secure the arm position temporarily by tightening the screw on
top ( ).
8. Attach the interactive module
The interactive module includes one M3 × 10 mm hexagon socket head cap bolt with washer and
spring washer, one M3 × 8 mm cross-head screw, and one M4 hexagonal wrench. Use these materials to
attach the interactive module to the attachment plate as described below.
1. Insert the interactive module into the attachment plate.
The interactive module is included with BrightLink 425Wi/430i/435Wi and can be
purchased as an option for PowerLite 420/425W/430/435W. If you did not purchase
this option for your PowerLite model, please skip to step 9 on page 26.
Installation.book Page 25 Monday, February 13, 2012 4:23 PM
 Loading...