5
English
1 Package Contents
s 6
2 Specifications
s 7
3 Connecting Devices
s 9
4 Positioning the Projector
1. Installation Measurements for BrightLink 425Wi/435Wi and PowerLite 425W/
435W - Wide
2. Installation Measurements for BrightLink 425Wi/435Wi and PowerLite 425W/
435W - Tele
3. Installation Measurements for BrightLink 430i and PowerLite 420/430 - Wide
4. Installation Measurements for BrightLink 430i and PowerLite 420/430 - Tele
s 10
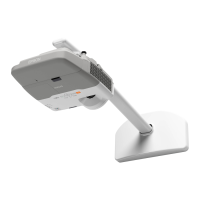
5 Installing the Projector
1. Install the wall plate
2. Assemble the wall mount
3. Route the cables through the arm unit
4. Attach the wall mount to the wall plate
5. Attach the attachment plate to the projector
6. Attach the projector to the adjustment unit
7. Adjust the arm length
8. Attach the interactive module
9. Connect the power cord and other cables to the projector
10. Attach the arm cover
11. Turn on the projector and check the screen
12. Attach the interface cover bracket
13. Attach the cable cover to the projector
14. Attach the wall plate cover
s 20
6 Appendix
s 30
Installation.book Page 5 Monday, February 13, 2012 4:23 PM
 Loading...