Do you have a question about the Esaote MyLabOmegaVET and is the answer not in the manual?
Information on patient/operator safety and conformity standards.
Manual for MyLab installation and basic usage instructions.
Detailed instructions for MyLab probes and admitted consumables.
CD-ROM manuals with probe temperature and acoustic output data.
Manual detailing advanced features, optimization, measurements, and archiving.
Manual targets sonographers, physicians, and biomedical engineers trained in ultrasound.
Dedicated software for veterinary use, providing specific probes and measurements.
Ultrasound scanner usage by trained personnel, awareness of limitations, and proper operation.
Product intended for safe and proper operation, subject to jurisdictional laws.
Explains graphical conventions used in the manual for device controls.
Manufacturer's responsibility for safety and functioning, contingent on user adherence.
Discusses product safety, efficiency, and lifespan guarantees.
Esaote ensures maintainability for seven years from the purchase date.
Guidelines for disposing of the device according to WEEE directive and local regulations.
Terms and conditions for using the device's software.
Outlines intellectual property rights for the device's software and associated materials.
Grants end-user rights to use software, with specific restrictions on copying and modification.
Information on third-party software used, specifically 7-Zip under GNU LGPL license.
Requirements for product traceability and notification of ownership transfer.
Post-market surveillance for potential hazards and reporting malfunctions.
Device contains lithium-ion batteries and mercury lamp; requires special waste disposal.
Device design for electromagnetic environments per IEC 60601-1-2.
Emissions characteristics making it suitable for industrial/hospital use (Class A).
Defines performance criteria related to image quality, accuracy, and safety.
Tests simulating electromagnetic environments for transients and typical levels.
Guidance for use in specified electromagnetic environments per IEC 60601.
Immunity guidelines and measures for non-life-supporting medical equipment.
Recommendations for RF system usage to prevent interference with echographic images.
Information on built-in wireless capability and operational distance recommendations.
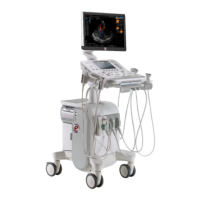
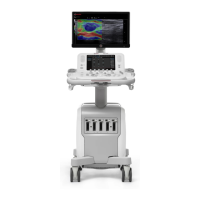
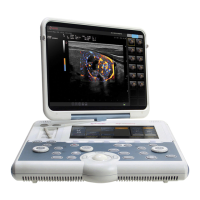
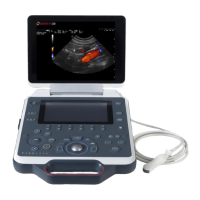
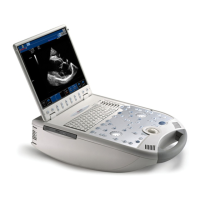
General description of MyLabOmegaVET as a high-resolution ultrasound scanner.
Lists various ultrasound probes compatible with MyLabOmegaVET.
Specifies that MyLabOmegaVET is not intended for ophthalmic use or eye-related applications.
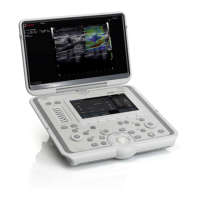
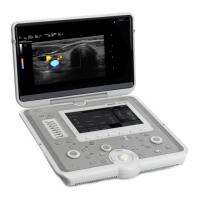
Device features a built-in LCD, can be used portably or with a trolley.
Describes the components of the console in portable configuration.
Details connectors on the right and left sides of the MyLab unit.
Location of the mains socket on the rear side for AC/DC adapter connection.
Steps for placing the MyLab on a surface and connecting power.
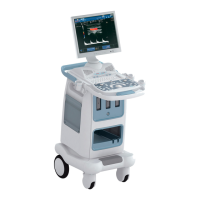
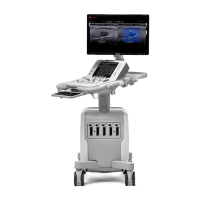
Information on housing MyLab in a shell body or on a fold-away trolley.
Details on connecting imaging and Doppler probes to the EA1 and EA2 connectors.
Describes the height-adjustable trolley for mobile configuration setup.
How to set up the trolley, house the AC/DC adapter, and position the unit at the working site.
Trolley accessories like insulation transformer, probe multi-connector, and auxiliary monitor.
Role and mounting of the insulation transformer on the trolley.
Option to mount a multi-connector to increase probe connectivity.
Mounting and connection of an auxiliary monitor to the trolley.
Information on the internal battery pack, installation, and usage.
Explanation of battery LEDs and icons indicating charge level.
Procedure for first-time use of a new battery pack.
Information on battery lifespan and recommended replacement intervals.
How the device handles internal faults and displays error messages.
Specific error codes related to battery management and their meanings.
Error codes related to power supply issues like overheating or fan failure.
Waiting times required for the device to acclimate to temperature changes before use.
Steps to connect the device to a network for connectivity features.
Procedures for connecting auxiliary devices like printers and monitors.
Requirements for connecting additional equipment to ensure system safety and compliance.
Defines conditions for patient environment based on IEC60601 standards.
Extra safety precautions like protective earth connections and avoiding multiple sockets.
How to house peripherals on the trolley's dedicated tray.
Procedure for connecting a B/W Thermal Medical USB printer.
Procedure for connecting a non-medical USB printer.
Precautions for moving and transporting the MyLab system.
Steps for moving the system in portable configuration.
Precautions for moving the system in mobile configuration.
How to quickly move the system between working positions using batteries.
Steps for plugging in the power cord and connecting to mains power.
Procedure for powering the MyLab system on and off at the examination site.
Overview of MyLab controls on the control panel and touchscreen.
Details the main imaging controls on the control panel.
Functionality and display of the EKnob control.
Description of the trackball's operation modes.
How the trackball functions as a mouse pointer for screen navigation.
Overview of the touchscreen, including ON/OFF and MENU buttons.
Location and indicator lights of the ON/OFF button.
Accesses the device menu for configurations and settings.
Functionality and layout of the touchscreen interface.
Describes the layout of the touchscreen for standard exam functions.
Explains the function of six levers (toggles) on the touchscreen.
Layout used for advanced exam functions like body marks and annotations.
Details the QWERTY keyboard layout for data entry.
Control for signal amplification in image areas.
Explains the four main areas of the screen layout.
Displays center, patient data, accession number, and date.
Displays trackball functionality, Wi-Fi, media icons, battery, and peripheral status.
Indicates next function below the image and how to switch.
Icon status for Wi-Fi connection and more details in Advanced Operations manual.
Icons for archival media and their status, with more details in Advanced Operations.
Displays icons for activated features like XView or MView.
Displays battery status icons when the pack is installed.
Icons for managing peripheral devices like printers.
Describes elements in the image area independent of active mode or probe.
Memory bar displayed when image is frozen for reviewing saved images.
Details imaging parameters like F, G, AG, D, X/M, PRC, PRS, SV, Θ.
Saved clips and images displayed as thumbnails for review.
Used to access the device menu and available options.
Optimizing MyLab for specific exam types with probe-specific settings.
Defines device-specific parameters like DICOM, multimedia, and network settings.
Defines general parameters like units, security, and licenses.
Common procedure for setting parameters via the configuration screen.
How to set up MyLab options for configurations.
Group of settings optimizing MyLab for a specific exam type.
Procedure to create or modify presets via the MENU.
Procedure to create presets by adjusting real-time image settings.
Allows recording and saving sequences of keys as customized buttons.
Accessing the eTouch configuration menu to set up custom buttons.
Steps to record a macro sequence for eTouch button customization.
How to position and delete customized buttons on the touchscreen.
Organizing customized touchscreens into tabs.
Overview of system settings configuration options.
Allows creating user profiles with personalized system configurations.
Handling corrupted profiles and troubleshooting steps.
Setting the center name for display and report headers.
Input field for the center name displayed in the heading area.
Adding hospital name, department, and logo to report headers.
Entering the station name used in DICOM.
Overview of general settings configuration.
Menu for setting date, time, units, and other general configurations.
Setting date and time manually or automatically via NTP server.
Setting units for height, weight, and probe temperature scales.
Setting needle guide line types for biopsy procedures.
Explains fields and actions for configuring the control panel.
Options for different shutdown types like standby or virus scan.
Selecting available alphanumeric keyboards for the touchscreen.
Settings for reviewing stored images and traces in cine mode.
Setting specific features for each application.
Information on antivirus and encryption features for data protection.
Details on Windows Defender antivirus and its update options.
Procedures for disk data encryption and recovery key management.
General information about security options provided by MyLab.
Managing optional licenses and checking demo license status.
Steps to activate new licenses using license numbers.
Information on activated demo licenses and expiration dates.
Interface for exporting and importing clinical and system settings.
Saving customized settings to USB medium.
Settings that can be exported within the clinical configurations.
System configuration settings that can be exported.
Loading customized clinical and system configurations from USB.
Displays model name, serial number, software version, and BIOS revision.
Explains encryption for data confidentiality and recovery key usage.
Accessing operation manuals via the user interface.
Instructions for accessing electronic manuals from the Esaote website.
Procedure for starting a new exam after initialization or device power-up.
Steps to start an exam: patient data, probe, application, and preset selection.
Ways to enter patient data: new screen or retrieving from archive.
Entering patient data and application details on the ID screen.
Accessing past exam data for reopening or retrieving patient information.
Procedure for selecting a connected probe from the touchscreen.
Choosing an application compatible with the selected probe.
Selecting a preset (clinical setting) for the probe and application.
Using imaging modes to cover various needs and optimize quality.
Capturing and saving single images or cineloop sequences.
Stopping/starting acquisition and reviewing images using memories.
Using EXAM REVIEW to view saved images and sequences.
Archiving exam data and exporting it to local or external media.
Recommended maintenance procedures and schedules for users and personnel.
Specific cleaning recommendations for devices in veterinary use.
Periodic cleaning of MyLab and connected devices with compatible agents.
How to clean the control panel and device using soft cloths and mild detergent.
Procedure for cleaning the QWERTY keyboard using commercial wet wipes.
Method for cleaning the trackball by removing the locking disk.
Removable probe and gel holders cleaned with mild soap solution.
Steps for cleaning the touchscreen surface with dry or dampened cloths.
How to clean the LCD screen with a soft dry cloth and glass cleaner.
Wiping the case with a soft dry cloth and mild detergent.
Differences in MyLab models based on installed and installable licenses.
How licenses enable specific functions and are linked to the serial number.
Lists the application licenses available for MyLab.
Details features configurable on MyLab depending on the model.
Describes product specifications with all options, including display and connectors.
Specifications for the main and touchscreen LCD displays.
Information on the number and type of probe connectors.
Details I/O connectors, USB ports, Wi-Fi, and video output.
Supported image file formats like BMP, PNG, JPEG, and AVI.
Operating system (Windows 10) and multi-lingual support.
Basic and advanced calculations, annotations, and bodymarks.
Keyboard features including sliders, encoders, and touchscreen controls.
Physical dimensions of the device in closed and working positions.
Approximate weight of the device with and without batteries.
IP rating indicating the device is not watertight.
Specifications for the AC/DC power supply and optional batteries.
Recommended temperature, humidity, and pressure for operation.
Recommended temperature, humidity, and pressure for storage.
Information on probe storage requirements found in the probe case.
List of standards complied with by the medical electrical equipment.
| Type | Veterinary Ultrasound System |
|---|---|
| Battery Life | Up to 2 hours |
| Application | Veterinary |
| Transducer Frequency Range | 1 to 18 MHz |
| Imaging Modes | B-Mode, M-Mode, Color Doppler, Power Doppler |
| Portability | Portable |
| Connectivity | USB, HDMI, Wi-Fi, Ethernet |
| Software | Veterinary-specific software packages |
| Applications | equine |