Hardware Installation
3. Hardware Installation
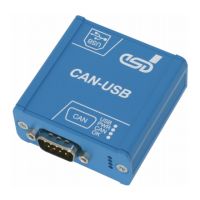
To put the CAN-USB/2 into operation, please follow the installation notes.
Step Procedure
see
page
Read the safety instructions at the beginning of this document
carefully, before you start with the hardware installation!
5
1. Connect the CAN bus via the DSUB9 connector of the CAN-USB/2 as
described in chapter “Correctly Wiring Electrically Isolated CAN
Networks“.
Please note that the CAN bus has to be terminated at both ends!
esd offers special T-connectors and termination connectors for external
termination. Additionally the CAN_GND signal has to be connected to
earth at exactly one point in the CAN network.
16
2. Connect the USB interface of the CAN-USB/2-module via USB bus to
your PC. Use the supplied USB cable for this purpose.
The module is powered via USB.
-
NOTICE
Access via esd's NTCAN API is supported.
The software installation via esd's NTCAN API is described in the manual ‘NTCAN-API,
Installation Guide’.
CAN-USB/2
Hardware Manual • Doc. No.: C.2066.21 / Rev. 1.6
Page 11 of 28