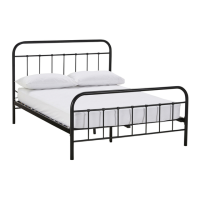
Step 9
Page 11fantasticfurniture.com.au
You will need
Position top panel (P1)
onto panels (P3 x 2, P4) as shown.
Make sure the groove in
top panel (P1) is on the same side
as the back panel (P5).
Insert 6 x large cam nuts (H2)
into panels (P3 x2, P4).
Rotate the cam nuts so the arrows
point towards the incoming cam bolts
and turn clockwise to lock
with a flat head screwdriver.
Step 10
Flat Head
Screwdriver
6 x Large Cam
Nuts (H2)
(P1)
(P4)
(P3)
(P3)
H2
H2
H2
H2
H2
H2
You will need
If necessary, gently adjust the top panel (P1) sideways in either direction
until XX and YY are equal.
Holding it in place, fix 4 x back panel connectors (H7) to assembled unit
with 4 x screws (H6) as shown, using a phillips head screwdriver.
Phillips Head
Screwdriver
4 x Screws
16mm (H6)
4 x Back Panel
Connectors (H7)
H7
H7
H6
(P5)
(P5)
(P1)
(P5)
XX
YY
Required
Two People
XX=YY
XX
YY
(P1)
(P1)
H7
H7
H7
(P5)
(P1)
H7