1. Press the Edit button to confirm the selection.
Ä
[FLW] or [ConS] flashes.
2. Select flow measurement (ConS) with the A/B buttons.
3. Press the Edit button to confirm the selection.
Ä
[CI] flashes.
4. Set the value for the air consumption switching impulse (CI) with the A/B
pushbuttons.
5. Press the Edit button to confirm the set value.
Ä
[no] or [nc] flashes.
6. Select the switching element function (NO/NC) with the A/B pushbuttons.
7. Press the Edit button to confirm the set value.
Ä
SFAB is in RUN mode.
8. Check whether the SFAB switches as desired with a test run (flow rate).
9.7.3 Setting the colour change (only for OutB)
In order to detect the system status over longer distances, a colour change can be
set at the OutB output. If the set switching threshold is exceeded or not reached,
the colour of the display changes.
The following settings can be selected:
– r.ON
– Display is red when the switching output is High (1).
– Display is blue if the switching output is Low (0).
– r.OFF
– Display is red when the switching output is Low (0).
– Display is blue if the switching output is High (1).
– bLUE
– Display is blue; the colour change function is switched off.
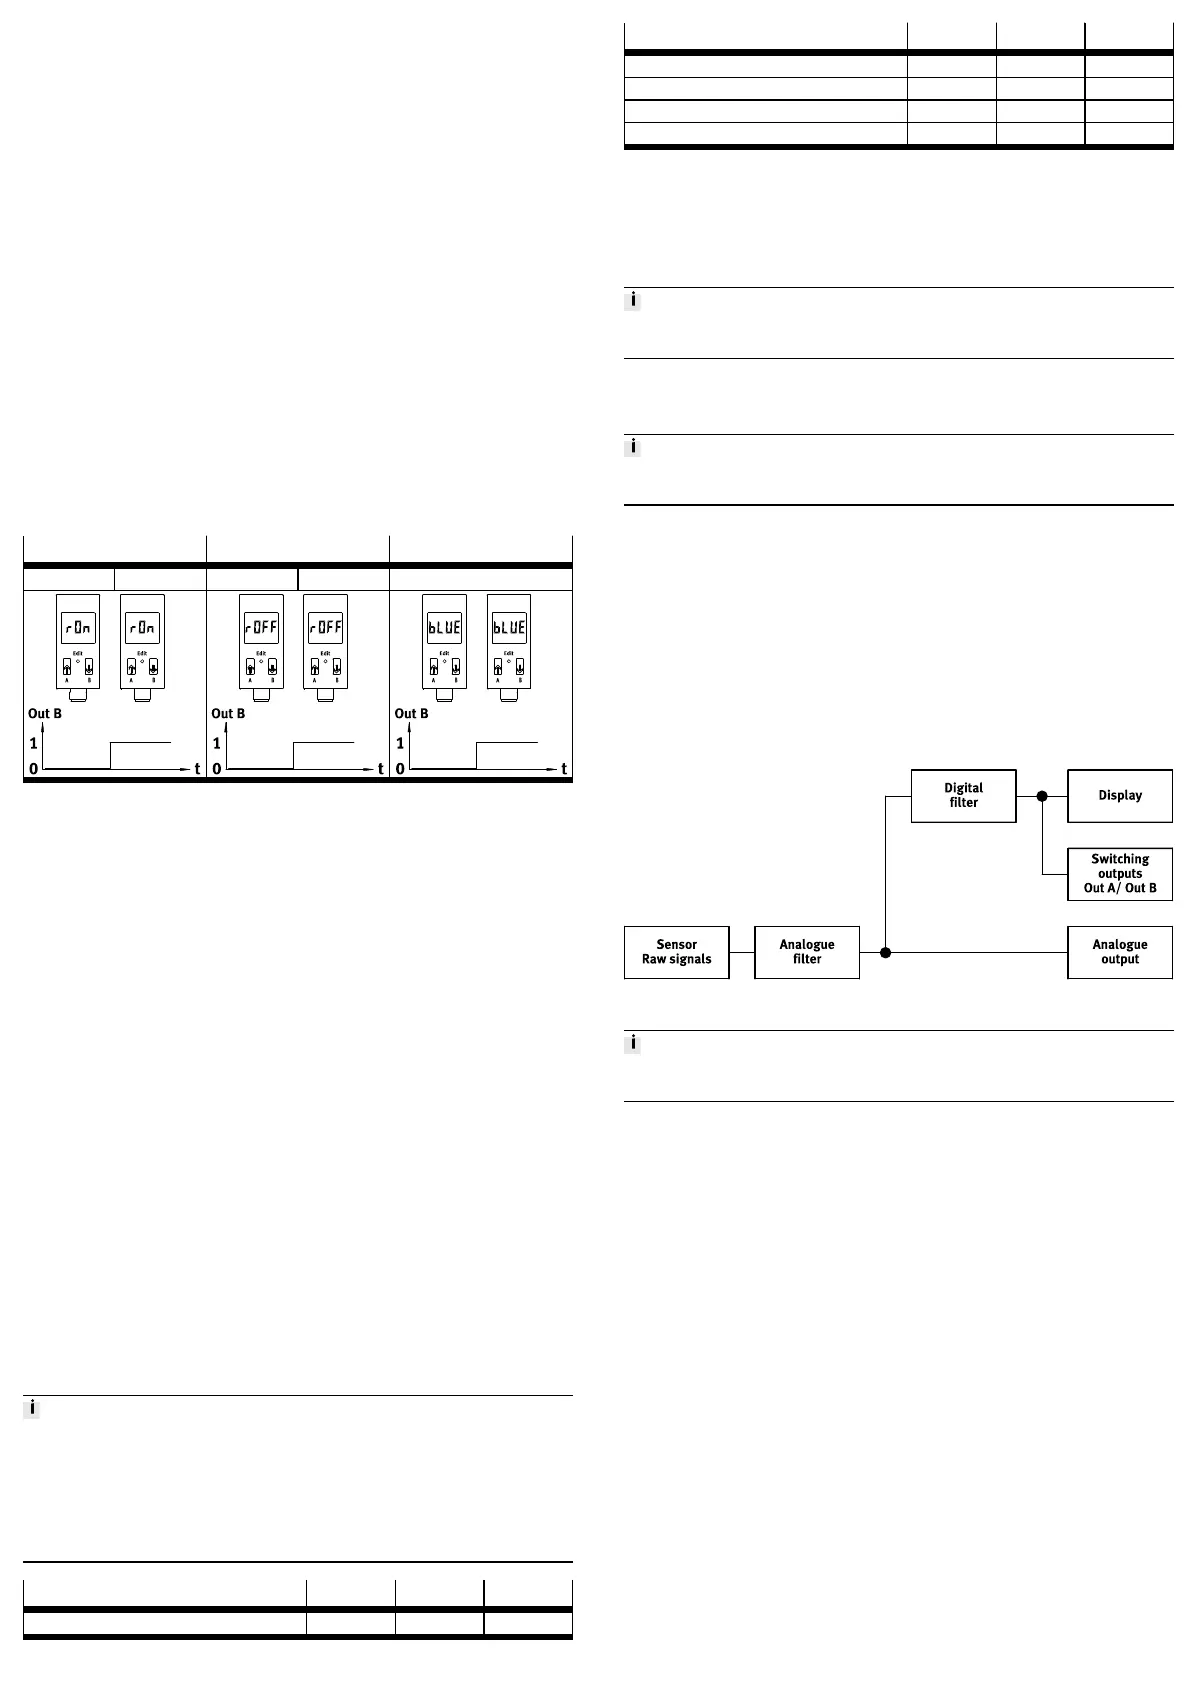
r.ON r.OFF bLUE
Blue Red Red Blue Blue
Tab. 8 Colour change
Requirement
– SFAB is in EDIT mode and [OutA] flashes
1. Press B pushbutton.
Ä
[OutB] flashes.
2. Press the Edit button to confirm the selection.
3. Press the Edit button repeatedly until [rON], [rOFF] or [bLUE] flashes in the dis
play.
4. Select the desired setting (rON, rOFF or bLUE) using the A/B pushbuttons.
5. Press the Edit button to confirm the selection.
Ä
SFAB is in RUN mode.
9.7.4 Setting the special menu
The following settings can be undertaken in the special menu:
– Standard conditions
– Physical units for flow rate (l/h, scfm or l/min)
– Analogue filter [AnA.F] with filter time constant in ms
– Digital filter [dIG.F] with smoothing in 7 steps for display and switching output
– Physical units for air consumption (m3, scf or l)
– Select the switching output [PnP] or [nPn].
– Removal of the security blocking [Lock] with security code
Requirement
– SFAB is in EDIT mode and [OutA] flashes
1. Press the A or B pushbutton repeatedly until the menu (SPEC) is selected.
Ä
[SPEC] flashes.
2. Press the Edit button to confirm the selection.
Ä
[Option] flashes. The standard conditions (OFF, 1 or 2) can be set.
9.7.4.1 Setting the standard conditions
The air mass flow measured and output by the SFAB refers to standard condi
tions. The SFAB is factory calibrated to the physical standard conditions according
to DIN 1343.
Changing the reference standard only adjusts the display on the sensor. The ana
logue value at the analogue output still refers to DIN 1343 and must be conver
ted.
• Multiply the end value of the flow measurement range by the specified correc
tion factor.
• End value of the analogue output refers to the end value of the measuring
range. This changes the transfer function.
REF / Cond Off 1 2
Standard DIN 1343 ISO 2533 ISO 6358
REF / Cond Off 1 2
Air pressure (absolute) [kPa] 101.325 101.325 100
Temperature [°C] 0 15 20
Humidity [%] 0 0 65
Correction factor, measurement range limit value 1 1.055 1.087
Tab. 9 Standard conditions for flow rate and volume units
1. Select the desired setting (OFF, 1 or 2) using the A/B pushbuttons.
2. Press the Edit button to confirm the selection.
Ä
[FLW] is displayed and the set value flashes. The unit for the flow rate
(l/h, scfm or l/min) can be set.
9.7.4.2 Setting the physical unit for the flow rate
For the types SFAB600U and SFAB1000U, the unit l/h cannot be set due to dis
play reasons.
1. Select the desired setting (l/h, scfm or l/min) using the A/B pushbuttons.
2. Press the Edit button to confirm the selection.
Ä
[AnA.F] and the set value are displayed. The analogue filter can be set.
The selected physical unit is shown in RUN mode in the display at the bottom
right.
9.7.4.3 Setting the filter time constant for the analogue filter
With the analogue filter, the rise time (filter time constant) of the analogue output
can be changed (default value = 60 ms).
1. Select the value for the filter time constant (15 ms, 30 ms, 60 ms, 125 ms, 250
ms, 500 ms or 999 ms) with the A/B pushbuttons.
2. Press the Edit button to confirm the set value.
Ä
[dIG.F] and the set value flash. The digital filter can be set.
9.7.4.4 Setting smoothing for the digital filter
The display values can be smoothed with the digital filter. The degree of smooth
ing can be set in 6 steps from d1 = low smoothing to d6=maximum smoothing.
With increasing smoothing, the switchon / switchoff time of the switching out
puts rises. With d.Off the smoothing is deactivated.
Fig. 8 Signal flow from the analogue filter to the digital filter
A high filter time constant and high smoothing can result in a switching time of
several seconds.
1. Select the value for cushioning (d1 to d6 or d.OFF) with the A/B pushbuttons.
2. Press the Edit button to confirm the set value.
Ä
[ConS] is displayed and the currently selected value flashes. The unit for
the air consumption (m3, scf or l) can be set.
9.7.4.5 Set the physical unit for the air consumption
1. Select the desired setting (m3, scf or l) with the A/B pushbuttons.
2. Press the Edit button to confirm the set value.
Ä
The currently set value [PnP] or [nPn] for the switching element output
flashes. The switching element output can be set.
9.7.4.6 Set switching element output
The two switching outputs can be set as positive switches (PNP) or as zero
switches (NPN) by means of the integrated pushpull step.
1. Select the desired setting (PNP or NPN) using the A/B pushbuttons.
2. Press the Edit button to confirm the selection.
Ä
[Lock] flashes. The security code can be set.
9.7.4.7 Setting the security code
To protect the setting from unauthorised access, a numerical code of up to 4
digits can be set. The security code must be entered each time the settings are
changed (EDIT mode and TEACH mode).
1. Set the desired security code with the A/B pushbuttons.
2. Press the Edit button to confirm the selection.
Ä
The SFAB is in RUN mode.
9.8 TEACH mode
The switching points can be set in the TEACH mode.
 Loading...