11
ANGLE MAT GUIDE
The Angle Mat Guide provides an indispensable addition to the Fletcher 2200. You can produce angled cuts over a
range of 15 degrees to 75 degrees. In addition to simple 45 degree corner cuts, a wide variety of multi-sided openings
can be produced easily and with precision. No matter how complex the opening, you can create double mats with exact
and consistent liner exposures.
It is simple to attach the Angle Mat Guide to the Mat Guide on your Fletcher 2200. Refer to Figure 16. The Locking
Pin (a) can be placed in any of the three holes (b). Selecting the hole on the left will locate the Angle Mat Guide at the
lower end of the Mat Guide for smaller mats, up to 8" X 10" (200mm X 250mm). Using either of the next two holes to the
right will locate the tool toward the upper end of the Mat Guide for large mats.
To attach, set the Angle Mat Guide on the Mat Guide and slide it downward until it stops. It will locate on the right side of
the Mat Guide with two projections on the underside, and on the left with the Locking Pin. While continuing to pull it
toward you, turn the Locking Pin (a) counterclockwise to firmly lock the Angle Mat Guide in place. To remove it, turn the
Locking Pin clockwise.
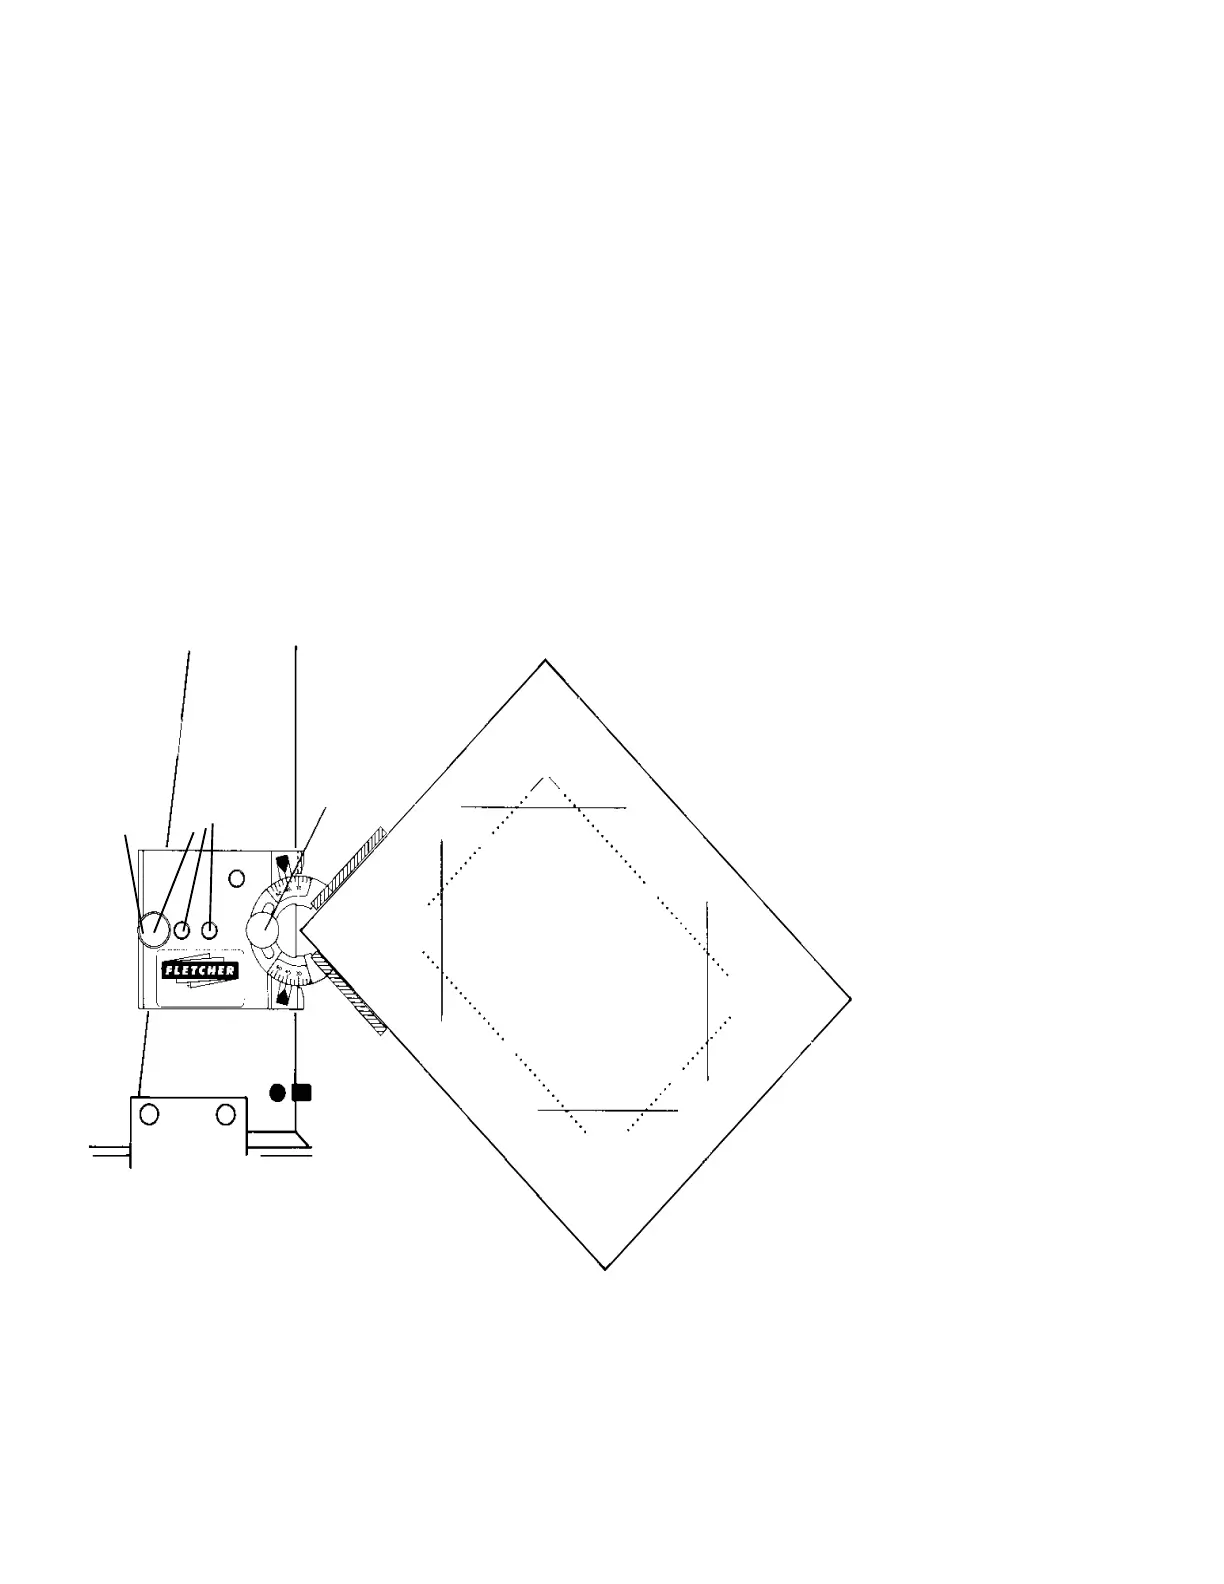
1. Figure 16 illustrates a simple 45 degree corner cut opening in an 8" x 10" (200mm x 250mm) mat. Mark pencil lines
on the back of the mat in the conventional way starting with the Mat Guide set at 1-1/2" (38mm) as shown by lines
labelled B.
2. Set both Angle Arms of the Angle Mat Guide at 45 degrees. Place a 90 degree drafting triangle between them while
tightening the Angle Locking Knob (c). Use a corner of your mat instead of a triangle if it is accurately squared.
3. Set the Mat Guide for a
3" (76mm) border and
using the Clamp as a
straight edge, make
pencil marks on the
back of the mat as
shown by lines (A).
4. Now make the 4 cuts
(A), starting and stop-
ping at lines (B) to
control over cuts. Be
sure the corner of the
mat is well seated
against both Angle
Arms during each cut.
5. Remove the Angle Mat
Guide, reposition the
Mat Guide to 1-1/2"
(38mm) and cut lines
(B), using the angle
cuts produced in step 4
to control over cutting.
DUST COVER
A dust cover is available for the Fletcher 2200. It is a practical and recommended option to maintain cleanliness and top
working order of your mat cutter.
a
b
A
A
B
B
B
B
c
Figure 16
A
A
62
OPCIONES
PARADAS DE MEDIDA
Las Paradas de medida son más que una ayuda en la producción de passe-partout de medidas comunes. Se usan
rápidamente y eliminan la técnica de dibujar las líneas detrás del passe-partout que desperdicia tiempo. Además, aseguran
sobre cortes mínimos y evitan cortes demasiado pequeños. Los Tornillos de parada se ajustan de la siguiente manera y no necesitan
cambiarse a menos que se cambie la extensión de la cuchilla para distintos espesores de passe-partout.
1. Inserte el Gancho de ubicación para el ancho de borde deseado y coloque un passe-partout
debajo del Gancho en la posición general para corte biselado. PRECAUCIÓN: Asegúrese de que
el borde izquierdo inferior del passe-partout repose sobre la Parada de passe-partout (N) según
se ve en la Figura 11. Haga cuatro marcas en lápiz según se describió anteriormente.
2. Establezca la Escala de medida superior (A) (Figura 8) al mismo ancho que el Gancho
de ubicación y trábela en su lugar con el Tirador B.
3. Deslice la Parada superior (D) hacia el passe-partout mientras se pulsa el Botón con
resorte (C) sobre la hoja. Cuando el Botón toque el borde superior del passe-partout,
trabe la Parada superior en la posición con su Tirador (E).
4. Mueva el Cabezal de corte contra el Tornillo de parada (F) sobre la Parada superior.
Haga girar la cuchilla de corte biselado hasta que toque el passe-partout. Debería tocar el passe-
partout aprox. a 1/8" (3 mm) sobre la línea en lápiz horizontal. Si no fuera así, gire el Tornillo de
parada hacia adentro o afuera hasta que la cuchilla esté en la posición correcta. Trabe el Tornillo
de parada en su lugar con la Contra tuerca (G).
5. Establezca la Parada inferior (H) sobre el mismo ancho de borde con la escala montada
sobre el Gancho. Vea la Figura 9. Empiece en la posición superior e inserte la cuchilla a través
del passe-partout. La línea escrita sobre la derecha de la Bandeja (L), en la Figura 10, debería
alinearse con la línea hecha en lápiz y la Mira debería alinearse con la línea en lápiz. Ahora, tire
del Cabezal de corte hacia la parada más baja de forma
normal. Debería tocar la parada más baja cuando la cuchilla
haya pasado la línea horizontal más baja, aprox. 1/8"
(3 mm). La línea escrita sobre la izquierda (M) de la Bandeja
debería alinearse con la línea hecha a lápiz, vea la Figura 11.
Si es necesario, ajuste el Tornillo de parada (J) en la parada
más baja para lograr una dimensión de 1/8" (3 mm). Trabe
el Tornillo de parada (J) en su lugar ajustando su
Contra tuerca (K).
6. Comience a cortar un passe-partout completo. Corte los lados
opuestos primero, luego mueva la parada superior hacia el final superior del passe-partout y corte
los otros dos lados. Observe los ángulos de los cortes biselados de la parte delantera.
La “caída” debe estar completamente suelta y los sobre cortes apenas visibles. Si no fuera así,
ajuste los Tornillos de parada. Demasiados sobre cortes requieren mover el Tornillo de parada
hacia el Cabezal de corte. Una separación de ángulo incompleta requiere mover el tornillo de
parada lejos del Cabezal. No es necesario volver a ajustar el tornillo de parada a menos que
se corten passe-partout de diferente espesor.
LEVANTADORES DE GANCHOS
DE PASSE-PARTOUT
Figura 8
A
B
C
D
E
G
F
H
J
K
Figura 9
Figura 10
L
M
Figura 11
N
Dos Levantadores de ganchos de passe-partout, (uno se ve a la
izquierda), se proveen como una opción. Cada uno se monta debajo
de un Soporte con bisagra con el rodillo a resorte sobre la Base según se
muestra a la derecha. Esto deja libres ambas manos para poder ubicar la hoja
y el passe-partout. Una leve presión sobre el Asa baja el Gancho
de passe-partout hacia el passe-partout.
 Loading...