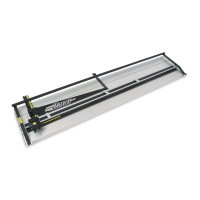
7
V-GROOVE
If you wish to add a V-groove before cutting the opening on page 6, follow this procedure.
1. CAUTION: Loosen the Mat Stop and slide it to the left so it does not protrude from the Mat Guide. Re-tighten its
Locking Knob. Remove the Locator Pin, loosen the two Mat Guide Locking Knobs and slide the Mat Guide all
the way to the right against the CLAMP. Place the Locator Pin in the hole nearest the hex screw on the left side of
the Mat Guide base and slide the Mat Guide back to the left so the hex screw rests against the Locator Pin. Tighten
the Mat Guide Locking Knobs. This instruction applies to both the imperial and metric versions.
2. Remove the Sight Gage. Place the “fall-out”, right side up, against the Mat Guide. Start with the Cutting Head well
above the upper edge of the mat. Rotate the bevel cutting pivot and pull it at a steady speed until it has trimmed a
sliver from the edge of the “fall-out”. Repeat this procedure on the other three edges. Remove the scrap strip after
each cut to prevent interference when positioning the mat against the Mat Guide. If the blade projects too far from
the magazine it may touch the Mat Guide which will damage the blade.
3. Place the “fall-out” upside down on a flat table surface. Lay the mat over the “fall-out”, oriented as it was in step 3 on
the previous page. Tape the four cuts with non-removable tape. Turn the mat over and inspect the V-groove.
4. Remove the Locator Pin, loosen the Mat Guide Locking Knobs, slide the Mat Guide to the left and insert the
Locator Pin in the fourth hole from the right, the 3” (70mm) hole. Slide the Mat Guide against the Locator Pin and
tighten its two Locking Knobs.
5. Proceed to cut out the opening as described in steps 4 and 5 on the previous page. The result will be a mat with a V-
groove 1/2” (10mm) outside an opening with a 3” (70mm) border.
6. The width of the V-groove can be adjusted slightly by turning the hex screw on the left side of the base of the Mat
Guide with the hex wrench provided in the parts bag. Turning the hex screw clockwise will increase the width of the
V-groove, but increasing it too much will cause the blade to cut all the way through the mat resulting in a gap, not a
groove. Turning the screw counter-clockwise will decrease the width of the V-groove. Too much of this adjustment,
however, may cause the blade to hit the Mat Guide.
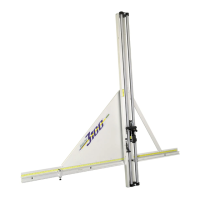
DOUBLE MAT
A double mat with a V-groove is a very attractive and popular mat, and is easily produced on the Fletcher 2200 Profes-
sional Mat Cutting System.
1 Prepare a color contrasting mat to become the liner. Size it 1/8” (3mm) smaller in both width and length than the mat
you used in the previous example.
2. Lay the “fall-out” you produced in step 5 above, upside down on a clean flat surface. Place the V-grooved mat over it
so the “fall-out” fits into its opening. Using an adhesive transfer type device, roll one or two strips of adhesive in the
four borders of the mat. Place two strips of adhesive on the “fall-out,” but stay well away from the edge. Place the
liner mat face down over the first mat. Be sure all four of its edges are inside the edges of the top mat. The entire
assembly is now glued together.
3. The Mat Gage will increase the Mat Guide setting when the Locator Pin is inserted through the Mat Gage then the
Mat Guide Slide. Place the Locator Pin through the Mat Gage and into the 3" (70mm) hole as before. You will
notice the Mat Gage can be rotated. Turn it so the side labelled 3/16” (5mm) is to the left. Move the Mat Guide into
contact with the Mat Gage and tighten the Locking Knobs.
4. Place the assembled mat upside down under the Clamp and against the Mat Guide and Mat Stop. Make four pencil
lines as you did when you produced the first mat. Proceed to bevel cut all four borders as before.
5. The double “fall-out” is now discarded and you have made a double mat with V-groove. Notice the exposed liner
is 3/16" (5mm) wide and uniform on all four sides.
66
AJUSTES
COLOQUE EN ESCUADRA LA GUÍA DE PASSE-PARTOUT
1. Deslice la Guía de passe-partout hacia la derecha hasta que haga
contacto con el Gancho de ubicación (A) en el orificio de 2" (50 mm),
y ajuste el Tirador inferior (B), luego el superior en la Guía de
passe-partout. Vea la Figura 17.
2. Coloque una tabla de passe-partout de 8" x 10" bajo el Gancho
en contacto con la Guía sobre su parte inferior.
3. Haga un corte biselado de 1" (25 mm) de largo cerca del borde inferior
del passe-partout. Mueva el passe-partout hacia arriba de la Guía de
passe-partout y haga otro corte comenzando desde abajo del primer
corte y metiéndose en éste. Cuando la Guía de passe-partout esté
correctamente en escuadra, estos dos cortes coincidirán y parecerá que
son uno solo.
4. Si los dos cortes no están en línea, la Guía debe encuadrarse así: Afloje
los tornillos del lado izquierdo (C) y del lado derecho (D) de la Guía de deslizamiento de passe-partout (E). Afloje ambos
Tiradores de bloqueo, el inferior (B) y el superior (F). Coloque las dos Piezas para encuadrar (G) de la bolsa de piezas sobre
el Eje de acero, una sobre el borde inferior de la
Guía y la otra sobre el borde superior, como se ve
en la Figura 18. Quite el Gancho de ubicación (A)
y utilice la mano izquierda para deslizar la Guía
firmemente contra las piezas para encuadrar.
Mientras se presiona contra las piezas ajuste
el Tirador inferior (B) luego el tornillo izquierdo
(C), luego el tornillo derecho (D) en la Guía de
deslizamiento (E). Asegúrese de dejar el Tirador
de ajuste superior (F) flojo durante este ajuste.
Verifique si quedó en escuadra como indica
el punto 3.
5. Siempre ajuste el Tirador inferior de la guía de passe-partout (B) antes que el superior (F). Es el inferior el que alinea
a la Guía. El superior simplemente ajusta el borde superior de la Guía.
6. Haga un corte biselado y mida la distancia desde el lado izquierdo del passe-partout. Si no son exactamente 2" (50 mm), gire el
tornillo hexagonal (H) en el sentido de las agujas del reloj para dismininuir o en sentido contrario a las agujas del reloj para
aumentar el borde del passe-partout. Luego, vuelva a posicionar el Índice (J) para ver 2" (50 mm) en la escala.
AJUSTES DEL CABEZAL DE CORTE
Figura 17
B
C
D
F
G
Figura 18
Figura 20
L
1. Periódicamente hay que ajustar el Cabezal de
corte para asegurar que está bien colocado en
el Eje. Ajuste despacito cualquiera de los tornillos
del juego (K) mientras se desliza el Cabezal de corte
hacia adentro y hacia afuera del Eje. Cuando sienta un
peso, afloje el tornillo hasta que el Cabezal se deslice
libremente. Repítalo con el otro tornillo (K).
2. Ajuste los tornillos (L) de la misma manera. Asegúrese de deslizar el cabezal
mientras
ajusta los tornillos para no ajustarlos demasiado y dañarlos.
K
Figura 19
A
D
E
H
J
G
 Loading...