5
MAT BLADES
The bevel cutting side of the Cutting Head accepts any of three different Fletcher Mat Blades. The 05-012 is .012”
(.3mm) thick and is used for cutting regular mats. The 05-015 is .015” (.4mm) thick and is used for denser or thicker
mats. The 05-016 is a single edge blade, beveled on one side only. It is used for very dense or thick mats and must be
installed with the beveled edge away from the head.
The straight sizing blade on the right is the Utility Blade, 05-004, and is capable of cutting material up to a nominal
1/2” (12mm) thick. All blades except the 05-016 single edge blade can be reversed in their magazine to double the life of
the blade, however, they must be inserted carefully
to avoid damage.
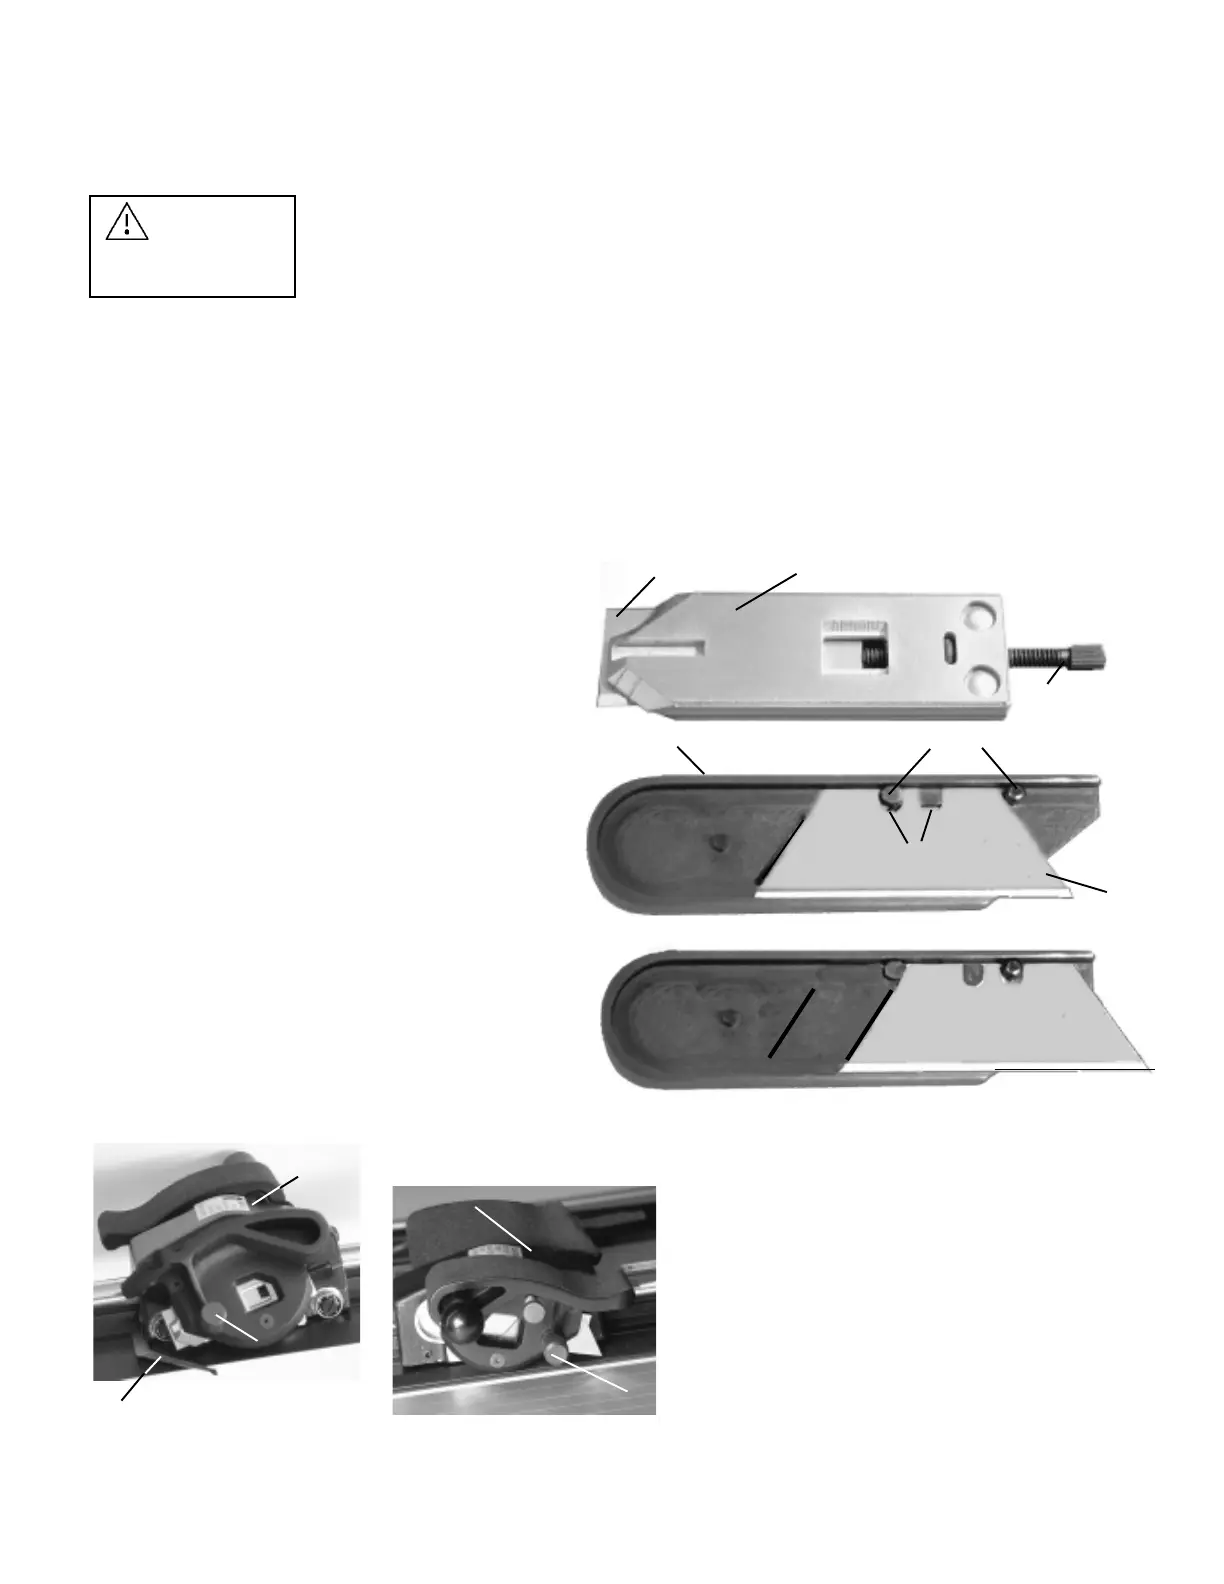
1. Insert a Blade (C) in the bevel cutting Magazine
(A) as shown in Figure 1. The Blade Extension
Screw (B) should be adjusted so the Blade (C)
penetrates about 1/3rd the thickness of a slip
sheet under the mat being cut. The blade should
always rest against the Blade Extension Screw
(B), and the Magazine (A) must be fully inserted
in the Cutting Head (D). Tighten its Locking
Knob (E) firmly. See Figure 3.
2. Straight cutting (sizing) is done on the right side
of the Cutting Head (D). The Magazine (F) and
Utility Blade (G), (05-004), are shown in Figure 2.
There are 4 possible depth positions for this blade,
but only two are used as seen in Figures 2 and 2a.
Figure 2a is the position for nominal 1/2” (12mm)
material, while Figure 2 is for 2, 4, 6, and 8 ply mat
board. The blade is held in place by a magnet. Insert
the Magazine (F) to a stop in the Cutting Head (D)
and tighten its Locking Knob (K). See Figure 4.
3. The Sight Gage (L) shown in Figure 3 is used to control the start of cut and end of cut when using pencil lines drawn
on the back of the mat. It is held in place on the Cutting Head with a magnet and can
be removed and set aside when not being used. The
use of this feature is explained on the following page.
CAUTION:
SET UP
Place nine self adhesive rubber bumpers from the parts bag equally spaced on the bottom of the Base to prevent
scratching a table top. Set the Fletcher 2200 on a flat table with the Clamp Handle to the left.
Figure 1
A
Figure 2a
F
H
E
F
J
C
D
Figure 3
Figure 4
D
B
USE EXTREME CARE
HANDLING BLADES.
THEY ARE VERY SHARP
G
K
L
Figure 2
D
68
“Ganchos” en La cuchilla se proyecta Ajuste la proyección MONTAJE
los cortes demasiado lejos de la cuchilla
Cabezal flojo Ajuste los rodamientos MANTENIMIENTO
del cabezal
El cabezal El paso del rodamiento Limpie el gancho de MANTENIMIENTO
hace ruido a rodillo está sucio passe-partout
Los rodamientos a rodillo Quite el cabezal y MANTENIMIENTO
están sucios limpie los rodamientos
Use cinta para quitar MANTENIMIENTO
material extraño
PUEDE RECIBIR AYUDA PONIÉNDOSE EN CONTACTO CON SU DISTRIBUIDOR DE FLETCHER-TERRY
O CON EL SERVICIO AL CLIENTE DE FLETCHER-TERRY C AL 860.677.7331
customerservice@fletcher-terry.com.
GUÍA DE SOLUCIÓN DE PROBLEMAS
PROBLEMA CAUSA POSIBLE CORRECCIÓN REFERENCIA
Cortes en bisel Cuchilla desafilada Cámbiela por una cuchilla nueva MONTAJE
deshilachados
Hoja gastada Use una hoja nueva CÓMO CORTAR
PASSE-PARTOUT
No corta a través Proyección de la cuchilla Extienda la proyección MONTAJE
del passe-partout de la cuchilla
Cuchilla gastada o rota Reemplace la cuchilla MONTAJE
Demasiada presión sobre Libere la presión CÓMO CORTAR
el asa PASSE-PARTOUT
Demasiados cortes Proyección de la cuchilla Ajuste la proyección MONTAJE
en exceso de la cuchilla
Paradas de medida Ajuste las paradas de medida CÓMO CORTAR
PASSE-PARTOUT
Cortes en defecto Proyección de la cuchilla Ajuste la proyección MONTAJE
de la cuchilla
Paradas de medida Ajuste las paradas de medida CÓMO CORTAR
PASSE-PARTOUT
El cabezal Rodamientos del cabezal Ajuste los rodamientos MANTENIMIENTO
se bloquea del cabezal
El cabezal está Rodamientos del cabezal Ajuste los rodamientos MANTENIMIENTO
demasiado flojo del cabezal
 Loading...