waveform observed on
the
oscilloscope
CRT should
not
exceed a
peak-to-peak indication
of 2. 5
volts.
f.
Disconnect the oscilloscope from
the
Model 893.
g.
Connect the input of the dc differential
voltmeter
to
TP14
of
the A2 Reference
Amplifier
Assembly
and connect the common lead to A2
terminal
6 or 7.
The voltmeter should indicate +19
±0. 5
volts dc.
h. Remove
ac power from the
Model
893
and connect
the
dc differential
voltmeter input to terminal
2 of
the A5
Kelvin-Varley Divider
Assembly.
i. Reapply ac power
to the
Model
893,
observing
that
the dc
differential voltmeter indicates
1100
±0. 13
volts dc.
j.
Rotate A2R26 to
each
available
limit,
observing that
the dc
differential voltmeter
indication changes
by
at least
±0.
2 volts.
k.
Adjust A2R26 for an
indication
of 1100 volts dc on
the
dc
differential voltmeter.
l. Decrease
the
ac
input voltage
applied to the
Model
893 to 103. 5 volts ac
with
the autotransformer
con-
trol.
The voltage
observed on
the
dc differential
voltmeter
should not vary more
than
±0. 0055 volts.
m. Increase
the
ac
input
voltage applied
to the
Model
893
to
126. 5 volts ac with the
autotransformer
control. The
voltage observed
on the dc
differ-
ential voltmeter
should not
vary more than
±0. 0055
volts.
n. Remove ac
power from
the
Model
893 and
connect
the
dc
differential
voltmeter
input to A2TP9.
0
.
Reapply
115 volts ac to the
Model
893,
observing
that the
dc differential voltmeter
indicates
17 ±0. 01
volts
dc.
p.
Rotate
A2R19 to each
available limit,
observir^
that
the dc differential
voltmeter indication
changes
by at least
AlOO millivolts.
q.
Adjust
A2R19 for an indication
of +17 ±0.
01
volts dc
on the
dc differential voltmeter.
r. Place the RANGE switch to 100
and connect the
dc
differential voltmeter input to
terminal 2 of the
A5
Kelvin-Varley
Divider Assembly.
s.
The
dc differential voltmeter
should
indicate
110
±0. 009 volts dc.
t. Rctate
A3R14
to
each available limit,
observing that
the
dc differential
voltmeter indication
changes
by
at
least ±0. 010 volts.
u.
Adjust A3R14
for an
indication
of
110 volts dc
on
the
dc differential voltmeter.
v.
Place the RANGE switch to
10,
observii^ that the dc
differential voltmeter indicates
!1
±0.0009 volts dc.
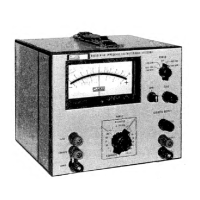
4-8
1
MODEL 853A
Figure
4-3.
REFERENCE AMPLIFIER/REFERENCE INVERTER
CHECKS
-
EQUIPMENT CONNECTIONS
w.
Rotate A2R33 to
each
available limit,
observing
that the
dc differential
voltmeter
indication
charges
by at
least
±
one
millivolt.
X. Adjust A2R33
for an indication
of
11 volts dc on the
dc differential
voltmeter.
y.
Place the
RANGE switch to
1,
observing that
the
dc differential voltmeter
indicates
1.1
volts dc
±0.
9 millivolts.
z. Rotate
A2R35 to each available
limit, observing
that
the dc differential
voltmeter indication
changes
by at least
±1
millivolt.
aa. Adjust A2R35
for
an indication
of
1 . 1
volt
dc on the
dc differential
voltmeter.
ab. Connect the dc differential
voltmeter
common to
terminal
1
of the
A4 Null Detector
Assembly and
the input to TP17.
ac. Place the
Model 893 NULL SENS switch to the TVM
position and the RANGE
switch to the
100
position.
ad.
The
dc differential voltmeter should
indicate
-6.
8
volts dc ±400 millivolts.
Record the exact
value.
ae. Place the
Model 893 RANGE
switch to the 1000
position.
af. Rotate
A3R8 to each available limit,
observing
that the dc differential
voltmeter
indication
chaises
by at least
±15 millivolts.
ag. Adjust A3R8
for an indication
on the dc differential
voltmeter that
is within 10
millivolts of the voltage
recorded in
step ad.
9/22/71
893A