CmCUITRY
ADJUSTMENTS AND THEIR, EFFECTS
100
VOLT AC RANGE
(50
KHz)
STRAY
CAPACITY
COMPENSATOR
Adjusts the AC Converter gain
at
high frequencies
on the 100
volt
ac range.
Adjustment
of this compensator will affect
high frequency calibration of all other ac ranges.
100
VOLT AC RANGE
(50
KHz)
A7C15 Adjusts the high
frequency
response at l/lOOO of full-scale
on the 100 volt ac
range.
Adjustment of this
capacitor
affects
calibration of all
other
ac ranees.
10 VOLT AC RANGE
(400 Hz)
A7R33 Adjusts the
AC
Converter
gain
at low frequencies on the 10
volt ac
rai^e. Adjustment of this resistor will not affect
calibration of any
other voltage
range.
10 VOLT AC RANGE
(50 KHz)
A7C21 Adjusts the AC Converter gain at high frequencies on the 10
volt
ac
rai^e. Adjustment of this capacitor will not affect
calibration of
any other voltage range.
1 VOLT AC
RANGE
(400 Hz)
A7R35 Adjusts the
AC
Converter
gain
at
low frequencies on the
1 volt
ac range.
Adjustment of this resistor will not affect calibra-
tion of any other voltage
range.
1
VOLT AC RANGE
(50
KHz)
A7C22 Adjusts the AC Converter gain at high frequencies on the
1
volt
ac
range.
Adjustment of this capacitor will not affect
calibration of
any
other voltage range.
AC CONVERTER A7R4 Adjusted to provide
a
dc bias of +1. 5 vdc across
A7C16
in the
AC
Converter.
Figure
4-11.
SUMMARY
OF
CALIBRATION ADJUSTMENTS
(Shee» 2 of
2)
4-47.
ZENER
REFERENCE SUPPLY
CALIBRATION
4-48.
To
calibrate the Zener Reference Supply,
apply
ac power to the instrument
and proceed
as follows:
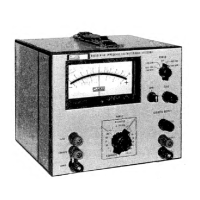
a. Place the
Model 893 controls
as follows:
POWER
RANGE
NULL SENS
MODE
Readout dials
ON/LINE OPR
1
TVM
-f-
.OOOOfi
b. Connect
a
dc differential voltmeter to A2TP9
and
adjust A2R19
for an indication of +17 ±0. 01 volts
dc.
c. Disconnect
the dc differential voltmeter.
4-49.
NULL
DETECTOR CALIBRATION
c. Adjust A4R27 clockwise until negative
(-)
deflection
of the meter pointer reaches
a maximum and then
continue
an additional 10
°
clockwise.
d. Remove the INPUT terminals shortir^ jumper and
adjust
A4R31
for a meter pointer indication of zero
center
±1/2
small divisions.
e.
Connect
the shorting jumper between the LO
and
HI
INPUT terminals
and adjust A4R5 for an exact
full-
scale
(-)
meter pointer indication.
f. Replace
the
shorting jumper between the
INPUT
terminals with a
10
megohm
1%
resistor and place
the Readout dials to
,
00200.
g.
Adjust
A4R17 for an exact full-scale
(-1)
meter
pointer
indication.
h.
Repeat
steps e through
g
until the specified
results
are obtained.
4-50
To calibrate
the Null Detector circuitry,
proceed
as follows
:
a. Place the
Model 893 controls
as follows:
POWER
RANGE
NULL SENS
MODE
Readout
dials
b. Connect
a
shorting
jumper between the LO
and HI
INPUT
terminals and rotate A4R27 and A4R31 fully
1.
counter-clockwise.
4-14
Replace the resistor between
the INPUT
terminals
with
a
shorting
jumper.
On each RANGE and
NULL SENS switch
setting,
place the Readout
dials to the voltage indicated
on
the
NULL SENS
switch, observing that the
meter
pointer
indicates
full-scale
(-1)
±2 small division.
On the one volt
range, perform the
checks
in both
positions of the
POLARITY switch.
Remove the
INPUT terminal shorting
jumper and
place the NULL
SENS switch to TVM.
Apply the dc
voltages
to the
Model 893 INPUT
terminals on the
ranges indicated in Figure 4-12,
ON/LINE
OPR
1
.001
+
.00105
893A