99
EN
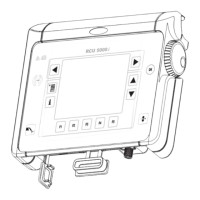
Description of
US control panel
(continued)
MIG/MAG pulsed-arc welding ... continuous correction facility for the droplet-
detachment force
- lower droplet-detachment force
0 neutral droplet-detachment force
+ increased droplet-detachment force
MIG/MAG standard-manual welding ... for influencing the short-circuiting dynamic
at the instant of droplet transfer
0 harder and more stable arc
10 soft, low-spatter arc
Rod electrode (MMA) welding ... for influencing the short-circuiting amperage at the
instant of droplet transfer
0 soft, low-spatter arc
100 harder, more stable arc
(18) JOB n° parameter ... for retrieving parameter records / job numbers that were
previously saved with the “Store” button.
(19) Indicators: F1 / Wirefeed-drive current input / F3 ... for displaying previously
defined parameters
(20) Intermediate arc indicator ... between the dip-transfer arc and the spray arc, a
spatter-prone “intermediate arc” occurs. To alert you to this critical area - and help
you avoid it - the intermediate arc indicator lights up.
(21) Store button ... for accessing the Set-up menu or (in Job Mode) for storing param-
eter settings.
Important! If you press the Store button (21) and the “Material” button (6) at the
same time, the display gives you a read-out of the software version.
If you then press the “Material” button (6) on its own, the version number of the
welding databank appears on the display (e.g.: “0 | 029” = M0029).
If you then press the “Material” button (6) a second time, the number of the wire-
feeder (A, or B in the case of twin-head mounts) and the software version n° of the
wirefeeder appear on the display (e.g.: A 1.5 | 0.23).
To exit, press the Store button (21).
(22) Gas-test button ... for setting the required gas-flow rate on the pressure regulator.
After you press this button, gas will flow out for 30 s. Press the button again to stop
the gas test-flow before the end of this period.
If you press the Store button (21) and the gas-test button (22) at the same time, the
display gives you a read-out of the pre-set gas pre-flow time
(e.g. “GPr | 0.1 s).
- You can alter the gas pre-flow time with the adjusting dial (1)
If you now press the “Process” button (4), the display gives you a read-out of the
pre-set gas post-flow time (e.g. “GPo | 0.5 s”)
- You can alter the gas post-flow time with the adjusting dial (1)
To exit, press the Store button (21).

 Loading...