En-5
*LayoutofConnectorandPC
boardisvaries,depending
onthetypeofindoorunit.
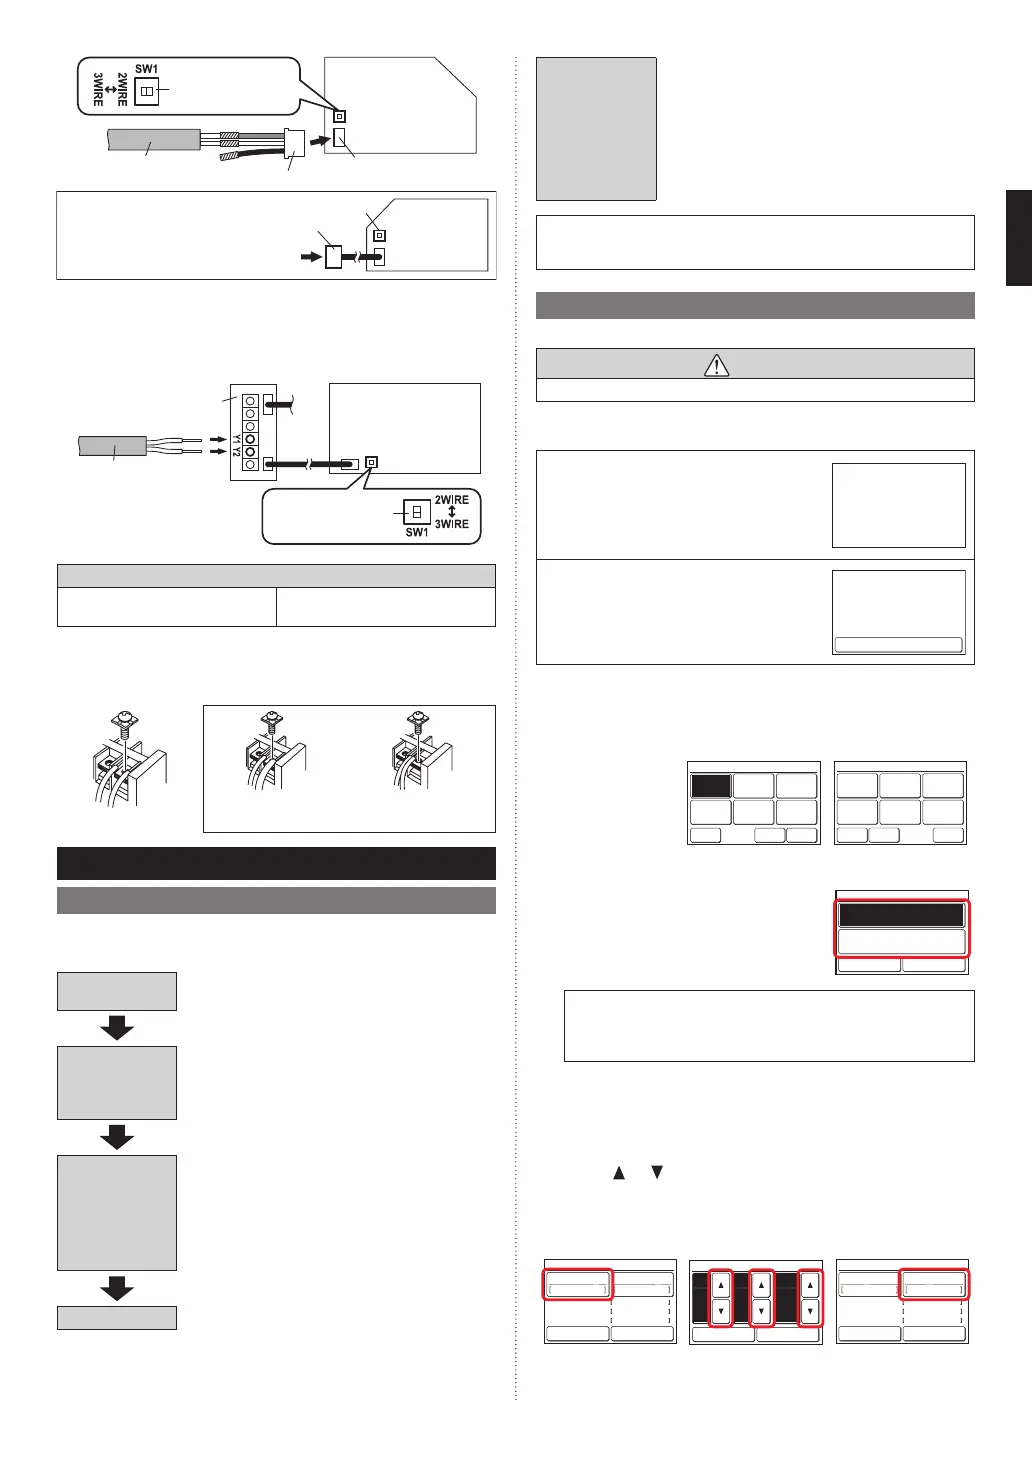
Setto"2WIRE"the
DIPswitch(SW1)
Indoorunit
PCboard
Connector
(adapter)
Remotecontroller
cable(Non-polar)
Connectingcable
ConnectorCNC01
(onboard)
SW1
Indoorunit
PCboard
5.4.2. Whenconnectingtoexclusiveterminalblock
(1) Connecttheendofremotecontrollercabledirectlytotheexclusive
terminalblock.Setto“2WIRE”theDIPswitch(SW1)onthePCB
(printedcircuitboard)oftheindoorunit.
*Layoutofterminalblockand
PCboardisvaries,depend-
ingonthetypeofindoorunit.
Terminalblock
Remotecontroller
cable(Non-polar)
Setto"2WIRE"the
DIPswitch(SW1)
Indoorunit
PCboard
Tighteningtorque
M3screw
(Remotecontroller/Y1,Y2)
4.4to5.3lbf·in
(0.5to0.6N·m)
For“Groupcontrol”or“Multipleremotecontrol”,refertothefollowing
gureonhowtoconnecttotheindoorunitterminal.
GOOD PROHIBITED
Diameterofcables
aredifferent
Connectthecables
to1side
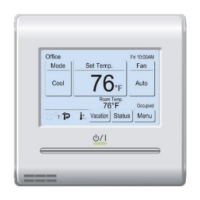
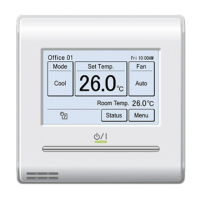
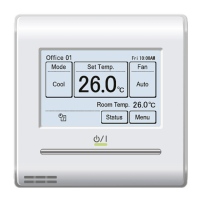
6. SETTINGTHEREMOTECONTROLLER
6.1. Initializationprocedure
Afterremotecontrollerinstallationworkiscomplete,performinitialization
usingthefollowingproceduresbeforestartingtousethesystem.
(*:Itemsthatindoorunitdoesnotsupportarenotdisplayed.)
Turnonthe
power
Settingofrst
timestart
Initialsetting
Initializationend
OtherSettings
Afterinstallingthisunit,performthetestruntoconrmthattheunitis
operatingproperly.Then,explaintheoperationofthisunittothecus-
tomer.
6.2. Settingofrsttimestart
6.2.1. Turnonthepower
CAUTION
Recheckthewiring.Incorrectwiringwillcausetrouble.
Wheninitiallystartingupthisunit,thefollowingsettingscreenwillbe
displayed.Settingsconguredatthisstagecanbechangedafterwards.
Ifanerrorscreenisdisplayed,shutdownall
unitpower,andchecktheconnections.After
resolvingtheproblem,turnonthepower
again.
Error
Code 01
If“Pleasesettheaddresscorrectly.”is
displayed,touch[Close],andthe“RCAd-
dressSetting”screen(referto6.4.6)willbe
displayed.Aftersetting,pleaserestartthis
unit.
Error (code:XX.X)
Please set the address correctly.
Close
6.2.2. LanguageSetting
1.
The“LanguageSetting”screenhastwopages.Youcanswitchbe-
tweenthepagesbytouching[NextPage]or[PreviousPage].Touch
thelanguagetobeused.
Touch[OK]to
displaythe“R.C.
Master/Slave
Setting”screen.
Deutsch Español
Ё᭛ Français
Język
polski
Language Setting
Page 1/ 2
Cancel
OK
Next
Page
English
Language Setting
Page 2/ 2
Cancel
OK
Русский
Previous
Page
Português Türkçe
Italiano Ελληνικά
Dutch
6.2.3. R.C.Master/SlaveSetting
1.
(a) Iftheremotecontrollerisasingle
connection,thissettingisomitted.Pro-
ceedto“6.2.4.DataandTimeSetting”.
(b) Ifaremotecontrollerhasmultiplecon-
nections,andif“Master”isinitiallyset,
allotherunitswillbesetto“Slave”.
R.C. Master / Slave Setting
Cancel OK
Master
Slave
PleasesetonlyoneMasterremotecontroller.UnitsotherthanMas-
teraresettoSlaveautomatically.
Whenremotecontrollersaresetto“Slave”,settingitemswillbe
restricted.
Touch[OK]todisplaythe“DateandTimeSetting”screen.
6.2.4. DateandTimeSetting
1.
Touchthe[Date]onthe“DateandTimeSetting”screen.The“Date”
screenisdisplayed.
2.
Touch[
]or[ ]tosettheyear,month,anddate.Touch[OK]to
returntothe“DateandTimeSetting”screen.
3.
Touchthe[Time]onthe“DateandTimeSetting”screen.The“Time”
screenisdisplayed.
1. 2. 3.
Date and Time Setting
Date
01/ 01/2017
Time
12:00 AM
Sun 12:00AM
Cancel OK
Date Format Day/Month/Year
Time Format 12:00-11:59AM/PM
Summer Time Setting Disable
2017
0101
Sun 12:00AM
Date
Cancel OK
YearMonthDay
Date and Time Setting
Date
01/ 01/2017
Time
12:00 AM
Sun 12:00AM
Cancel OK
Date Format Day/Month/Year
Time Format 12:00-11:59AM/PM
Summer Time Setting Disable
6.2.1. Turnonthepower......................................5
6.2.2. LanguageSetting....................................... 5
6.2.3. R.C.Master/SlaveSetting......................... 5
6.2.4. DateandTimeSetting............................... 5
6.2.5. Temp.UnitSetting...................................... 6
6.2.6. PasswordDefaultSetting.......................... 6
6.3.4. R.C.GroupNameSetting.......................... 7
6.3.5. RCSensorSetting*....................................7
6.3.6. MasterIndoorUnitSetting......................... 7
6.3.7.
PasswordSetting(administratorpassword)..
7
6.3.8. DisplayItemSetting................................... 7
6.3.10. DeadbandSetting...................................... 8
6.3.11. OptimumStartSetting................................ 8
6.3.12. I.U.DisplayNumberSetting*.....................8
6.4.1. ErrorHistory...............................................8
6.4.2. SettingStatusList...................................... 8
6.4.3. FilterSignReset*....................................... 8
6.4.4. Version....................................................... 9
6.4.5. TestRun..................................................... 9
6.4.6. R.C.AddressSetting.................................. 9
6.4.7. I.U.AddressVerication............................. 9
6.4.8. FunctionSetting......................................... 9
6.4.9. InstallerPasswordChange...................... 10
6.4.10. Initialization.............................................. 10
9373328407-01_IM.indb 5 2/22/2017 11:06:18 AM

 Loading...