© Fulton Group N.A., Inc. 2022
3-4
OPERATION EDR-SOLA-IOM-2022-0216 SECTION 3
! WARNING
Non-Fulton product information is for
reference purposes only. No Fulton
document should substitute for full
review of documentation available
from the component manufacturer.
4 CAUTION
Commissioning/Start up by a non-
Fulton authorized person will void the
product warranty.
Please read these instructions and
post in an appropriate place near the
equipment. Maintain in good legible
condition.
When commissioning is complete,
SOLA control must be placed into
automatic mode.
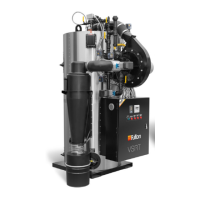
Commission The Neg-Reg System
NOTE: Perform the following steps for eld commissioning with the Gas Valve
(Figure 27).
NOTE: A properly calibrated combustion analyzer will be required when making
changes to the valve settings.
1. Follow the steps in the SOLA Hydronic Controller section of this manual
to access the parameters to run the boiler in manual mode.
2. Turn the boiler on and ensure that there is a call for heat. If the unit does
not go directly to pre-purge, there is not a call for heat or an interlock is
open. If all interlocks are closed, the unit will drive to the max RPM for pre-
purge and begin countdown.
3. When pre-purge is nished, the unit will go to the light-o point.
4. Input the low-re RPM setting into the SOLA manual ring rate (Figure
32). Once the boiler is at this RPM verify combustion. If combustion is
within the acceptable O2 range stated in Table 9, increase at 1,000 RPM
increments until the high re RPM rate is reached. Once at high re take
another combustion reading.
NOTE: Gas Valve adjustments will change combustion. Proceed only if
authorized with a valid EDR Certicate of Registration. Gas valve adjustments
should only be made at high re and low re. If an adjustment is made at low
re it will eect high re, and vice versa. It is recommended to adjust high re
combustion prior to making any adjustments at low re.
5. To increase the O2 level at high re, turn the Valve Adjustment (Gas valve
shutter on the downstream side of the gas valve, see Figure 27) in the
negative (-) direction. To decrease O2 level, turn the Valve Adjustment
screw in the positive (+) direction. Once the correct O2 level is reached
slowly go back to low re and check combustion.
6. When you have reached low re RPM and if O2 adjustments are required
the Valve Oset Adjustment (allen screw on the side of the valve, see
Figure 27) will need to be rotated. To increase O2 turn the Valve Oset
Adjustment screw in the negative (-) direction; turn in the opposite
direction to decrease O2.
7. When turning the valve oset adjustment go half past the desired setting,
then turn the valve oset adjustment back to arrive at the desired setting.
Example: To turn the valve oset adjustment a desired setting of a quarter
turn positive, start by turning the oset a quarter turn positive, then
proceed an additional half turn positive, then turn adjustment back a half
turn positive to arrive back at the desired setting.
 Loading...