137
<Model Menu (Airplane/Glider Functions)>
ŏ6HOHFWWKHIXQFWLRQQDPH
and return to the Model
menu by pushing the RTN
button or pushing the
HOME/EXIT button.
<Push Dial>
RETURN
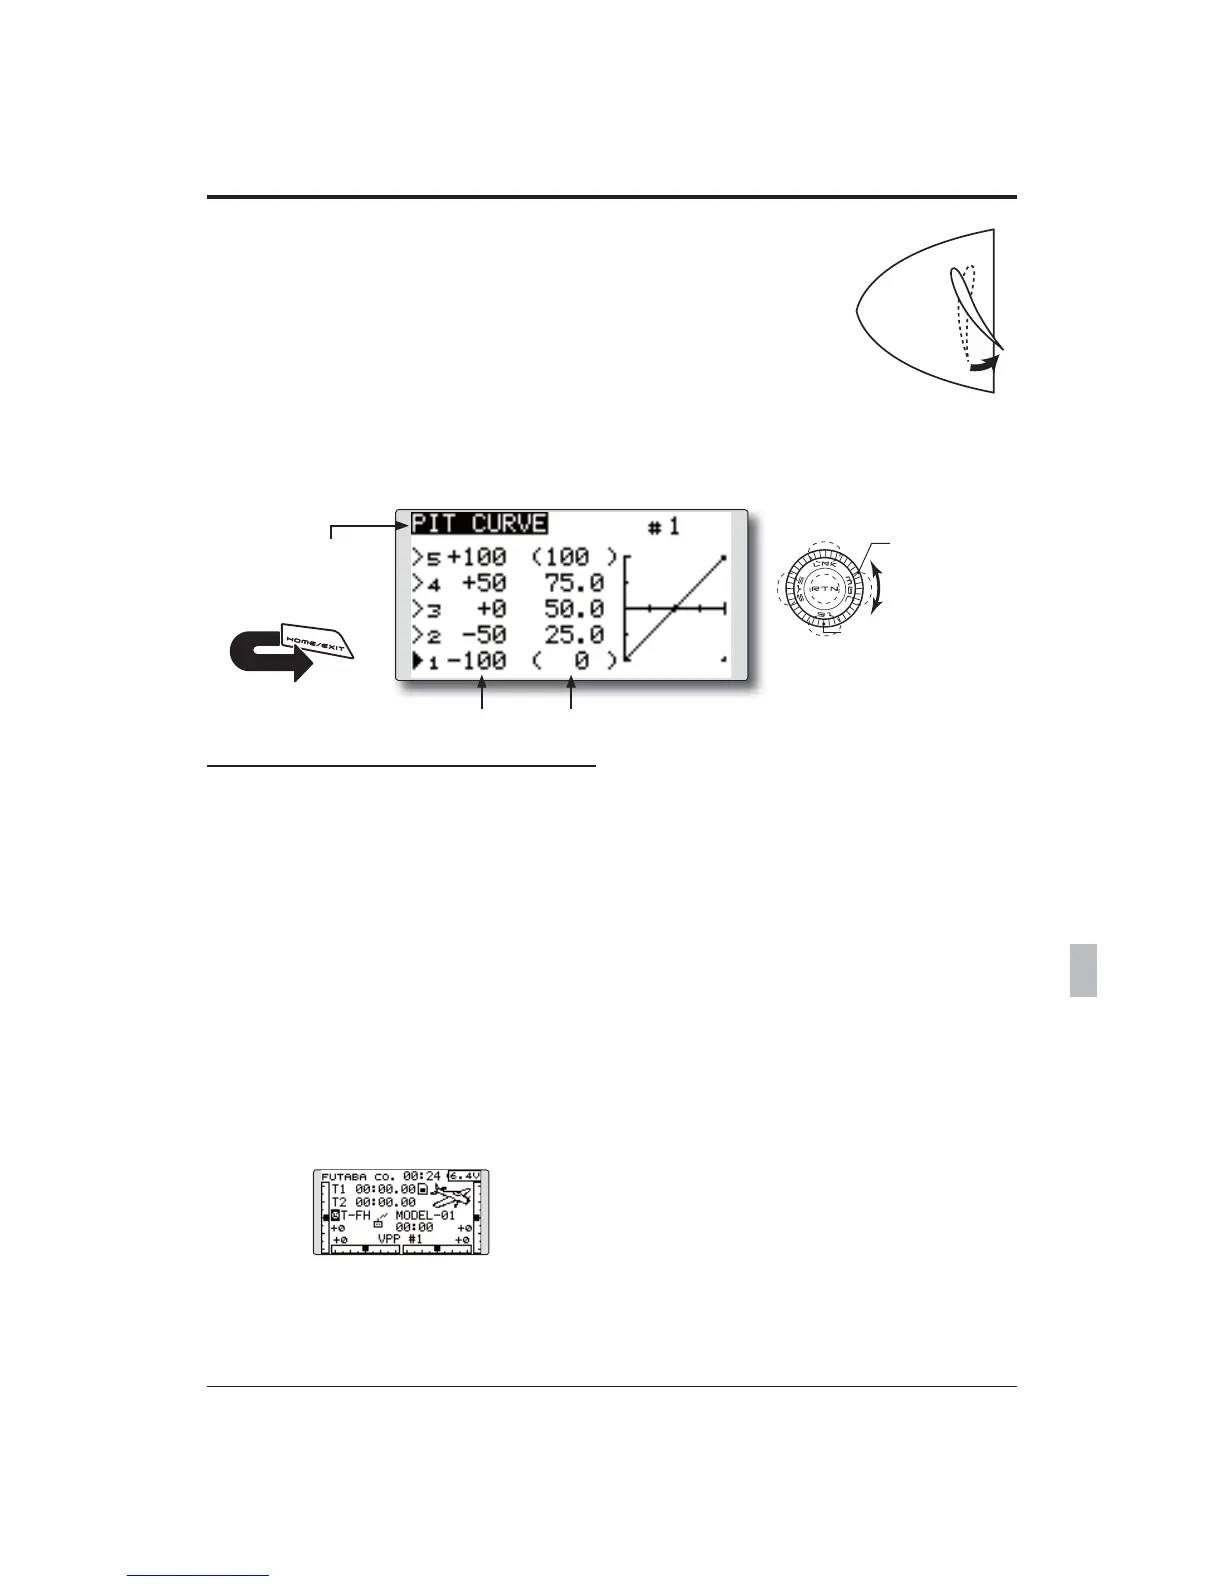
This function adjusts the pitch curve for VPP
(Variable Pitch Propeller) airplane.
*Up to 3 conditions can be set.
7KHSULRULW\LQFUHDVHVLQFRQGLWLRQĺĺRUGHU
NOTE: When VPP is not assigned to any
channel, the pitch curve is not displayed in
the model menu. In this case, assign VPP to
any channel on the function screen.
ŏ6HOHFW>3,7&859(@DWWKH0RGHOPHQX
and access the setup screen shown
below by pushing the RTN button.
ŏ&XUYHUDWH
6FUROOLQJ
ŏ0RYLQJFXUVRU
ŏ6HOHFWLQJPRGH
ŏ$GMXVWLQJYDOXH
ŏ7RQH[WSDJH
PIT CURVE
>&RUUHVSRQGLQJPRGHOW\SH@$LUSODQHJHQHUDO
Setting method
Ɣ933FRQGLWLRQVHOHFWLRQ
1. Move the cursor to the # button at the top
right side of the screen and push the RTN
button to switch to the data input mode.
6HOHFWWKH933FRQGLWLRQE\VFUROOLQJWKH3XVK
dial.
*The display blinks.
3XVKWKH571EXWWRQWRFDOOWKHVHWWLQJVFUHHQ
and return to the cursor mode.
2. Move the cursor to the switch item and
push the RTN button to access the selection
VFUHHQ6HOHFWWKHVZLWFKDQGVHWLWV21
direction.
*For a description of the switch selection method, see the
description at the back of this manual.
6HWWKH933FRQGLWLRQDQGVZLWFK
*The VPP conditions can also be checked in the HOME
screen.
ƔSRLQWFXUYHVHWWLQJ
>&XUYHUDWHVHWWLQJ@
1. Move the cursor to the curve rate setting
LWHP\RXZDQWWRDGMXVWDQGSXVKWKH571
button to switch to the data input mode.
$GMXVWWKHUDWHE\VFUROOLQJWKH3XVKGLDO
,QLWLDOYDOXH
$GMXVWPHQWUDQJHa
*When the RTN button is pushed for one second, the rate is
reset to the initial value.
3XVKWKH571EXWWRQWRHQGWKHDGMXVWPHQW
and return to the cursor mode.
2. Repeat this procedure for each point.
>0RYLQJFXUYHSRLQW@
1. Move the cursor to the curve point setting
LWHP\RXZDQWWRDGMXVWDQGSXVKWKH571
button to switch to the data input mode.
$GMXVWWKHFXUYHSRLQWE\VFUROOLQJ WKH3XVK
dial.
,QLWLDOYDOXH3333
3
$GMXVWPHQWUDQJH8SWRLQIURQWRIWKH
DGMRLQLQJSRLQW
*When the RTN button is pushed for one second, the curve
position is reset to the initial value.)
3XVKWKH571EXWWRQWRHQGWKHDGMXVWPHQW
and return to the cursor mode.
2. Repeat this procedure for each point.
>'HOHWLQJUHWXUQLQJFXUYHSRLQW@
Move the cursor to the curve point setting
LWHP\RXZDQWWRGHOHWHUHWXUQDQGSXVKWKH
RTN button for one second.
ŏ&XUYHSRLQW