3
D-Light
®
Pro
intervals. The Low Power mode (LP) can also be used to
limit heat generation when close to the pulp.
• If the handpiece is not used for an extended period of
time, or the unit is being transported, then the battery
should be removed from the handpiece or charging
station.
• Maintain adequate infection control measures when using
the D-Light Pro in the oral cavity, and execute the
appropriate hygiene plan after usage with patients.
• Protect the D-Light Pro from contamination by using
protective plastic barrier-sleeves. These sleeves are
intended for single-use; discard after each patient to
prevent possible cross-contamination. Protective plastic
barrier-sleeves are not needed when the light-guide and
handpiece sleeve are autoclaved between each patient.
• When using protective plastic barriers (bags, shields, etc.)
with the D-Light Pro, be certain that these are securely
affi x to avoid patient aspiration and treatment
complications.
• Do not use the Detection mode (DT) in conjunction with
caries detection dyes.
• Do not use if you have red-green color blindness or visual
impairment.
2. FEATURES
• LED powered visible light curing and visualisation unit
with high power output
• The D-Light Pro can polymerize light cured dental
materials, quickly and effi ciently.
• The D-Light Pro contains two diff erent types of LEDs
with diff erent wavelength peaks. This enables the
D-Light Pro to activate commonly used photo initiators
used in dentistry, like Camphorquinone (wavelength
peak of 468 nm) used in most light-cured materials, and
other initiators (wavelength peak of 400 +1-20 nm)
used in some light-cured dental materials.
• The D-Light Pro Detection mode (DT) assists the
visualisation of bacteria in plaque and carious lesions
and the identifi cation of fl uorescent materials.
• The D-Light Pro off ers an easy-to-use and elegant
stainless steel design. The design ensures a
user-friendly operation of the unit.
• Lithium polymer batteries, when fully charged, allow
for more than 45 individual irradiations of 20 seconds
duration each. The lithium polymer battery has no
memory eff ect, and a fast recharging speed of 75
minutes.
• The D-Light Pro is designed to off er a stable and
continuous high light output over several years.
• Built-in radiometer
• In addition to the light guide, the handpiece is
autoclavable once the internal electronic module and
battery pack have been removed.
• The D-Light Pro is under warranty for a period of 3
years, except the battery (1 year warranty) and
consumables (no warranty).
3. INDICATIONS
• Polymerisation of visible light curing materials curing
with a wavelength range of 400 to 480nm. In case of
questions about the wavelength ranges for certain
materials, please contact their respective
manufacturers.
• The Detection mode (DT) assists the visualization of
bacteria in plaque, fi ssures, infected dentin and the
presence of micro-leakage. It also helps to identify
fl uorescent restorative materials, and to evaluate the
depth of cracks in the tooth structure.
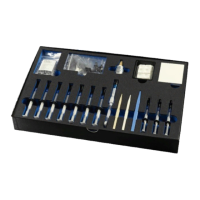
4. IDENTIFICATION OF PARTS
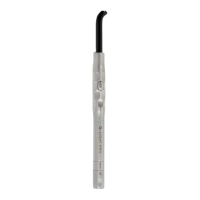
• Handpiece Figure 1
• Electronic module Figure 2
• Battery packs (x2) Figure 3
• Light-guide Figure 4
• Soft eye-protector shields (x3) Figure 5
• Hard, oval eye-protection shield Figure 5
• Charging station Figure 6
• Power supply and cable Figure 6
• EU/UK plug adapters Figure 7
5. SETUP
• Carefully unpack all D-Light Pro components and
familiarize yourself with the individual items. Check for
completeness.
• First, check that the voltage indicated on the D-Light Pro
charging station name plate complies with the local
power supply.
Battery
• Prior to initial use or use after a long interval of non-use,
be sure to charge or recharge the batteries completely.
Use the original charging station and lithium polymer
battery only. Do not use any other battery chargers or
batteries.
• Connect the power cord to the charging station, and the
plug of the power cord to the mains power outlet
(110-240V AC) (Figure 8)
• Insert the batteries fully onto the docking ports of the
charging station until you hear/feel a ‘click’ (Figure 9)
• There is a LED corresponding to each docking port.
When the LED is illuminated, the battery is in the process
of being charged. When the LED turns off , then charging
is completed. Two batteries can be simultaneously
charged.
• Do not connect the depleted battery pack to the
charging station until it is properly cleaned and
disinfected.
• The time to fully charge an empty battery is
approximately 75 minutes.
• When the D-Light Pro is not in use for a prolonged
period of time, the battery pack should be disconnected
from the handpiece; or the handpiece/battery should be
in the “off ” position.
• Batteries may be stored on the docking ports of the
charging station as long as there is power to the
charging station.
EN
DE
FR
IT
ES
NL
DA
SV
NO
PT
FI
EL
 Loading...