GETINGE SAFESTEP ATP MONITOR GETINGE SAFESTEP ATP MONITOR
3 4
IMPORTANT: Please ensure that you have read and
understood all the “Operating Precautions and Limitations
of Use” section at the beginning of the manual before
continuing any further.
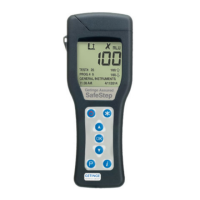
2.1 Unit Description
The unit has the following external front and rear features:
Unit lid
Liquid crystal display
Keypad
Neck strap anchor
Serial number label
Baery compartment
Opening the lid reveals the following internal features:
RS232 connector cover
Protective pocket and sample
insert port
For details on the RS232 connector and protective pocket,
refer to section 6.3.
2.2 Keypad Symbols
The keypad is arranged with the following buons:
Power on/off buon
Menu select buon
Up/increase buon
Start/accept buon
Down/decrease buon
Program select buon
Statistics shortcut buon
The function of the buons is explained in more detail in the
following sections.
TIP: Holding down the “Up” or “Down” buon will make it
automatically repeat. Holding down this buon scrolls
through all functions rapidly.
2.3 Display Layout and Icons
The liquid crystal display (LCD) has the following layout. The
upper half of the display contains the status icons and the
large RLU result digits.
2. Basic Unit Operation
The following is a list of icons and their definitions.
Low baery warning icon
Lid icon - flashes when the lid needs to be closed,
or the RS232 connector cover needs to be
properly tucked under the lid
Insert icon – arrow flashes when the testing
device should be inserted
Remove icon – arrow flashes when an testing
device needs to be removed
Pass result icon
Caution result icon
Fail result icon
Sample measurement reading in Relative Light
Units (RLU)
Retested icon – identifies the failed test result as
having been retested
Retest result icon – identifies the Program
location or test result as a retest result
2.4 Fiing the Baeries
The unit is designed to operate from both non-rechargeable
alkaline baeries and rechargeable Nickel Metal Hydride
(NiMH) or Nickel Cadmium (NiCD) baeries:
Baery Technology Nominal Cell
Voltage
Relative
Capacity
Alkaline 1.5 V 1.0
NiMH 1.2 V 0.6
NiCD 1.2 V 0.5
The unit requires two baeries of the size AA, LR6 or E91.
TIP: For best results, always use a quality brand of Alkaline
baery and replace them as soon as they become flat (see
section 2.6).
WARNING: Do not mix baeries of different technologies,
or use recharged alkaline baeries as these are prone to
overcharging and leaking, which may cause permanent unit
damage and malfunction.
The baeries are fied by unclipping the baery
compartment cover on the back of the unit, and inserting
two baeries with the positive ends (+) towards the top of
the unit:
(1) Remove cover (2) Insert baeries (3) Replace cover
2
4
6
1
3
5
1
2
4
6
3
5