Do you have a question about the Gima multiCare-in and is the answer not in the manual?
Lists necessary system components: meter, strips, lancing device, lancets, control solutions, and software.
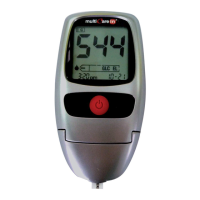
Shows test results, messages, and stored results in memory.
Turns meter on/off, enters SET mode, navigates steps.
Enters MEMORY mode, recalls results, increases values in SET mode.
Enters MEMORY mode, recalls results, decreases values, resets test results.
Insert test strip here; meter automatically enters TEST mode.
Transfers data from the meter to a computer.
To open for cleaning.
Slides to access the battery compartment.
Where the data-chip is inserted.
Presses to discharge the used strip.
Indicates if a data-chip is being inserted.
Shows the current operating mode of the meter.
Alerts the user when the battery charge is low.
Displays measurement outcomes and system notifications.
Indicates units for test results (e.g., mg/dL or mmol/L).
Shows measured substance (e.g., glucose, cholesterol).
Alerts to temperatures outside optimal measurement range.
Displays the current time.
Shows the current date.
Indicates active alarms or notifications.
Default mode, showing data chip, time, and date.
Allows reviewing stored test results.
Used for configuring meter settings.
Steps to remove data-chip from box, insert into meter, and press until complete.
Verify displayed number matches the one on the strips vial.
Measurement impossible without data-chip insertion.
Defines abbreviations for measured substances: GLC EL, CH, TGL.
Wash/dry hands, ensure finger is dry, prepare lancing device with sterile lancet.
Use new lancets, check protection integrity, store protection for sealing.
Press Power button, verify data-chip code matches strips vial code.
Insert strip into meter, listen for click and acoustic signal.
Prick finger, apply blood drop to strip, let it aspirate.
Sit, massage finger, prick, discard first drop, apply second drop to strip.
Select gender (F/M) and meal status (b/a) using buttons.
Meter signals result, stores it; eject used strip.
Contact physician for unexpected or extreme high/low values.
Meter turns off automatically after 60 seconds of inactivity.
Measured values saved chronologically, from most recent to oldest.
Proper disposal of materials and instrument; follow safety procedures.
Keep strips in original vial, protect from light/humidity, store at 5-30°C.
Use immediately, close vial, do not use after expiry, write opening date.
Do not use damaged strips. Use only original multiCare-in strips.
Used to check instrument working; available as separate accessory.
Apply to strip like blood; result must be within interval on vial label.
Control solution must be used within 90 days of first opening.
Use control solutions when suspecting defects or malfunctions.
Control solution results must be deleted from memory.
Press +/- buttons in standby mode to enter MEMORY and scroll results.
Hold Power, press '-' for 1 sec to delete one result.
Hold Power, press '-' for 5 secs to delete all stored results.
Use Power, '+' and '-' buttons to select and change month and day.
Choose between month-day (mm-dd) or day-month (dd-mm) format.
Use Power, '+' and '-' buttons to set year (2007-2017).
Hold Power to enter SET mode, use +/- to set hour/minutes.
Choose between 12-hour or 24-hour format using '+' or '-' buttons.
Select between mg/dL and mmol/L for test results.
Set number of days (0-28) for displaying average results.
Toggle acoustic signal ON/OFF in SET mode using '+' or '-' buttons.
Enter SET mode, select alarm number (0-3), set hour and minutes.
Alarms are not active if set to 12.00 or 0.00.
Install manufacturer's software before connecting the meter.
Connect meter via USB, press Power button to display 'PC', start transfer.
Use wet cloth (water/70% alcohol) for external parts if soiled.
Lift cover, clean optics with wet cloth, dry glass carefully.
Clean instrument with 70% alcohol after each measurement for multiple users.
Perform measurements between 10-40°C (50-104°F).
Store kit (meter/strips) between 5-30°C (41-86°F).
Allow instrument to acclimatize to room temperature for ~20 mins if too hot/cold.
Place instrument in allowed temperature range and wait for equilibration.
Use new strip, apply blood after blinking drop, clean reading window if dirty.
Switch off, reinsert strip, apply blood without removing from holder.
Use data-chip and strip that correspond; check parameter symbol.
Remove and reinsert data-chip; contact customer service if error persists.
Repeat test and apply a larger drop of blood.
Insert the correct data-chip corresponding to the strips used.
Repeat test with larger blood drop; contact physician if LO persists.
Contact physician immediately and repeat test at hospital laboratory.
Get new batteries or replace them before taking a measurement.
Check strip expiry date and use new strips; blinking results are not saved.
Replace battery if icon blinks; shut down meter before removal.
Open rear panel, remove old battery, insert new (negative up), close cover.
Flat batteries can be disposed of through recycling centers.
Reset time and date if battery removed for over 60 seconds.
Symbols for instructions, In-Vitro Diagnosticum, and use until date.
Symbols for batch number, temperature, battery type, and CE mark.
Indicates no urban waste disposal; use separate collection for WEEE.
Specifies measurement ranges for glucose, cholesterol, and triglycerides.
Uses 2x3V lithium batteries (CR 2032), lasting approx. 1 year with 3 tests/day.
Provides physical dimensions (length, height, width) and weight (incl. battery).
Features LCD display, operating temp 10-40°C, humidity 0-90% RH.
Capacity for 500 values, data transfer via connecting cable.
CE mark compliance with EC directives for electromagnetic compatibility.
Accuracy checked after 3 years; consult for legal provisions.
Refer to local regulations for waste disposal when meter is unusable.
| Brand | Gima |
|---|---|
| Model | multiCare-in |
| Category | Personal Care Products |
| Language | English |