EasyManua.ls Logo

Gold's Gym Cycle Trainer 310 User Manual

Gold's Gym Cycle Trainer 310
16 pages
To Next Page IconTo Next Page
Page #1 background imageLoading...
Page #1 background image
USER’S MANUAL
Serial Number
Decal
CAUTION
Read all precautions and instruc-
tions in this manual before using
this equipment. Keep this manual
for future reference.
Model No. GGEX62410.0
Serial No.
Write the serial number in the
space above for reference.
QUESTIONS?
If you have questions, or if parts
are damaged or missing, DO NOT
CONTACT THE STORE; please
contact Customer Care.
IMPORTANT: Please register this
product (see the limited warranty
on the back cover of this manual)
before contacting Customer Care.
CALL TOLL-FREE:
1-877-776-4777
Mon.–Fri. 6 a.m.–6 p.m. MT
Sat. 8 a.m.–4 p.m. MT
ON THE WEB:
www.workoutwarehouse.com
Question and Answer IconNeed help?

Do you have a question about the Gold's Gym Cycle Trainer 310 and is the answer not in the manual?

Gold's Gym Cycle Trainer 310 Specifications

General IconGeneral
BrandGold's Gym
ModelCycle Trainer 310
CategoryExercise Bike
LanguageEnglish

Summary

Warning Decal Placement

Cautionary Notes on Stopping

Advice on how to stop the pedals safely by reducing speed or using the brake.

Critical Safety Warnings

Critical safety warnings regarding machine misuse, user weight, and proper usage.

Important Precautions

Medical Consultation Advice

Recommendation to consult a doctor before starting exercise, especially for certain age groups.

Operational and Environmental Safety

Instructions on using the bike as described, in a supervised environment, and keeping it indoors.

User Conduct and Maintenance

Precautions about clothing, shoes, user weight, back posture, and stopping the flywheel.

Assembly

Assembly Requirements and Tools

Information on needing two people, hiring a technician, and required tools for assembly.

Step 1: Front Stabilizer Installation

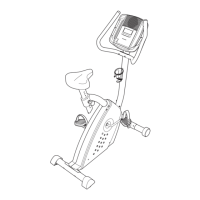
Instructions for attaching the front stabilizer to the frame using bolts and locknuts.

Step 2: Rear Stabilizer Installation

Instructions for attaching the rear stabilizer to the frame using bolts and locknuts.

Step 5: Seat Post and Carriage Adjustment

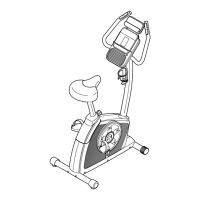
Detailed steps for adjusting the seat post and seat carriage height and position.

How to Use the Exercise Bike

Console Features and Operation

Exercise Guidelines

Ordering Replacement Parts

Related product manuals