2
1 Welcome
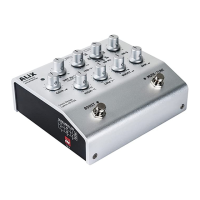
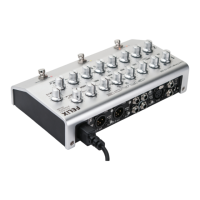
Like its big brother FELiX, the ALiX you hold in your hand is
designed to make you sound better, play better and have more
fun in the process. From Banjo, bass to bouzouki, if it has strings
and a pickup, ALiX will make its tone shine through.
While ALiX is not the most complicated piece of gear you’ve
ever operated, it does aord a good bit of exibility and setup
options, which means we highly recommend you have a good
look at this owner’s manual to familiarize yourself with its
ner points. Once you overcome the learning curve (easy, we
promise), you’ll nd AliX to be intuitive and user friendly.
It is our sincere hope that our gear helps you do better work.
You are why we do this. Please drop us a line or a message and
let us know what you think.
And by all means if you ever have any questions about using
your ALiX or anything else we make, call us at 1-303-823-8100,
9-5 MST.
Have fun!
- The Grace Design Team
2 Safety Information
• Indoor use only
• Ordinary Protection: This equipment should not be
exposed to dripping or splashing.
• Avoid placing objects lled with liquids, such as vases or
glasses, on this equipment.
• Class I Equipment (grounded type)
• Electrical rating: 100-240V~ 50-60Hz 10W
• Mains supply voltage uctuations are not to exceed ±10%
of the nominal supply voltage.
• Pollution Degree 2
• Installation (Over voltage) Category II for transient
overvoltages.
• Maximum Relative Humidity: <80%
• Operation temperature range: 10 °C to 40 °C
• Storage and transportation temperature
range –40 °C to 70 °C
• Maximum altitude: 3000m (9843 ft)
• Equipment suitable for continuous operation
• Weight: 2.2lbs
TABLE OF CONTENTS
1 Welcome 2
2 Safety Information 2
3 Safety Marking Symbols 3
4 Features 3
5 Top Panel Controls and Features 4
6 Back Panel Controls and Features 5
7 Side Panel Controls and Features 5
8 Connecting ALiX to Stu 6
8.1 1/4” Instrument input 6
8.2 Insert (FX LOOP) 6
8.3 Amp Out 6
8.4 Tuner Output 6
8.5 DI Output 6
8.6 100-240VAC Power Input 6
8.7 9V @ 500mA DC POWER OUTPUT 6
9 Operation 6
9.1 Where to put ALiX? 6
9.2 Instrument / line input 6
9.3 Filtering and EQ 7
9.4 Output controls 8
9.5 Footswitch Controls 8
9.6 Side Panel Controls 8
10 Diagrams 9
10.1 Insert cable Wiring 9
10.2 Block Diagram 10
10.3 Connection Diagram 11
10.4 AdJusting Internal Jumpers 12
10.5 Internal Jumper Locations 13
11 Specications 14
12 Cleaning and Maintenance 15
13 Warranty 15
14 Manual Revisions 16