6
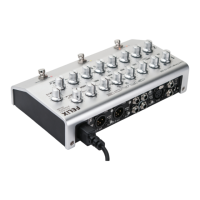
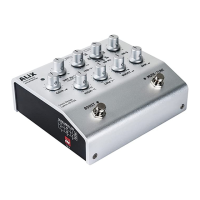
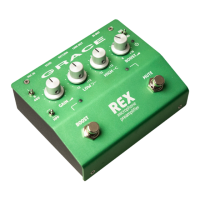
8 Connecting Felix to Stuff
8.1 1/4” INSTRUMENT INPUTS, CH1 & CH2
INPUT 1 - This input is for connecting any instrument pickup,
electret mic or line source to Ch1. The connector is a standard
unbalanced 1/4” jack wired tip signal, sleeve ground. If you are
using this input, remember to select the ‘line’ setting of the
adjacent ‘mic/line’ switch. We recommend muting Felix before
changing the setting of the mic/line switch to avoid pops on
the output.
INPUT 2 - This input is for connecting any instrument pickup,
electret mic, or line source to Ch2. This input can also
accommodate two dierent signals from a dual source pickup
system on one TRS 1/4” cable. The connector is a standard TRS
1/4” jack wired tip signal to Ch2, ring signal normaled to Ch1,
and sleeve ground. If you are using this input, remember to
select the ‘line’ setting of the adjacent ‘mic/line’ switch.
Both Ch1 and Ch2 line inputs have 3 input impedance settings,
selectable from the toggle switch labeled ‘Z’ . The settings are:
Ch1: med - 1MΩ / hi -10MΩ / low – 10kΩ
Ch2: med - 1MΩ / hi -20MΩ / low – 332kΩ
Some pickups or sources are more sensitive to preamp input
impedances than others. For example, if you use a ‘Sunrise’
magnetic pickup, they prefer to connect with an input
impedance of 1MΩ. If you have an onboard preamp or a lower
impedance pickup, the input impedance setting will probably
make less of a dierence. In any case, we encourage you to try
dierent settings with your pickup or source. The dierence
may be noticeable or not, and should be set accordingly to
what sounds best to you. Always what sounds best to you!
8.2 CH1 XLR MIC INPUT
This input can accommodate any type of microphone, from
a SM57 to a large diaphragm condenser, even a ribbon mic.
The connector is wired pin 2 positive, pin 3 negative and pin 1
ground. 48V phantom power, if activated, is supplied on pins
2 and 3. If you are using this input, remember to select the
‘mic’ setting of the adjacent ‘mic/line’ switch. The side panel
phantom power switch should always be set to OFF whenever
connecting or disconnecting this input. We recommend
muting Felix before changing the setting of the mic/line and
48V switches to avoid pops on the output.
8.3 INSERT
The insert connection is a buered, unbalanced insert point of
the blended signal (post boost) for connecting outboard eects
to Felix. This allows mono outboard signal processing to be
placed in series with the blend signal, while still utilizing all of
Felix’s output capabilities. It is a 1/4” TRS connection, wired tip
to send, ring to return and sleeve to ground.
SEE WIRING DIAGRAM page 11
8.4 AMP OUT
This output is for sending an unbalanced, non-transformer
isolated output to a stage amp or anywhere else you may need
an additional unbalanced signal. This output has the added
benet of a level control, which is situated on the right side,
bottom row of controls on the top panel. This output is muted
when the MUTE / tune footswitch is activated.
Amp out can be sourced from either the blended signal or Ch2
alone, with the selection being made with the ‘amp source’
selector switch on the rearpanel.
8.5 TUNER OUTPUT
This is another unbalanced output which is always active –
provided as a dedicated stage tuner out. When the MUTE is
activated, your stage tuner will continue to receive signal,
allowing you to tune silently. The Tuner output level follows
the Amp Out level control.
8.6 FS - FOOTSWITCH INPUT
This input is for connecting an external footswitch to operate
the top panel footswitch functions. This is provided for folks
who will keep their Felix in a rack, on top of an amp, mounted
to a mic stand, or anywhere up o the oor. This allows you
to connect a standard 2 way foot switch and access the MUTE
and BOOST / TOGGLE functions. These controls have a logic
‘or’ function, so if either the footswitch or the front panel
toggle is engaged, the associated function will be activated.
Felix utilizes and requires ‘normally open momentary’ type
footswitches.
SEE WIRING DIAGRAM page 11
8.7 DI OUTPUTS, CH1 & CH2
These two outputs are balanced and transformer isolated, for
sending Felix signals to a front of house, monitor console, or
any mixer or interface where balanced, isolated signal needs to
be sent. XLR pinout is: pin 2 positive, pin 3 negative and pin 1
ground.
Each output can be sourced from either its individual channel
only, or the blend of the two channels, adjusted by the ‘MIX’
control on the far right of the top panel controls. Source select
is via the ‘DI source select’ switch above each XLR output. Also,
each output has an adjacent level setting switch – line and
mic, depending on what input this source will be feeding. In
the ‘mic’ setting, the output is padded down -26dB to interface
properly with mic inputs at the console, the ‘line’ setting is not
padded for better level matching with line level inputs at the
console or interface.
8.8 HEADPHONE OUTPUT
This is a 1/8” mini style headphone jack for monitoring Felix
via your headphones, EIM, earbuds etc.. This output level is the
same as the amp out, so the top panel amp out level control is
used to adjust headphone volume as well. This output remains
active when Felix is muted, so you can plug in your IEM’s and
practice privately during long, boring soundchecks. This can
also be very useful for hearing a very detailed and isolated