308155 17
Service
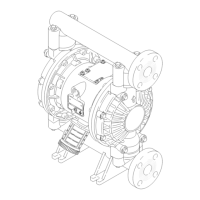
20. Place the cylinder (25) on the cylinder cap (32).
Install the piston (22) and valve assembly (31).
NOTE: When you reinstall the cylinder (25), be sure
the “P” port in the top cylinder cap of the spool valve
assembly (31) and the port in the bottom cylinder cap
(32) are in line with each other. Be sure the o-rings
(13*) are in place in the valve spool assembly (31) and
cylinder cap.
21. Install the capscrew (3), o-ring (39), and washer
(2). Install the lockwashers (37) and nuts (36).
Torque the nuts to 28 to 32 ft-lb (36 to 43 N.m).
CAUTION
Never install the fluid tube (45) before you torque
the tie rods. Doing so could cause misalignment
and damage the reciprocator when it is operated.
22. Reinstall the fluid tube (45) and fittings (1). Torque
the fittings to 25 to 35 ft-lb (34 to 48 N.m). See the
Parts Drawing on page 18.
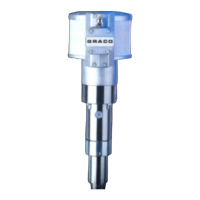
23. Pull the displacement rod (34) in and out to be
sure it moves easily
24. Grease the inside top of the displacement cylinder
(108) opening. Thread the guide collar, Part No.
168085, onto the displacement cylinder. Slide the
packing assembly into the collar/cylinder. See Fig.
14. Remove the guide collar.
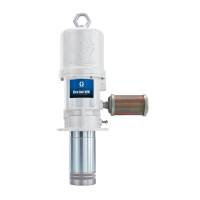
25. To reconnect the reciprocator and pump, screw the
connecting rod (117) into the displacement rod
(34). Install the cotter pin (118). Make sure the
o-ring (119) in the bottom of the adapter (43) is in
good condition. Push the cylinder up into the
adapter, and engage the threads. Screw in the
pump, using a strap wrench for the final tightening.
See Fig. 12.
26. Connect the hydraulic supply and return hoses to
the fittings (5, 60).
WARNING
To reduce the risk of static sparking be sure to re-
connect the ground wire before operating the
pump.
Fig. 11
36,37
31
32
*13
25
13*
3,39,2
43
34
38
1
1
Torque to
28 to 32 ft-lb
(36 to 43 N.m).
06145
Fig. 12
01662
117
103
118
34
108
119*
43