MAINTENANCE
1
Check
the
packing nut/wet–cup daily
.
Relieve the
pressure.
Keep the packing nut/wet–cup 1/3 full with
TSL at all times to help prevent fluid buildup on the
piston
rod and premature wear of packings.
T
ighten
the packing nut just enough to stop leakage. Over-
tightening
may
cause binding and excessive packing
wear.
Use a 1/4 inch diameter rod to adjust the nut.
2
Clean
the fluid filter often
and whenever the spray
-
er is stored. First relieve pressure. See manual
307–273
for the cleaning procedure.
3 For very short shutoff periods, leave the suction
tube in the paint, relieve pressure, and clean the
spray
tip.
4 At the end of each work day , flush the sprayer
and relieve pressure. Leave the pump and hoses
filled
with mineral spirits to help prevent pump corro
-
sion and freezing. See FLUSHING GUIDELINES,
page
10.
Fig 7
PLUG
SPOOL
5 If the pump stalls at the top of its stroke, relieve
fluid
pressure, remove the plug from the top of the hy
-
draulic motor
, and push the spool all the way down.
See
Fig 7. Replace the plug and
restart the sprayer
.
NOTE: Relieving pressure whenever you are not using
the sprayer helps prevent the pump stalling at
the
top of its stroke.
6
Coil
the hose and hang it on the
hose rack
when
storing
it, even for overnight, to help protect the hose
from
kinking, abrasion, coupling damage, etc.
7 Check the hydraulic fluid level occasionally. Add
fluid
as necessary to keep the fluid level between the
ADD
and FULL marks on the dipstick. See page 9.
8 Change
the hydraulic fluid
every 2000 hours of
op
-
eration or 12 months, whichever comes first. Also
clean
the hydraulic pump intake filter and replace the
disposable
filter in the return line. First
, relieve pres
-
sure. then remove the sprayer shield. Refer to Re-
placing
the Electric Motor
on page 17 to get at the
filters. Remove the old hydraulic fluid and clean the
sump.
9 Periodically, or if the electric motor is overheating,
unplug the sprayer , relieve pressure, remove the
shield,
and
clean all paint and dirt from the shield, fan
blades,
motor and cooling fins.
10 To transport the sprayer, empty the wet-cup, or re-
duce
the level of Throat Seal Liquid to 1/3 full or less
and
stuf
f
a rag into the wet-cup. Load the sprayer as
shown in Fig 8. To avoid leakage of hydraulic fluid,
never
lay the sprayer on its side.
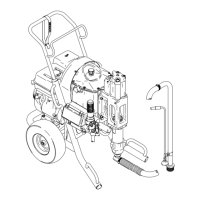
Fig 8
LOAD
AS SHOWN.
NEVER LAY SPRA
YER ON SIDE.
TROUBLESHOOTING GUIDE
WARNING
To
reduce the risk of serious bodily injury
, including fluid injection, injury from splashing fluid
or solvent in the eyes
or
on the skin, moving parts
or electric shock, always follow the
Pressure Relief Procedure
on page 1
1 whenever
you shut off the sprayer, when checking or servicing any part of the spray system, when installing, cleaning or
changing
spray tips, and whenever you stop spraying.
Check everything in the guide before disassembling the sprayer
.
PROBLEM CAUSE SOLUTION
Building
circuit breaker opens
Check all electrical wiring for damaged
insulation.
Replace any damaged wiring.
Check for other electrical appliances on
circuit.
Shutdown other electrical appliances on
circuit.
 Loading...