SETUP
PACKING
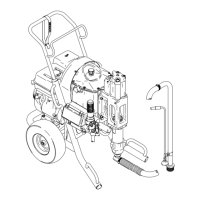
NUT/
WET–CUP
FILL 1/3 FULL
WITH TSL
Fig
1
ON/OFF
SWITCH
Pull on/Push off
1/4 npsm(m) FLUID
OUTLET NIPPLE
DO NOT INST
ALL ANY
SHUT
OFF DEVICE HERE
PRESSURE ADJUSTING
KNOB
PRESSURE DRAIN V
ALVE
DO NOT INST
ALL A SPRA
Y HOSE HERE
FULL
ADD
STRAINER
DIPSTICK
PUSH CLIPS T
O
RELEASE SHIELD
1 Check
the Hydraulic Fluid
(See Fig 1.) Push in
on
the
two spring clips and lift
the shield of
f the sprayer
.
Remove the expander plug from the sump fill hole
and lift the strainer/dipstick out of the hole. Using a
clean,
lint–free cloth
, wipe the dipstick clean, replace
it
in the sump hole,
and then remove it and check the
fluid
level. The fluid level should be between the
ADD
and
FULL marks on the dipstick.
If
the fluid level is at or below the ADD mark, replace
the strainer/dipstick in the sump hole. Add approved
hydraulic fluid (see ACCESSORIES) through the
hole to bring the level to the FULL mark. One and
three–fourths pints will raise the level from ADD to
FULL.
If
you are supplying your own hoses and spray gun,
be sure the hoses are electrically conductive, that
the
gun has a tip guard, and that each part is rated
for at least
3000 psi (210 bar) Working Pressure
.
This is to reduce the risk of serious bodily injury
caused by static sparking, fluid injection or over–
pressurization
and rupture of the hose or gun.
WARNING
2 Connect
the gun, 3 ft. hose and 50
ft. hose.
Don’t
use
thread sealant, and don’t install the spray tip yet.
3 Fill the packing nut/wet–cup 1/3 full with Graco
Throat Seal Liquid (TSL), supplied. T o access the
cup,
push in on the two spring clips and remove the
sprayer
shield. See Fig 1.
 Loading...