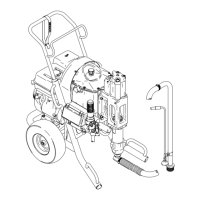
SETUP
WARNING
Proper electrical grounding is essential to reduce
the
risk of fire
or explosion which can result in seri
-
ous bodily injury and property damage. See the
warning section
FIRE OR EXPLOSION
HAZARD
on
page 3
for more detailed grounding instructions.
4 Check
the electrical service
to be sure it is
appro
-
priate for your sprayer ’s wiring. See the next two
paragraphs.
Use a properly grounded outlet. Do
not
remove the grounding prong of the power supply
cord. Do not use an adapter. Extension cords must
have
3 wires of a minimum 12 gauge size. Long ex
-
tension cords reduce sprayer performance; use a
longer
hose rather than a longer extension cord.
Models 226–433 and 231–004 require 115 Volt, 60
Hz AC, 20 Amp electric service , equipped with a
NEMA NO. 5–20P plug. Since the unit draws 20
amps,
use it only on a separate circuit with no other
loads.
NOTE: A licensed electrician can rewire Models
226–433 and 231–004 for 230 volt service, if
necessary.
See the wiring diagram in Fig 2.
Model
226–432 requires 220 V
olt, 50 Hz AC, 15 amp
electric
service.
Have a licensed electrician install a
plug conforming to local code.
5
With the ON/OFF switch OFF, plug the cord into
a grounded electrical outlet located at least 20 ft.
(6
m) away from the spray area.
6 Flush the pump.
See page 10.
7 Prepare the paint. Follow the paint manufacturer’s
recommendations. Remove any paint skin. Stir to
dissolve hard pigments. Strain the paint through a
fine nylon mesh bag to remove particles that could
clog the filter or spray tip.
This is probably the most
important
step toward trouble-free spray painting.
Fig 2
9
10
4
3
5
BROWN
BLUE
GREEN
GREEN
GREEN
BLACK
WHITE
BLACK
WHITE
9
104
35
3
9
105
4
FOR
1
15V SERVICE
(Model 226–433 only)
FOR 230V SERVICE
(Model 226–433 only)
FOR 220V SERVICE
(Model 226–432 only)
 Loading...