FLUSHING GUIDELINES – WHEN TO FLUSH
1. New Sprayer . The sprayer was factory tested in
lightweight
oil which was left in to protect pump
parts.
Before using water–base paint
, flush with mineral
spirits, then warm, soapy water , and then clean
water.
Before using oil–base paint,
flush with mineral spir-
its.
2. Changing
Colors.
Flush with a compatible solvent.
3. Changing from water–base to oil–base paint.
Flush
with warm, soapy water
, then mineral spirits.
4. Changing from oil–base to water–base paint.
Flush with mineral spirits, then warm, soapy water ,
and
then clean water
.
5. Storage. Flush as indicated below , shut of f the
sprayer, open the pressure drain valve to relieve
pressure
and leave it open.
Water–base paint:
flush with water , then mineral
spirits.
Leave the system filled with mineral spirits.
Oil–base paint:
flush with mineral spirits.
6. Startup after storage. Before using water–base
paint, flush out mineral spirits with soapy water and
then clean water. When using oil–base paint, flush
out
the mineral spirits with the paint to be sprayed.
FLUSHING GUIDELINES – HOW TO FLUSH
1. Relieve pressure. See the Pressure Relief Proce-
dure
W
arning
on page 1
1.
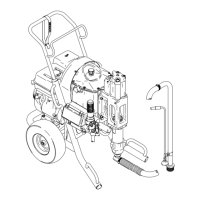
2. Remove the filter bowl and screen; see manual
307–273.
Clean the screen separately and install the
bowl
without the screen to flush it. See Fig 3.
Fig 3
PRESSURE
DRAIN
V
ALVE
FILTER
BOWL
SCREEN
FIL
TER
SUPPORT
3. Close
the pressure drain valve.
4. Pour one–half gallon of compatible solvent into a
grounded
metal pail. Put the
suction tube in the pail.
5. Remove
the spray tip from the gun, if it is installed.
6. Turn
the pressure adjusting knob all the way counter
-
clockwise
to lower the pressure setting.
WARNING
To reduce the risk of static sparking and splashing
when
flushing,
always remove the spray tip from the
gun, and hold a metal part of the gun firmly to the
side
of grounded metal pail.
Fig 4
MAINTAIN
FIRM
MET
AL T
O MET
AL
CONT
ACT WHEN
FLUSHING
7. Hold a metal part of the gun firmly against a metal
waste container.
See Fig 4. Hold the trigger open,
turn
on the sprayer
, and slowly increase the pressure
just until the sprayer starts. Keep the gun triggered
until
all air is forced out of the system
and the solvent
flows
freely from the gun.
Release the trigger and en
-
gage
the gun safety latch.
NOTE: If
the pump is hard to prime, open the drain valve.
When fluid comes from the valve, close it. Pro-
ceed
as in Step 7.
8. Remove the suction tube from the pail. Disengage
the
gun safety latch and trigger the gun to force sol
-
vent
from the hose. Do not run the pump
dry for more
than
30 seconds to avoid damaging the pump pack
-
ings!
Relieve pressure.
9. Remove the suction tube and strainer and clean
them separately . Normal flushing does not ade-
quately
clean these parts.
10. Leave the pressure drain valve open until you are
ready
to use the sprayer again. If the screen was re
-
moved,
unscrew the filter bowl and reinstall the clean
screen.
Reinstall the bowl, hand tight only
.
11. If
you flushed with
mineral spirits and are going to use
a
water–base paint, flush with soapy water and
then
clean
water
. Relieve pressure.
 Loading...