Do you have a question about the Grizzly G1182HW and is the answer not in the manual?
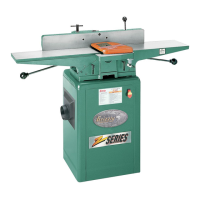
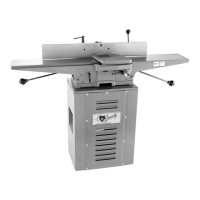
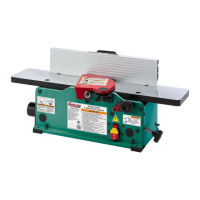
Table where the cutting operation begins; on the right side when facing the jointer.
Table where the cutting operation ends; on the left side when facing the jointer.
Cylindrical assembly holding jointer knives, spinning on a horizontal axis.
Adjustable cast iron surface for wood stock alignment during jointing.
Controls for adjusting the height of the infeed and outfeed tables.
Handles that must be loosened before table height adjustment.
A groove cut along the long edge of wood stock for joinery.
Running the face of wood over the jointer for one flat side.
Running the long edge of wood over the jointer for a flat edge.
Metal guard covering the cutterhead when wood stock is not passing.
Explanation of safety symbols and general precautions for operating equipment.
Essential rules for safe operation of power tools, covering guards, work area, and more.
Details power requirements and precautions for 110/120V operation.
Guidelines for selecting and using appropriate extension cords.
Importance and procedure for grounding the jointer to prevent electric shock.
Overview of the jointer series, features, and the manual's purpose.
General instructions and safety warnings before starting the assembly process.
Step-by-step guide for assembling the jointer stand.
Instructions for attaching the main jointer unit to the assembled stand.
Procedure for installing and tensioning the V-belt.
Guide for attaching the fence to the jointer.
Steps for installing the cutterhead guard.
Instructions for attaching the belt guard.
How to set up the knife setting gauge for proper knife installation.
Guide for installing the pedestal-mounted switch assembly.
How to adjust table gibs for smooth table movement.
Procedures for inspecting and adjusting jointer knives.
Steps to align the outfeed table correctly relative to the cutterhead.
Steps to align the infeed table correctly relative to the cutterhead.
How to set the fence to the 90-degree stop position.
How to set the fence to the 45-degree stop position.
Steps for performing an initial test run of the machine.
Guidelines for inspecting wood stock for defects before jointing.
Technique for creating a square, flat edge on lumber.
Technique for creating angled edges on lumber by tilting the fence.
Process for flattening one face of a board.
Instructions for cutting rabbets (grooves) on the edge of wood.
Routine checks for loose bolts, worn parts, cords, and belts.
Protecting metal table surfaces from rust and pitting.
Information on bearing lubrication and table ways.
Inspecting V-belt tension, wear, and pulley alignment.
Final safety warnings and contact information for assistance.
| Brand | Grizzly |
|---|---|
| Model | G1182HW |
| Category | Power Tool |
| Language | English |