6 OM-GSSP-BL-E BOILERLESS STEAMER
CLEANING
WARNING: DISCONNECT THE POWER SUPPLY BEFORE CLEANING THE OUTSIDE OF THE
STEAMER.
KEEP WATER AND CLEANING SOLUTIONS OUT OF CONTROLS AND
ELECTRICAL COMPONENTS. NEVER HOSE OR STEAM CLEAN ANY PART OF
THE UNIT.
AVOID CONTACT WITH ANY CLEANERS, DELIMING AGENT OR DEGREASER
AS RECOMMENDED BY THE SUPPLIER. MANY ARE HARMFUL. READ THE
WARNINGS AND FOLLOW THE DIRECTIONS!
EVEN WHEN THE UNIT HAS BEEN SHUT OFF, DON’T PUT HANDS OR TOOLS
INTO THE STEAMING CHAMBER UNTIL THE FAN HAS STOPPED TURNING.
DON’T OPERATE THE UNIT UNLESS THE REMOVABLE STEAM LID HAS BEEN
PUT BACK IN ITS PROPER LOCATION.
DON’T USE ANY CLEANING AGENT THAT CONTAINS ANY SULFAMIC AGENT
OR ANY CHLORIDE,INCLUDING HYDROCHLORIC ACID (HCL). TO CHECK FOR
CHLORIDE CONTENT SEE ANY MATERIAL SAFETY DATA SHEETS PROVIDED
BY THE CLEANING AGENT MANUFACTURER.
IMPORTANT
:
DO NOT USE ANY METAL MATERIAL (SUCH AS METAL SPONGES) OR METAL
IMPLEMENTS (SUCH AS A SPOON, SCRAPER OR WIRE BRUSH) THAT
MIGHT SCRATCH ANY STAINLESS STEEL SURFACE. SCRATCHES MAKE THE
SURFACE HARD TO CLEAN AND PROVIDE PLACES FOR BACTERIA TO GROW.
DO NOT USE STEEL WOOL, WHICH MAY LEAVE PARTICLES EMBEDDED IN THE
SURFACE, WHICH COULD EVENTUALLY CAUSE CORROSION AND PITTING.
WARNING: ALLOW THE STEAMER TO COOL COMPLETELY BEFORE CLEANING. HOT
SURFACES CAN CAUSE SEVERE BURNS.
WARNING: FAILURE TO CLEAN THE STEAMER AS SPECIFIED COULD NEGATIVELY
IMPACT THE PERFORMANCE OF THE STEAMER OR WILL NOT ALLOW UNIT
TO HEAT.
To keep your Boilerless Steamer in proper working condition, use the following
daily procedure to clean the unit. This regular manual cleaning will reduce the time
and effort required to clean the water reservoir and cavity.
SUGGESTED SUPPLIES
1. Mild detergent
2. Stainless steel exterior cleaner
3. Cloth or sponge
4. Brush with soft bristles
5. Spray bottle
6. Measuring cup
7. Nylon pad
8. Towels
9. Plastic disposable gloves
10. Funnel
EXTERIOR CLEANING
1. Prepare a warm solution of the mild detergent as instructed by the supplier.
Wet a cloth with this solution and wring it out. Use the moist cloth to clean the
outside of the unit. Do not allow freely running liquid to touch the controls, the
control panel, any electrical part, or any louver on the rear panels.
2. To remove material which may be stuck to the unit, use a ber brush or a
plastic or rubber scraper with a mild detergent solution.
3. Stainless steel surfaces may be polished with a recognized stainless steel
cleaner. Do not scrub across the grain of any stainless steel.
INTERIOR CLEANING
Daily cleaning must be done in order to enhance the performance and prolong the
life of your Boilerless Steamer.
1. Press the power button to off and open steamer door. Allow the steamer to cool
completely before cleaning.
2. Remove steam lid by grasping the horizontal ange located on the lid front and
sliding pan forward. Wear heat resistant hand coverings if the steam lid is hot.
3. Remove left pan rack by lifting rack up and pulling away from cavity wall.
4. Remove right fan shroud and rack assembly by lifting rack up and pulling
away from cavity wall.
5. Clean steam lid, left pan rack and right pan rack/shroud assembly to remove
food soils. These three parts may be cleaned in a dishwasher.
6. Use a mild detergent to wipe down the entire steamer cavity to remove food
and scale particles. Carefully clean probes if food residue or loose scale is
present. A thin layer of tightly bound scale is normal and will not affect steamer
performance. If scale is excessive, then refer to deliming instructions below.
7. Clean cup and overow drains per instructions in “Cup & Overow Drains”
section.
8. Remove drain strainer and clean thoroughly to remove any build-up of debris.
9. Replace pan racks and steam lid. Steamer is now cleaned and ready to use.
DELIMING
The steamer control monitors the water level probes for cleanliness and to ensure
continuous steamer operation and reduce the need for service repair due to
probe cleaning issues. The control will display an advanced cleaning warning in
the event probe cleaning is required. Despite the warning, the steamer operation
will continue for a limited period of time of 8 hours and countdown clock will
be displayed. The countdown clock indicates how much time is available to the
operator to complete cooking process or regiment before the clock expires and
unit shutdowns automatically.
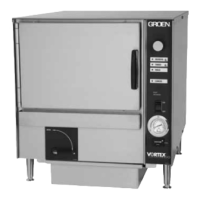
Settings
Performing self-diagnostic
DELIME button is only displayed during startup if the DELIME button is turned to
ON in settings menu. The default setting for DELIME button is OFF. The DELIME
REMINDER will provide you status visuals of where you are in the deliming
schedule. When the reminder is ON, the DELIME button will do the following:
• When 75% of the delime schedule has been reached, the DELIME button will
turn yellow
• When 90% of the delime schedule has been reached, the DELIME button will
turn yellow
• Upon expiration of the DELIME schedule, the DELIME button will turn red
• the DELIME button will return to normal after deliming has been completed or
the reminder is reset
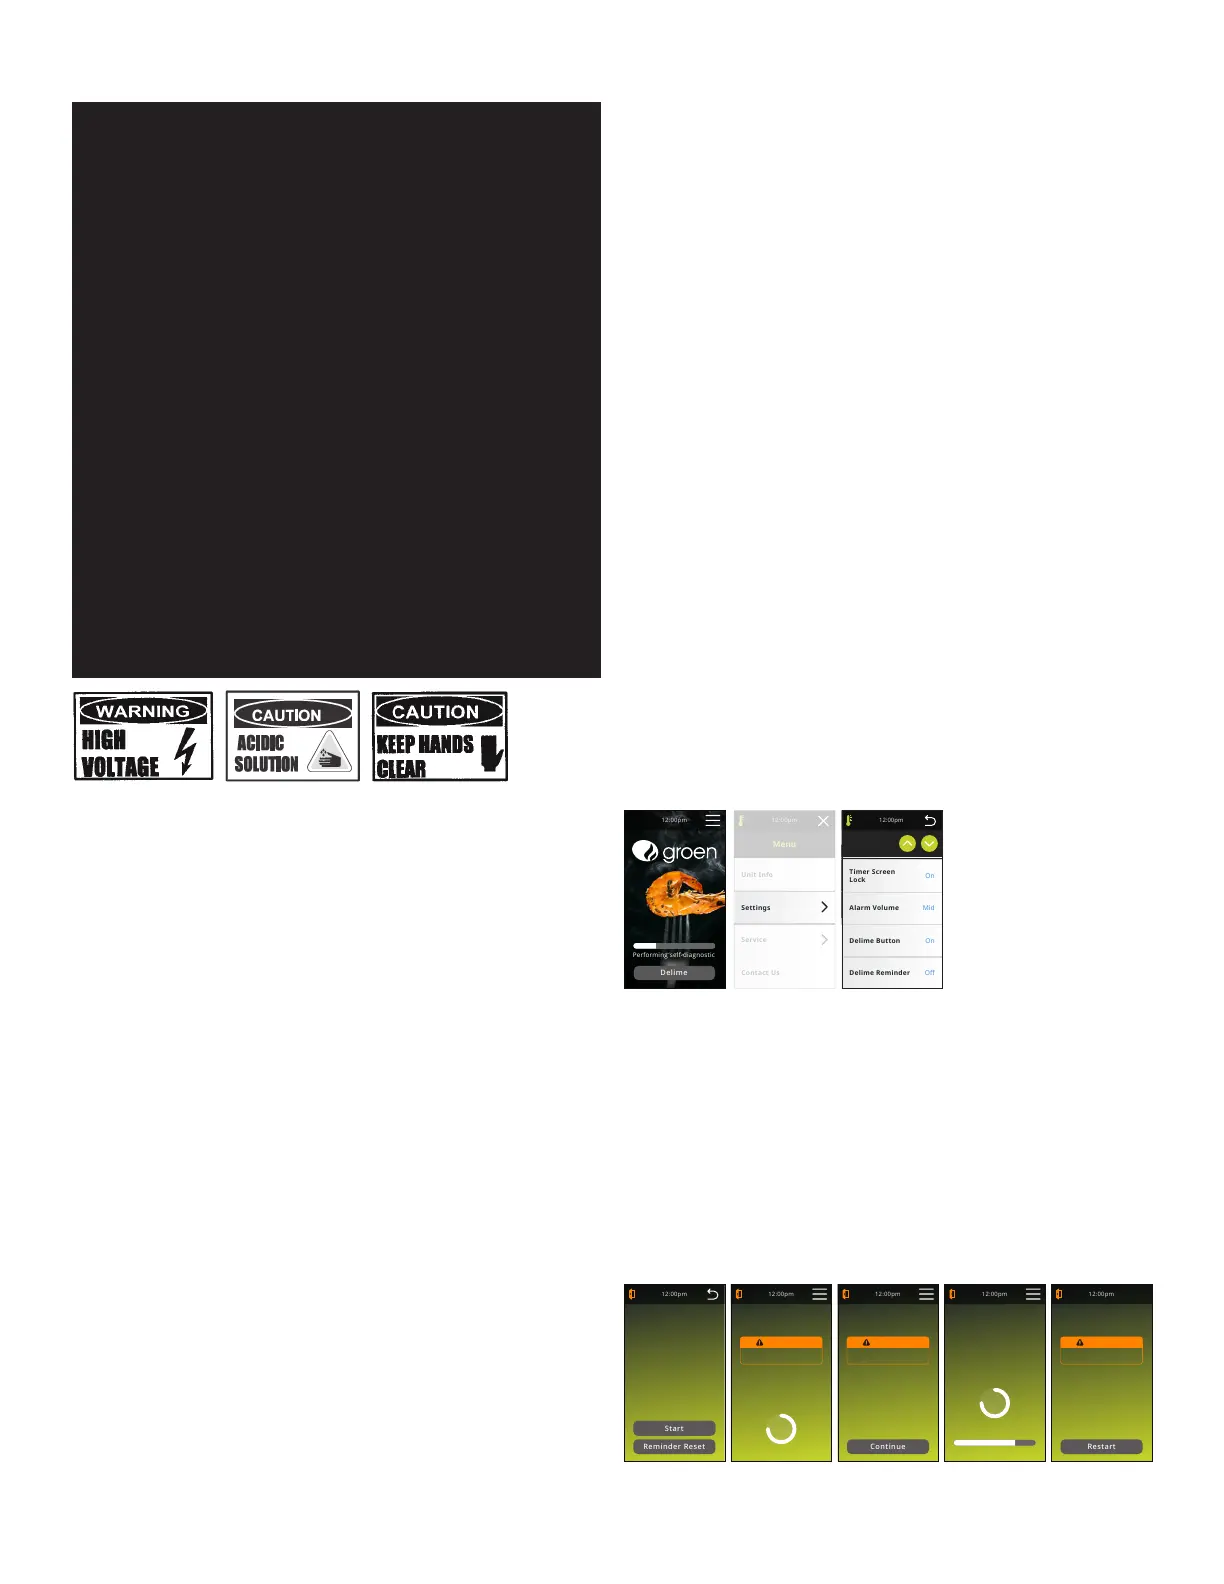
Delime
Prepare Cavity
Remove Fan Shroud, Racks
and Steam lid. Please wait
a few minutes to allow
reservoir to fill with water.
WARNING
Hot Surfaces. Exercise caution
when removing hot components.
Delime
In Progress
Delime process has
begun. Process will take
approximately 60-90
minutes to complete.
Delime
Add Solution
Using caution, add specified
amount of approved
Deliming Solution into
water reservoir. Close door
and press continue.
WARNING
Hot Surfaces. Exercise caution when
touching interior compartment.
Delime
Complete
Allow unit to cool prior to
wiping out interior. Clean all
probes, steam lid, drip cup
and overflow drains. Replace
interior components. Press
restart to use the steamer or
push the Power Button to
turn off the unit.
WARNING
Hot Surfaces. Exercise caution when
touching interior compartment.
Delime
Process Note
Prior to starting the
Delime process, review the
Operator's manual for
detailed instructions and
warnings.

 Loading...