7
OPERATION
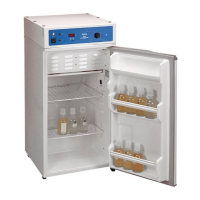
4.1 Check power supply against unit serial plate. They must match.
4.2 Plug service cord into the grounded electrical outlet. The power switch
must be in the I/On position before the unit will operate (this includes both
chambers on the 207).
4.3 Turn the High Limit thermostat to its maximum position (clockwise).
4.4 Set Main Temperature Controller: Enter desired set point temperature.
To enter set point mode on the controller, press either the Up or Down
arrow pad one time. The digital display will start to blink, going from bright
to dim. While blinking, the digital display is showing the set point. To
change the set point, use the Up and Down arrow pads. If the arrow pads
are not pressed for five (5) seconds, the display will stop blinking and will
read the temperature of the unit. Note that the High Limit Thermostat
should be turned to its maximum position, (clockwise) until the unit has
stabilized at desired set point temperature. Allow the incubator at least 24
hours to stabilize.
4.5 Calibrating the Main Temperature Controller: It is recommended that
calibration is done once the unit is installed in its working environment and
has been stabile at set point for several hours. Place a certified reference
thermometer in the chamber and allow the temperature to stabilize again
until the thermometer reads a constant value for one hour. Compare the
digital display with the reference thermometer. If there is an unacceptable
difference, put the display into calibration mode by pressing both the Up
and Down arrow pads at the same time until the two outside decimal points
begin to flash. While the decimal points are flashing the display can be
calibrated by pressing the Up or Down arrow pads until the display reads
the correct value. If the arrow pads are not pressed for five (5) seconds, the
display will stop blinking and will return to read the temperature of the
chamber. Allow the incubator temperature to stabilize again, and
recalibrate if necessary.
Sectio