Keep the sample lines as short as possible to prevent the accumulation of bottom sediment. The
sediment can absorb some of the analyte from the sample and cause low readings. The sediment
can later release the analyte and cause high readings. This exchange with the sediment also causes
a delayed response when the analyte concentration in the sample increases or decreases.
Figure 5 Sampling methods
1 Air 2 Sample flow
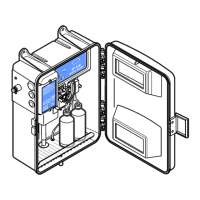
3.2.4 Install the pump valve pressure plate
The pressure plate and screws are supplied with the installation kit. Remove the tape from the pump
tubes before installation.
Make sure to turn the screws in small increments and move from one screw to the other so that the
plate is pulled down equally. Do not overtighten. To install the pressure plate, refer to Figure 6.
Figure 6 Install the pressure plate
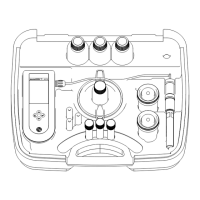
3.2.5 Install the sample conditioning kit
The sample conditioning kit is supplied with the instrument. The kit removes large particles from the
sample stream with a 40-mesh strainer. The ball valve on the raw sample inlet controls the flow to
the filter. The ball valve on the instrument supply line controls the flow rate of filtered sample to the
instrument. For complete sample conditioning installation instructions, refer to the installation kit
documentation. Refer to Figure 7.
English
11