6. Tighten the screws on the pump pinch plate. Do not overtighten.
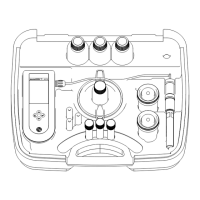
7. Remove the syringe from the tubing and connect the fitting on the colorimeter.
Section 6 Calibration
C A U T I O N
Chemical exposure hazard. Obey laboratory safety procedures and wear all of the
personal protective equipment appropriate to the chemicals that are handled. Refer to
the current safety data sheets (MSDS/SDS) for safety protocols.
6.1 Complete a 2-point calibration
Complete a calibration after reagent installation or when an optical system component is replaced.
The standardization procedure makes the sample first hard, then soft.
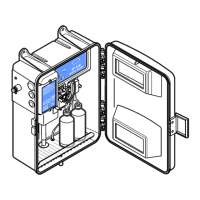
1. Remove the plug from the top port of the colorimeter. Refer to Figure 13 on page 16.
2. Push HARD CAL. The hard cal LED is on continuously.
3. When the hard cal LED flashes, add two drops of Magnesium Standard Solution into the
colorimeter.
4. When the LED stops flashing and is on continuously, wait for the cycle to complete.
At the end of the cycle, the LED sets to off to show a successful calibration.
5. HARD CAL failure: When the LED starts to flash, push HARD CAL to confirm a hard cal failure.
Do steps 2–4 again.
6. Push ZERO CAL. The zero cal LED is on continuously.
7. When the zero cal LED flashes, add two drops of EDTA Solution, 10 g/L, into the colorimeter.
8. When the LED stops flashing and is on continuously, wait for the cycle to complete.
At the end of the cycle, the LED is set to off to show a successful calibration.
9. ZERO CAL failure: When the LED starts to flash, push ZERO CAL to confirm a zero cal failure.
Do steps 1–7 again.
10. Replace the plug in the top port of the colorimeter.
Section 7 Operation
After the instrument power is set to on, the SOFT LED flashes until the first reading cycle is
completed. The cycle takes 2 minutes. Then, the SOFT LED shows a stable green light.
The HARD LED comes on with a red light when the sample reagent mixture measurement is higher
than the trip point for one measurement. Push ALARM OFF to set the alarm relay to off. The ALARM
OFF light will show a yellow light.
The instrument operates maintenance-free for a minimum of 2 months. Periodically, do a visual
check to see if bubbles are in the tubing. If there are bubbles, look for an air leak. Refer to
Maintenance schedule on page 19 for maintenance tasks.
Section 8 Maintenance
D A N G E R
Multiple hazards. Only qualified personnel must conduct the tasks described in this
section of the document.
18 English