p. 11 p. 12
Bicycle safety
Before connecting the bicycle trailer to your bicycle, ensure your bicycle is suitable for towing a trailer according to the bicycle
manufacturer’s instruction and is equipped with well functioning brakes. It is recommended that the bicycle to which the trailer
will be aached undergoes a safety check by a qualified bicycle mechanic before aaching the trailer. Bicycle trailers pulled by
an EPAC can be restricted by law.
Riding behavior
When towing a trailer, your bicycle behaves heavier and less responsive due to the added weight. Familiarize yourself with this
behavior by practicing with a loaded trailer in a quiet area before entering crowded public roads with passengers.
Be aware that due to the weight of the trailer, your bicycle has a longer braking distance. Use caution when driving downhill, as
your bicycle will gain speed more rapidly.
Do not exceed the maximum speed specified in this manual and slow down when making turns and on rough roads. Avoid riding
over rocks, curbs or other obstacles that may cause the trailer to tip over. Using the trailer in unfavorable weather, road or traffic
conditions can result in unsafe situations. Always use good judgement when deciding if conditions are safe to use the trailer.
High visibility
For optimal visibility and safety in traffic, the multifunctional carrier has front (white), rear (red) and wheel (orange) reflectors.
Reflective piping is integrated in the outer fabric. When using the carrier as a bicycle trailer, you also need to apply the orange
safety flag for even beer visibility [8]. Use the rear light that is included see [16].
Intended use
• the trailer is intended for transportation of children as specified in this manual on public roads with light traffic, sidewalks and
smooth paths. Hamax considers using the trailer in any other way as unintended use, including but not limited to:
• riding with excessive speed
• riding on rough off-road conditions
• using the trailer for commercial purposes
• transporting animals
• storing luggage in areas inside or outside the trailer other than in the trailer’s luggage compartment
• towing the trailer by motorized vehicles
• failing to comply with the instructions in this manual
GETTING STARTED INSTALLATION
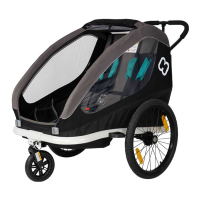
[1] Packaging content
• Trailer body (1x) [1a]
• Quick release wheel (2x) [1b]
• Bicycle arm (1x) [1c]
• Safety flag (1x) [1d]
• Stroller wheel (1x) [1e]
• User manual Hamax Traveller (1x)
[2] Product overview
• Push bar [2a]
• Front cover pocket [2b]
• Front cover [2c]
• Seat paddings [2d]
• Stroller wheel aachment [2e]
• Parking brake [2f]
• Wheel guard [2g]
• Bicycle arm aachment [2h]
• Push bar release handle [2i]
• Seat backrest rear [2j]
• Storage space [2k]
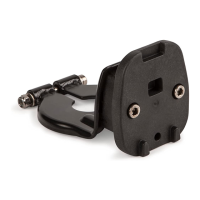
[3] Aaching the hitch on your bicycle
• Remove quick-release or nut [3a] from the le side of your bicycle’s rear wheel axle. Place hitch [3b] between quick-release or
nut and frame. Put the quick-release or nut back on and tighten according to the bicycle manufacturer’s instructions.
• Point the hitch to the rear. Keep the alignment / angle between hitch and bicycle arm as straight as possible.
[4] Mount the wheel guards
• Place the two wheel guards [4a] in the 2 holes on the side of the frame. Fasten the screw [4b] from the boom inside of the
frame. Use the allen key provided with the wheel guards.
[5] Unfolding the trailer
• Grab the rear frame [5a] inside the rear storage compartment [2k] and pull it backwards. While doing this you can push the top
frame [5b] forward.
• The folding locks [6a] lock automatically and you hear a clicking sound .
• Verify that the folding mechanism is locked by trying to push the rear frame forward.
• Insert the push bar [5c] into the pushbar connection [12a], push the pushbar buons [12b] and push the pushbar in further untill
it locks. Place the pushbar in its highest position when you go cycling [12c].
[6] Folding the trailer
• Remove the pushbar while pushing the buons [12].
• Pull both folding locks [6a] and push forward the frame untill it folds.
• Gently push the top frame down into its folded position and fold the fabrics into the trailer.
[7] Mounting the quick release wheels
• Ensure that the parking brake is not engaged [2f] and that the wheel axle [7a] is clean.
• Press the push buon [7b] and insert the wheel axle into the socket. Verify that the wheel is securely fastened by pulling the
wheel.
[8] Mounting the safety flag
• Place the flag pole [8a] in the hole [8b] next to the push bar. If needed open the luggage compartment in order to find the flag
pole hole. Place the flag pole on the side of the bicycle trailer that is most exposed to the road.
USE
[9] Using the stroller wheel
• To aach: Insert the pin of the stroller wheel [1e] into the stroller front connection [9a]. Verify that the wheel is securely
fastened by pulling the stroller wheel.
• To remove: Push the buon [9b] to unlock and pull the stroller wheel [1e ] out of the front connection [9a].
• When strolling you can store the bicycle arm [1c] in a backwards position into the bicycle arm aachment [10a] [19]. Don’t use
the bicycle arm buon [10b] in this position.
[10] Aaching the bicycle arm to the trailer
• Slide the bicycle arm [1c] into the bicycle arm aachment [10a].
• Push the bicycle arm buon [10b] and push the arm in further untill it clicks.
• Insert the locking pin [10c] in order to make a safe connection. Rotate the locking pin [10c] towards the back and snap it over
itself. Pull on the bicycle arm to verify a good connection.
[11] Aaching the bicycle arm to the bicycle
• Securely aach the bicycle arm & safety strap prior to use. Ensure that the trailer is unloaded when aaching & disconnecting
it to/from your bicycle.
• Slide the bicycle arm onto the hitch [11a]. Insert the locking pin [11b] through the hole in bicycle arm and close it. Verify that the
bicycle arm is securely fixed by pulling the bicycle arm. Wrap safety strap around the bike frame and fasten the hook to the
triangular plate [11c].
• Make sure that you put the safety strap around the chain stay [11d] or seat stay [11e] of your bicycle frame.
TIP: When you are not using the bicycle arm you can store it in the trailer
TIP: When the safety strap is too long you can wrap it twice aroun d the frame to ensure that the strap does not interfere
with any moving part of the rear wheel.
[12] Adjusting the push bar [2a]
• Take out the pushbar [2a] by pushing the pushbar locking pins [12b] on each side and pull the pushbar out.
• Adjust the pushbar 180 degrees to the desired low [12d] or high position [12c].
• Insert the push bar [5c] into the pushbar connection [12a], push the pushbar buons [12b] and push the pushbar in further untill
it locks. Place the pushbar in its highest position when you go cycling [12c].
[13] Using the parking brake
• To engage: Push the parking brake lever [13a] downwards until the buon [13b] pops out and the lever is locked. You may need
to move the trailer slightly back and forth for the brake pin near the wheel to find its hole. Always be sure to check if the brake
is engaged by pushing the trailer.
• To disengage: Push the release buon [13b] with the tip of your foot and the lever [13a] rotates upwards.
[14] Front covers and shades
• The Traveller has 3 front covers: a plastic cover [14a], a mesh cover [14b] and an additional sun shade [14d]. The plastic and
mesh cover can be fixed at the boom using the hooks just above the frame [14c].
• To fix the sunshade use the velcro pieces [14e]: 4 for short or 6 for full length. To shorten the sunshade [14d], fold it and fix the
boom velcro pieces to the top velcro pieces [14f].
• When not in use, the covers can be stored in the pocket [14g]. Close the pocket using the buons to prevent the covers from
falling out during a ride.
[15] 5-point safety harness
• Seat your child and guide the arms through the opening between the shoulder [15a] and waist belt [15b]. Check that the
shoulder straps are aligned with your child’s shoulders. Adjust the height by sliding the buckles [15e] above the headrest up or
down.
• Connect the two shoulder strap buckles together and insert them into the buckle [15c] on the crotch strap [15d] until it locks.
Adjust the length of the crotch strap and the shoulder belts so that your child is securely tightened. Verify that the safety
harness is locked by pulling both shoulder belts.
 Loading...