5
2.0 OPERATION
2.1 Minimum/Maximum operating conditions
A. Maximum inlet air pressure: refer to dryer serial number
tag
B. Minimum inlet air pressure: 30 psig (2.1 kgf/cm
2
)
C. Maximum inlet air temperature: 120°F (49°C)
D. Maximum ambient temperature:
Air-cooled models: 110°F (43°C)
Water-cooled models: 130°F (54°C)
E. Minimum ambient temperature: 45°F (7°C)
2.2 Start-up
A. Energize dryer. Green power on light will illuminate.
IMPORTANT: Energize dryer disconnect switch (provided
by others, sec NEC) 24 hours before refrigeration com-
pressor is started! Never use the disconnect switch to
shutdown the dryer for a extended period of time (except
for repair). Failure to follow these instructions may result
in a non-warrantable compressor failure.
NOTE: If there is no power to the control board for a
period of two weeks or more, it may return to the default
mode.
B. Program Monitor
Press and hold the ‘Day of the Week’ button until Main Menu
screen appears. Use the ‘Hour’ and ‘Minute’ buttons to scroll
through the list of submenu choices. Press the ‘Set/Run’
button to view the submenu that is displayed. Press the ‘Day
of the Week’ button to exit the Main Menu and return to
Display mode.
1. Language selection
a. Use the ‘Hour’ and ‘Minute’ buttons to scroll through
the list of languages (choice of 10 available: English,
Deutsch, Francais, Espanol, Italiano, Polski, Dansk,
Dutch, Norsk and Suomi).
b. Press the ‘Set/Run’ button to select the language that
is displayed.
c. Push the ‘Day of the Week’ button at any time to return
to the Main Menu.
2. Setting Date & Time
a. Use the ‘Hour’ and ‘Minute’ buttons to set minutes (00
to 59). Press the ‘Set/Run’ to accept new value.
b. Use the ‘Hour’ and ‘Minute’ buttons to set hours (00 to
23). Press the ‘Set/Run’ button to accept new value.
c. Use the ‘Hour’ and ‘Minute’ buttons to set year (00 to
99 representing 2000 to 2099). Press the ‘Set/Run’
button to accept new value.
d. Use the ‘Hour’ and ‘Minute’ buttons to set month (three
letter abbreviation). Press the ‘Set/Run’ button to
accept new value.
e. Use the ‘Hour’ and ‘Minute’ arrow buttons to set day
(01 to maximum for the month and year selected).
Press the ‘Set/Run’ button to accept new value.
f. Push the ‘Day of the Week’ button at any time to return
to the Main Menu.
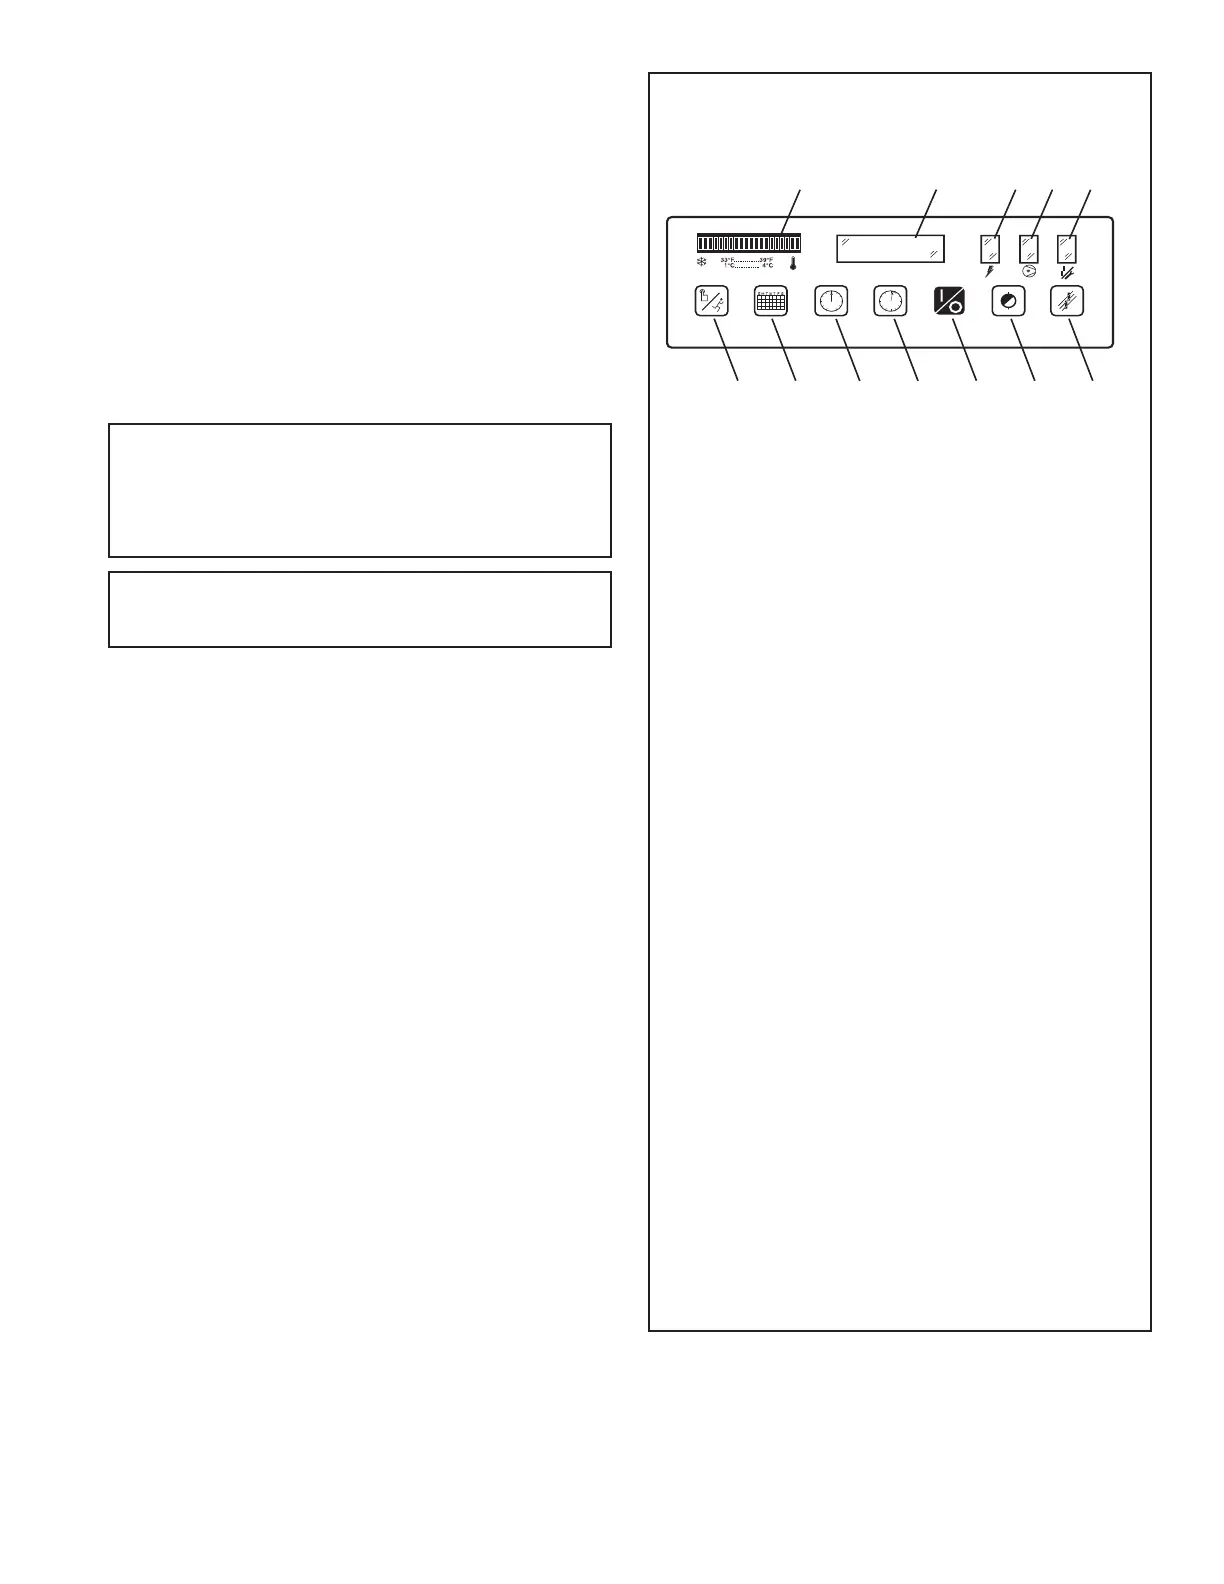
1 2345
6
78
910
11
12
1. Temperature Indicator
2. Operator Interface Display
3. Power-on Light
4. Compressor-on Light
5. Alarm / Service Light
6. Set/Run Button
a. In display mode: Press to toggle between
SCHEDULE RUNNING and MANUAL
OVERRIDE.
b. In program mode:
i. Press to move to a lower level menu.
ii. Press to accept a value that has been edited.
7. Day of the Week Button
a. In display mode: Press and hold to enter program
mode.
b. In program mode: Press to move to a higher level
menu.
8. Hour Button
a. In display mode: No function
b. In program mode:
i. Press to view the next item in a list or to
increment a variable to a higher value. Press
and hold for accelerated incrementing.
ii. When the top of the list (or highest value) is
displayed, pressing the hour button will cause
the display to wrap to the bottom of the list (or
lowest value).
9. Minute Button
a. In display mode: No function
b. In program mode:
i. Press to view the previous item in a list or to
increment a variable to a lower value. Press
and hold for accelerated incrementing.
ii. When the bottom of the list (or lowest value)
is displayed, pressing the minute button will
cause the display to wrap to the top of the list
(or highest value).
10. 1/0: Press at any time to turn the dryer on/off.
11. Drain test: Press at any time to momentarily the
open drains (like the current emm).
12. Reset: Press at any time to clear the alarm/service
message (if shown) and the alarm LED.
CONTROL PANEL