Do you have a question about the Harman Kardon AVR 330 and is the answer not in the manual?
Explains how remote and front-panel controls are indicated in text.
Explains how on-screen messages are indicated in text.
Explains how front-panel controls are indicated in text.
Explains how rear-panel connections are indicated in text.
Explains how remote control buttons are indicated in text.
Explains how Zone II remote buttons are indicated in text.
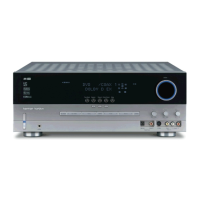
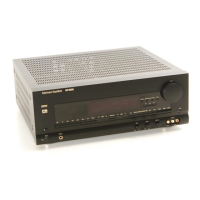
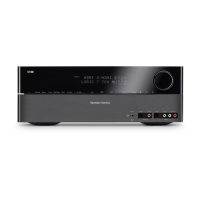
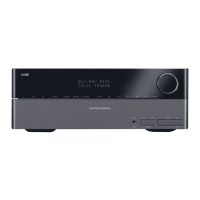
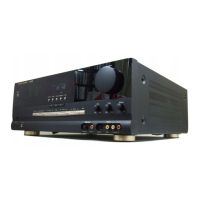
Introduces the AVR 330 and its capabilities.
Details the versatile and multi-featured nature of the AVR 330.
States compliance with Canadian ICES-003 standard.
Warns about electric shock hazards and proper plug usage.
Advises checking the unit's voltage compatibility before use.
Advises against using extension cords for safety.
Provides guidance on handling the AC power cord.
Warns against opening the cabinet due to shock hazard.
Explains CATV/antenna grounding for surge protection.
Provides guidelines for proper unit placement and ventilation.
Details how to clean the unit safely.
Advises on disconnecting before moving the unit.
States FCC compliance and interference guidelines.
Instructions for unpacking and saving packaging materials.
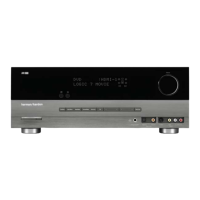
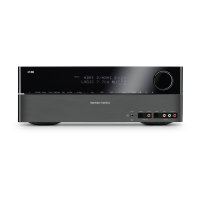
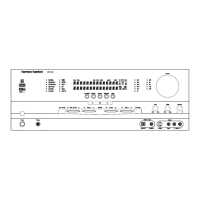
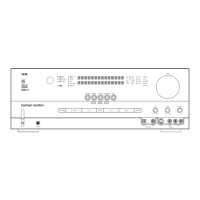
Visual representation of the AVR 330's front panel layout.
Explains how to use the main power switch.
Describes the function of the power indicator LED.
Explains how to turn the unit on and off from standby.
Details how to use the headphone jack for private listening.
Explains how to enable or disable Bass and Treble controls.
Describes the button for configuring speaker settings.
Allows selection of different surround mode groups.
Allows cycling through available surround modes.
Controls tuning up or down for stations.
Buttons used for selecting choices in settings.
Selects between AM and FM frequency bands.
Enters desired settings into memory during setup.
Selects digital or analog inputs for sources.
Scrolls through stored radio stations.
Initiates the process for entering delay settings.
Changes the input source by scrolling through indicators.
Selects between Auto and Manual tuning modes.
Connects optical digital audio output from devices.
Connects coax digital audio output from devices.
Jacks for temporary connection of video sources.
Audio jacks for temporary connection of video sources.
Adjusts low-frequency output of left/right channels.
Changes relative volume for front left/right channels.
Adjusts high-frequency output of left/right channels.
Initiates trimming channel output levels.
Controls the system volume.
Shows the currently selected source.
Displays speaker type and incoming data signal.
Shows messages like current input source.
Shows messages like current surround mode.
Indicates the currently selected surround mode.
Receives infrared signals from the remote control.
Connects to optional external audio/video distribution systems.
Connects to analog audio output of CD players.
Connects to audio recorder input jacks.
For connecting an external remote sensor.
Connects an IR sensor for remote room control.
Allows receiver's IR sensor to control other devices.
Connects to an external power amplifier.
Connects to the line-level input of a powered subwoofer.
Connects to front left and right speakers.
Powers surround back or second zone speakers.
Connects to surround left and right speakers.
Connects to the center channel speaker.
Connects HDTV set-top box component video.
Connects DVD player component video outputs.
Outputs to video projector or monitor.
Ventilation holes for airflow system.
Connects the unit to a non-switched AC wall outlet.
Powers accessory devices when the unit is on.
Powers accessory devices regardless of unit status.
Connects to digital input on recorders.
Connects to digital input on recorders.
Connects to TV monitor or video projector S-Video input.
Connects digital audio from sources.
Connects DVD player S-Video output.
Connects Video 1 source S-Video output.
Connects digital audio from sources.
Connects to video recording device S-Video input.
Connects Video 2 source S-Video output.
Connects discrete analog outputs from sources.
Connects to video recording device S-Video input.
Connects Video 3 source S-Video output.
Connects to TV monitor composite video input.
Connects DVD player composite video and audio.
Explains the color-coding for rear panel connections.
Connects to an external power amplifier for higher power.
Connects to the line-level input of a powered subwoofer.
Connects to front left and right speakers.
Powers surround back or second zone speakers.
Connects to surround left and right speakers.
Connects to the center channel speaker.
Connects HDTV set-top box component video.
Connects DVD player component video outputs.
Outputs to video projector or monitor.
Ventilation holes for airflow system.
Connects the unit to a non-switched AC wall outlet.
Powers accessory devices when the unit is on.
Powers accessory devices regardless of unit status.
Connects to digital input on recorders.
Connects to digital input on recorders.
Connects to TV monitor or video projector S-Video input.
Connects digital audio from sources.
Connects DVD player S-Video output.
Connects Video 1 source S-Video output.
Connects digital audio from sources.
Connects to video recording device S-Video input.
Connects Video 2 source S-Video output.
Connects discrete analog outputs from sources.
Connects to video recording device S-Video input.
Connects Video 3 source S-Video output.
Connects to TV monitor composite video input.
Connects DVD player composite video and audio.
Connects VCR/video source composite video and audio.
Connects VCR/video recorder composite video and audio.
Connects VCR/video source composite video and audio.
Connects VCR/video recorder composite video and audio.
Connects VCR/video source composite video and audio.
Connects audio recorder PLAY/OUT jacks.
Connects the AM loop antenna.
Connects the FM antenna.
Visual representation of the main remote control buttons.
Places the AVR 330 or selected device in Standby.
Transmits infrared commands from the remote.
Guides programming and indicates level settings.
Turns on the power to a selected device.
Selects input sources and controls devices.
Switches the remote to control the AVR 330.
Selects the AVR 330's tuner and AM/FM bands.
Activates the dimmer function for the display.
Initiates the output level calibration sequence.
Places the unit in Sleep mode for automatic shutdown.
Cycles through DSP, VMAX, and Stereo surround modes.
Activates Night mode for dialogue intelligibility.
Starts setting AVR 330 output levels to an external source.
Used for scrolling menus and adjusting settings.
Used for changing menu selections during setup.
Enters settings into memory and confirms adjustments.
Assigns digital inputs to a source.
Used for entering preset positions or track numbers.
Selects between automatic and manual tuning.
Starts sequence for direct entry of station frequency.
Tunes stations up or down by frequency band.
Activates the On-Screen Display system for setup.
Selects available Dolby Surround processing modes.
Selects available DTS modes for digital sources.
Selects available Logic 7 surround modes.
Changes discs on compatible changers or skips tracks.
Programmed for playback operations of various devices.
Selects stereo listening modes, including surround off.
Selects DTS Neo:6 modes for surround sound.
Stores or recalls preprogrammed command sequences.
Changes to the next disc in a changer or carousel.
Scrolls through tuner presets or advances tracks/chapters.
Clears incorrect entries when entering data.
Stores radio stations into preset memory.
Initiates setting delay times for surround sound.
Configures bass management system for speaker types.
Activates multiroom system or changes second zone input/volume.
Raises or lowers the system volume.
Switches between player output and external video input.
Activates the EzSet function for output level calibration.
Selects audio source from 8-Channel Direct Inputs.
Momentarily silences the AVR 330 or TV set.
Location for the EzSet microphone on the remote.
Notes on programming the remote for various devices.
Places the AVR 330 or selected device in Standby.
Transmits infrared commands from the remote.
Guides programming and indicates level settings.
Turns on the power to a selected device.
Selects input sources and controls devices.
Switches the remote to control the AVR 330.
Selects the AVR 330's tuner and AM/FM bands.
Activates the dimmer function for the display.
Initiates the output level calibration sequence.
Places the unit in Sleep mode for automatic shutdown.
Cycles through DSP, VMAX, and Stereo surround modes.
Activates Night mode for dialogue intelligibility.
Starts setting AVR 330 output levels to an external source.
Used for scrolling menus and adjusting settings.
Used for changing menu selections during setup.
Enters settings into memory and confirms adjustments.
Assigns digital inputs to a source.
Used for entering preset positions or track numbers.
Selects between automatic and manual tuning.
Starts sequence for direct entry of station frequency.
Tunes stations up or down by frequency band.
Activates the On-Screen Display system for setup.
Selects available Dolby Surround processing modes.
Selects available DTS modes for digital sources.
Selects available Logic 7 surround modes.
Changes discs on compatible changers or skips tracks.
Programmed for playback operations of various devices.
Selects stereo listening modes, including surround off.
Selects DTS Neo:6 modes for surround sound.
Stores or recalls preprogrammed command sequences.
Changes to the next disc in a changer or carousel.
Scrolls through tuner presets or advances tracks/chapters.
Clears incorrect entries when entering data.
Stores radio stations into preset memory.
Initiates setting delay times for surround sound.
Configures bass management system for speaker types.
Activates multiroom system or changes second zone input/volume.
Raises or lowers the system volume.
Switches between player output and external video input.
Activates the EzSet function for output level calibration.
Selects audio source from 8-Channel Direct Inputs.
Momentarily silences the AVR 330 or TV set.
Details how to select audio source with 8-Channel Direct Inputs.
Momentarily silences the AVR 330 or TV set.
Notes on not covering the EzSet microphone slots.
Visual representation of the Zone II remote control buttons.
Turns the Multiroom system on and off.
Turns on the AVR 330 and selects the last used input.
Selects the Tuner as the input for the Multiroom system.
Selects specific inputs and turns the unit on.
Changes tuner frequency or controls Fast Play/Reverse.
Activates Record or Pause on compatible devices.
Scrolls tuner presets or skips tracks/chapters.
Changes discs on compatible changers.
Raises or lowers the volume in the remote room.
Controls compatible CD, DVD, or cassette players.
Temporarily silences the feed to the remote room.
Notes on using the Zone II remote in the same or different rooms.
Initial steps after unpacking for system setup.
Advises turning off and unplugging before making connections.
Instructions for connecting various audio sources.
Connects analog output of CD player to CD Audio Inputs.
Advises using fixed output unless input is too low.
Connects cassette/MD/CD-R to Tape Input/Output jacks.
Connects digital outputs from CD/DVD changers, tuners, etc.
Connects AVR digital outputs to digital recorders.
Guides assembly and connection of the AM loop antenna.
Connects FM antenna, including 300-to-75-ohm adapter use.
Connects speaker outputs to the respective speakers.
Advises using high-quality speaker cable for clarity.
Recommends cable gauge (14 or smaller) for optimal performance.
Notes standards for cables run inside walls.
Emphasizes correct polarity for speaker connections.
Advises checking speaker identification plates for polarity.
Recommends using identical cable lengths for speaker pairs.
Explains connecting to powered or passive subwoofers.
Instructions for connecting various video sources.
Connects VCR/PVR audio and video to receiver.
Connects satellite/cable box audio and video to receiver.
Connects DVD player audio and video to receiver.
Connects DVD/HDTV converter digital audio to receiver.
Connects receiver's monitor outputs to TV/projector.
Connects DVD player component video to receiver.
Connects Video 2 component video to receiver.
Connects receiver's component video outputs to display.
Connects temporary video/audio sources to front panel.
Notes on component video, signal conversion, and multiple formats.
Guide for multiroom systems, external components, and power.
Instructions for extending remote control range.
Connects remote room IR receiver to AVR 330.
Details three options for connecting audio to a second zone.
Information on using accessory AC outlets.
Overview of necessary configuration adjustments after connections.
Guidance on speaker placement for optimal sound quality.
Recommendations for positioning front left, center, and right speakers.
Guidelines for positioning surround and surround back speakers.
Methods for finding the optimal subwoofer location.
Steps for programming bass management, calibrating levels, and setting delay.
Instructions for powering on the unit to begin setup adjustments.
Reminder to remove protective film from the front panel lens.
Instructions for installing batteries in the remote control.
Steps to power on the unit using front panel or remote.
Explanation of how to use the OSD system for adjustments.
States the need for a video connection to view OSD menus.
Warns about potential image retention from static OSD displays.
Guidance on using Semi-OSD and Full-OSD modes for adjustments.
Steps for configuring each input source's settings.
How to associate digital inputs with selected input sources.
Using front panel buttons to select digital or analog inputs.
Steps for setting the desired surround mode for inputs.
Recommendations for analog sources like movies or music.
How the AVR automatically selects modes for Dolby Digital/DTS.
Details available Dolby modes including Pro Logic and EX.
How to adjust the Night mode setting for Dolby Digital sources.
Details available DTS modes including Neo:6 for 5.1 and 7.1 systems.
Explains Logic 7 modes for 5.1 and 7.1 configurations and analog sources.
Details DSP modes like Hall, Theater, and VMAX for stereo sources.
Explains SURR OFF and 5/7 STEREO modes for stereo listening.
Guide to configuring speaker types (Large/Small) and bass management.
Setting speaker size and adjusting crossover points for optimal bass.
Configuring front speaker size and subwoofer bass management.
Setting center speaker size and a note regarding Logic 7 mode.
Configuring surround speaker size and notes on VMAX/phantom center.
Setting surround back speakers for 5.1 or 6.1/7.1 operation.
Setting subwoofer presence (SUB, LFE, or NONE) based on speaker setup.
Adjusting individual crossover points for speaker groups.
Finding and setting crossover points for front, center, surround speakers.
Choosing global or input-specific bass management settings.
Compensating for different speaker distances to listening position.
Selecting measurement units for speaker delay settings.
Entering distances for center, surround, and surround back speakers.
Importance of correct output levels for surround sound directionality.
Step-by-step guide to using EzSet for automatic output level setting.
Describes the EzSet process, indicators, and verification steps.
Notes that subwoofer output is not adjusted by the test tone.
Adjusting output levels manually using an SPL meter or test disc.
Steps to access and use the Channel Adjust menu for level trimming.
Activating test tone and verifying speaker connections and sound.
Using buttons to adjust individual speaker volume to match reference.
Steps to exit the Channel Adjust menu and return to Master Menu.
Setting up remaining inputs after initial configuration.
Returning to normal operation after all settings are made.
Introduction to operating the AVR 330 after initial setup.
Instructions for powering the unit on/off from standby or main power.
Setting the sleep timer for automatic power off.
How to select input sources using remote or front panel controls.
Using front panel inputs for temporary device connections.
How new input names appear on display when changing sources.
Allows viewing different video sources while listening to audio.
Selecting audio sources connected to the 8-Channel Direct Inputs.
Explains 6-channel direct input for sources with internal bass management.
Explains 8-channel direct input for sources with internal bass management.
Adjusting system volume and using balance/treble controls.
Momentarily silencing all speaker outputs.
Using the headphone jack for private listening.
Ability to reproduce surround sound from various sources.
Choosing modes based on program source material like movies or music.
How surround information is retained in stereo broadcasts.
Using front panel or remote to select surround modes.
Advancement over analog systems, delivering discrete channels.
Standard on DVD, satellite, and HDTV; requires RF demodulator for LD.
Capable of 5.1/6.1 discrete or matrix sound; requires digital output.
Connecting digital sources and potential backup analog signals.
Provides five main audio channels and LFE channel.
Latest Dolby Digital version for 6.1/7.1 operation.
Provides five main audio channels and LFE channel for DTS discs.
Decodes DTS-ES discrete or matrix for 6.1-channel sound fields.
Decodes matrix or stereo sources for full-range discrete channels.
Extracts maximum surround info from analog sources for wider soundstage.
Creates six-channel surround from matrix or stereo sources.
Creates center channel info and mixes surround to front channels.
Creates a sound field resembling a standard live-performance theater.
Creates sound fields resembling small and medium concert halls.
Delivers 3D sound with phantom speakers for two-channel sources.
Places stereo signal at front and back of room using multiple speakers.
Places stereo signal at front and back of room using multiple speakers.
Turns off surround processing for pure stereo presentation.
How the AVR senses and displays digital bitstream data types.
Explains the three-digit indications for discrete channels and LFE.
Displays PCM signal type and sampling frequency for CDs/LDs.
Unique indicators showing digital channels received or signal interruptions.
How the AVR senses changes in digital signal during playback.
Reminds user when digital signal is paused or stopped.
Enables playback of Dolby Digital sources with reduced peak levels.
Key considerations for digital playback compatibility and signal handling.
Playing PCM digital sources like CDs and LDs.
Tuning AM, FM, and FM Stereo broadcast stations.
Selecting stations manually or via preset memory.
Storing up to 30 stations in memory for easy recall.
Manually selecting stored stations by number or sequence.
Sending selected audio/video source to record outputs.
Recording digital signals using CD-R, MiniDisc, or Dolby Digital.
Digital outputs active only with digital signal, copyright restrictions.
Adjusting output levels using test tone or program material.
Setting reference volume and trimming levels using test signals.
Steps to exit menus after adjusting output levels.
System configuration and tuner presets preserved for approx. 4 weeks.
Using surround back amplifier channels for remote zone speakers.
Adjusting front panel display brightness for specific listening sessions.
Setting a specific volume level for when the unit is turned on.
One-line messages for control changes; can be turned off or time adjusted.
Instructions to disable semi-OSD display messages.
Setting the duration semi-OSD displays remain on screen.
Adjusting how long Full-OSD menus remain visible before disappearing.
Operating as control center for multiroom systems, sending one source to a second zone.
Feeding selected source to optional external power amplifiers.
Using surround back channels to power remote zone speakers.
Allows remote control commands from Zone II remote.
Complexity of multiroom systems and potential need for trained installers.
Configuring the AVR 330 for multiroom operation via menus.
Selecting the desired input for the multiroom system.
Setting the volume level for the second zone.
Using main or Zone II remote to control multiroom feed.
Notes that tuner station changes affect both main and remote rooms.
Turning the multiroom feed on or off from the main listening room.
Indicates MULTI-ROOM ON when unit is in standby.
Turning the multiroom system on or off from the remote room.
Controlling AVR 330 and other audio/video equipment.
Methods to program remote for devices from other manufacturers.
Easiest method to program remote using three-digit codes.
Alternative method for programming when codes are unknown or not working.
Finding the exact code used after Auto Search or for verification.
Repeating frequently used command combinations with one button.
Example of programming a macro to turn on multiple devices.
Steps to erase programmed macro command sequences.
How remote controls change function when operating other devices.
Tips on checking code sets and understanding button functions.
Programming remote to operate AVR 330 or TV volume control.
Programming remote to change channels on TV/cable box via another device.
Programming remote to control VCR/DVD/CD transport functions.
Pre-requisites and original configuration notes for punch-through.
Reprogramming input selectors to operate different device types.
Example of reassigning TV button to operate a second VCR.
Procedure to reset remote to factory defaults, erasing all entered data.
List of functions for Power, Mute, AVR, and Input Selector buttons.
List of functions for Device Selectors, Tuner, SPL, and Sleep buttons.
List of functions for Test, Volume, Surround, Night, and Multiroom buttons.
List of functions for Channel/Guide, Set, and Navigation buttons.
List of functions for Digital/Exit, Delay, and Numeric buttons.
List of functions for Tuner Mode and Memory buttons.
List of functions for Tune Up, Direct, Clear, Preset Up buttons.
List of functions for Tune Down, OSD, Disc Skip, and Dolby buttons.
List of functions for DTS Surr, DTS Neo:6, Logic 7, and Stereo buttons.
List of functions for Skip Down, Skip Up, Rewind, and Play buttons.
List of functions for Fast Forward, Record, Stop, and Pause buttons.
List of setup codes for TV brands from A to C.
List of setup codes for TV brands from D to G.
List of setup codes for TV brands from H to L.
List of setup codes for TV brands from L to P.
List of setup codes for TV brands from P to R.
List of setup codes for TV brands from S to T.
List of setup codes for TV brands from T to Z.
List of setup codes for VCR brands from A to E.
List of setup codes for VCR brands from F to L.
List of setup codes for VCR brands from M to P.
List of setup codes for VCR brands from S to Z.
List of setup codes for CD player brands from A to C.
List of setup codes for CD player brands from D to G.
List of setup codes for CD player brands from G to K.
List of setup codes for CD player brands from R to Y.
List of setup codes for DVD player brands from A to M.
List of setup codes for DVD player brands from N to Z.
List of setup codes for satellite receiver brands from A to O.
List of setup codes for satellite receiver brands from P to Z.
List of setup codes for Harman Kardon tape decks.
List of setup codes for cable box brands from A to P.
List of setup codes for cable box brands from R to Z.
Troubleshooting steps for power, display, and sound/picture issues.
Troubleshooting steps for sound issues related to modes or configuration.
Troubleshooting steps for remote command response and tuner interference.
Troubleshooting steps for digital audio feed pauses and fan operation.
Resetting the AVR 330's memory to factory defaults.
Technical details for stereo mode and seven-channel surround.
Technical details for the AM tuner section.
Technical details for video formats and frequency response.
Details on power, dimensions, and weight.
Technical details for the FM tuner section.
| Type | AV Receiver |
|---|---|
| Channels | 7.1 |
| Total Harmonic Distortion | 0.07% |
| Input sensitivity | 200 mV |
| Signal to noise ratio | 100 dB |
| Speaker load impedance | 8 ohms |
| Tuner | AM/FM |
| Supported Audio Formats | Dolby Digital, DTS, Dolby Pro Logic II |
| Frequency Response | 10 Hz - 100 kHz |
| Inputs | Digital Coaxial, Digital Optical, Analog Audio |
| Outputs | Component, Composite, S-Video, Digital Coaxial, Analog Audio, Subwoofer |