Do you have a question about the Hayward Super Pump Series and is the answer not in the manual?
Defines safety alert symbol, WARNING, CAUTION, and NOTICE.
Details hazards like hair, limb, body, evisceration, and mechanical entrapment.
Covers risk of electric shock, grounding, bonding, and GFCI requirements.
Advises on safe hot tub temperatures and risks of hyperthermia.
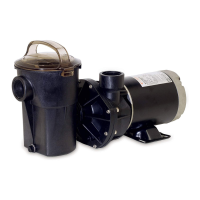
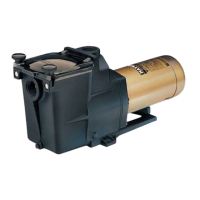
Manual covers proper installation and operation of Super Pump® 700 Series.
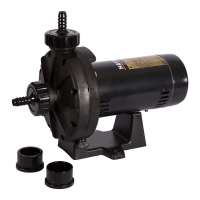
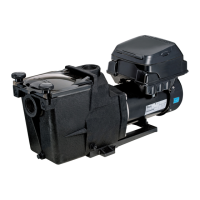
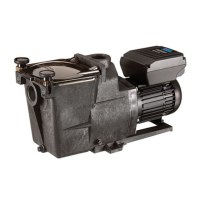
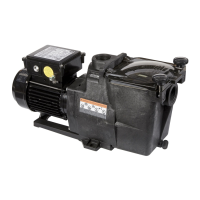
Highlights features like large basket, corrosion-proof construction, and uni-bracket base.
Provides dimensions and motor table for the pump series.
Guides on selecting a location, base, and mounting requirements for the pump.
Details pipe size recommendations, flow rates, and plumbing connection best practices.
Details wiring, grounding, bonding, and GFCI protection for electrical connections.
Step-by-step guide for safely starting and priming the pump.
Covers cleaning strainer basket, motor, and shaft seals.
Provides instructions for storing the pump, especially for winter.
Detailed procedure for removing and installing shaft seals and related parts.
Visual diagram and detailed list of all pump component part numbers.
Addresses problems like motor not starting, shutting off, or humming.
Guides on diagnosing and resolving issues related to the pump failing to prime.
Explains common causes and solutions for low flow and pump noise issues.
Outlines the 2-year limited warranty, exclusions, and claim procedures.
Instructions on how to register for a 90-day extended warranty using a smartphone.
Provides fields for recording installation date, pump model, and serial number.
This document serves as the owner's manual for the Hayward Super Pump® Series, providing comprehensive instructions for its installation, operation, and maintenance. The primary function of this device is to circulate water in residential pool and spa systems, ensuring proper filtration and water quality.
The Hayward Super Pump® Series is designed to provide efficient and continuous water circulation. It features a robust construction with a large strainer basket, ensuring extended periods between cleanings by accommodating a significant amount of debris. The pump is equipped with full-flow ports to facilitate rapid priming and maintain consistent operation. Its service-ease design allows for simple access to internal components, enabling the motor and drive group assembly to be removed with minimal effort, without disturbing existing pipe or mounting connections. This design simplifies maintenance and repair tasks, contributing to the longevity and reliability of the pump.
The pump is engineered for outdoor use, though protecting its electrical components from weather is recommended. It should be installed on a firm, level, rigid, and vibration-free base, secured with screws or bolts to minimize vibration and stress on pipe joints. Proper pump location is crucial, ideally as close to the pool as practical, with direct suction lines to reduce friction loss and continuous upward slope from the lowest point. It is essential to avoid damp or non-ventilated locations to ensure adequate air circulation for motor cooling.
For optimal performance and safety, the pump requires specific plumbing and electrical setups. Suction lines should have a diameter equal to or larger than the discharge line. When installing with 1.5" pipe diameter systems, a supplied bushing kit should be used. PTFE tape is recommended for sealing threaded plastic connections, but plumber's pipe dope should be avoided to prevent cracking. Fittings should be minimized to reduce flow restriction, and air traps must be prevented.
Electrical wiring must conform to local codes, regulations, and the National Electric Code (NEC). The pump must be properly grounded and bonded to the pool structure to prevent electrical shock hazards. A ground-fault circuit-interrupter (GFCI) protected circuit is mandatory, and the GFCI should be tested routinely. The supply voltage must match the pump's nameplate rated voltage within a 10% tolerance to prevent overheating and component damage. The pump must be permanently connected to a circuit with an appropriately sized/rated branch circuit protector, serving as the master On-Off switch. A disconnecting means must be located at least 5 ft. from the inside wall of the pool, spa, or hot tub.
Starting and priming the pump involves several critical steps. Single-speed pumps and two-speed pumps (on high speed) are self-priming up to 10 ft. The strainer housing must be filled with water to the suction pipe level before starting. All suction and discharge valves, as well as the filter air relief valve, must be open during startup. The pump should never be operated without water, as water acts as a coolant and lubricant for the mechanical shaft seal, and running it dry can cause damage and void the warranty. Undiluted chemicals should not be added directly in front of the pump suction. If the pump does not prime within five minutes, the motor should be stopped, and the cause investigated.
Regular maintenance is essential for the pump's longevity and efficient operation. The strainer basket should be cleaned regularly without striking it. The strainer cover gasket should be inspected and replaced as needed. The pump's motor bearings and shaft seals are self-lubricating, requiring no additional lubrication. The motor must be kept clean, and air vents should be free from obstruction to prevent damage; water should not be used to hose off the motor.
Shaft seals may require occasional replacement due to wear or damage. Genuine Hayward seal assembly kits should be used for replacements. This process involves carefully removing the motor assembly, diffuser, impeller, and ceramic seat, taking care not to scratch the graphite and ceramic sealing surfaces. Cleanliness and proper lubrication of components like the impeller hub and seal recess are crucial during reassembly.
For winterization or extended storage, all water must be drained from the pump and piping to prevent freezing, which can void the warranty. Only propylene glycol should be used as antifreeze in the pool/spa system, as other anti-freezes can be toxic and damage plastic components. The motor should be kept dry and covered during storage, but not wrapped in plastic film or bags, to avoid condensation and corrosion. Before draining, power to the motor must be turned off, and drain plugs removed from the strainer body. Once drained, the strainer cover and drain plugs should be re-installed, and the pump stored in a dry area.
Troubleshooting guidance is provided for common issues such as the motor not starting, shutting off, humming but not starting, or the pump not priming. These sections offer solutions ranging from checking electrical connections and clearing obstructions to inspecting for air leaks and replacing damaged components. For instance, if the motor hums but doesn't start, the impeller may be jammed with debris, requiring professional intervention. Low flow issues can be addressed by checking for clogged strainers, undersized piping, or air leaks. Noisy pump operation might indicate air leaks, improper mounting, or foreign matter in the housing, and solutions include correcting suction conditions, securing the pump, or cleaning the housing. Regular inspection and replacement of seals are also highlighted as critical maintenance steps to prevent bearing damage from chlorinated water.
| Voltage | 115/230V |
|---|---|
| Speed | Single Speed |
| Material | Thermoplastic |
| Connection Size | 1.5" or 2" |
| Warranty | 1 Year |