EasyManua.ls Logo

Heath Zenith DualBrite 5716 User Manual

Heath Zenith DualBrite 5716
16 pages
To Next Page IconTo Next Page
Page #1 background imageLoading...
Page #1 background image
DualBrite
®
Replacement
Sensor Head
Features
Turns on lighting when motion is detected.
Automatically turns lighting off.
Three lamp modes available: Normal, Soft, or Flash.
Patented DualBrite
®
Timer.
Photocell keeps the lighting off during daylight hours.
LED indicates motion was sensed (day or night).
Requirements
Not for use with fluorescent lights.
The light control requires 120-volts AC.
If you want to use Manual Mode, the control must be
wired through a switch.
Install sensor in accordance with local codes.
© 2007 HeathCo LLC 598-1307-01
Model 5716
OPERATION
* resets to Auto Mode at dawn.
Note: When first turned on wait about 1
1
/
2
minutes for
the circuitry to calibrate.
TEST
TEST 1 5 20
ON-TIME
Off 3 6 Dusk to
Dawn
DualBrite
®
Put ON-TIME switch on
the sensor bottom to
TEST and the DualBrite
®
switch OFF.
DualBrite
®
TIMER
Light comes on half bright for selected time after dusk
(Off, 3 hr., 6 hr., until dawn). Selecting OFF disables this
feature. The motion sensing features will continue to work
as described in this manual. If motion is sensed, the light
turns on full bright for the ON-TIME (1, 5, or 20 minutes)
then returns to dim mode.
LAMP MODES
There are three lamp modes (light turn-on effects) avail-
able when motion is detected:
NORMAL - Light instantly comes on.
SOFT - Light starts dim and gradually increases to full
brightness. Light gradually dims to half-bright, pauses,
and then continues dimming to off when motion is no
longer detected and after selected ON-TIME.
FLASH - Light flashes on then off twice before turning
on full brightness.
MANUAL MODE
ON-TIME
TEST 1 5 20
AUTO
Move ON-TIME Switch to 1,
5, or 20 minutes
Mode Switching Summary
Flip light switch off
for one second then
back on*
MANUAL MODE
AUTO
TEST
* If you get confused while switching modes, turn the power
off for one minute, then back on. After the calibration
time the control will be in the AUTO mode.
Manual mode only works at night be
-
cause daylight returns the sensor to
AUTO.
Flip the light switch off for one second
then back on to toggle between AUTO
and MANUAL MODE.
Manual mode works only with the ON-
TIME switch in the 1, 5, or 20 position.
Put the ON-TIME switch in the 1, 5,
or 20 minute position.
... back on.
1 Second OFF
then...
Mode: On-Time: Works: Day Night
Test
5 Sec
x x
Normal
1, 5, 20 min.
x
Manual
Until Dawn*
x
Accent
3, 6 Hr. to Dawn
x
LAMP MODE
NORMAL SOFT FLASH
LAMP MODE
Put the LAMP MODE switch
in the Normal, Soft, or Flash
position.
Question and Answer IconNeed help?

Do you have a question about the Heath Zenith DualBrite 5716 and is the answer not in the manual?

Heath Zenith DualBrite 5716 Specifications

General IconGeneral
BrandHeath Zenith
ModelDualBrite 5716
CategoryAccessories
LanguageEnglish

Summary

OPERATIONAL MODES

AUTO Mode Setup

Put the ON-TIME switch in the 1, 5, or 20 minute position for AUTO mode.

MANUAL Mode Operation

Manual mode works at night; daylight returns the sensor to AUTO.

Mode Switching Summary

Flip light switch off for one second then back on to toggle between modes.

DUALBRITE® Timer & Lamp Modes

DUALBRITE® Timer

Light comes on half bright for selected time after dusk, then full bright with motion.

LAMP MODES Explained

Describes Normal, Soft, and Flash light turn-on effects when motion is detected.

INSTALLATION

Eave Mount Sensor Head Rotation

Steps for rotating the sensor head for proper operation during eave mounting.

Wiring the Light Control

Connecting junction box wires to light control wires with connectors.

Mounting and Adjusting Fixture

Follow fixture instructions for mounting and adjusting the light fixture.

TEST AND ADJUSTMENT

Sensor Controls: Range, DUALBRITE®, ON-TIME

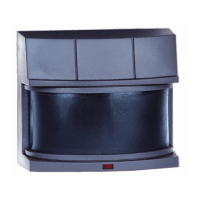
Adjusts Range, DUALBRITE®, and ON-TIME settings on the sensor bottom.

Avoiding False Triggering

Lists sources causing false triggering like heat vents and reflective surfaces.

Coverage Area Adjustment

Loosen clamp screw, rotate sensor head to adjust coverage area.

Technical Specifications

Lists sensor range, sensing angle, electrical load, and power requirements.

TROUBLESHOOTING GUIDE

Lights Not Coming On

Possible causes and solutions for the light not activating.

Lights Come On In Daylight

Reasons and fixes for light activation during daylight hours.

Lights Come On for No Apparent Reason

Troubleshooting false activation due to environment or settings.

Lights Stay On Continuously

Solutions for the lights remaining on constantly.

Lights Flash On and Off

Explains flashing behavior in Test or Flash mode.

Lights Flash Once, Stay Off in Manual Mode

Sensor detecting its own lights in Manual Mode.

TECHNICAL SERVICE

Contact Support

Phone number and address for technical support assistance.

Information Required for Service

Details needed when contacting Technical Service.

TEN YEAR LIMITED WARRANTY

Purchase Information

Related product manuals