46
Installation
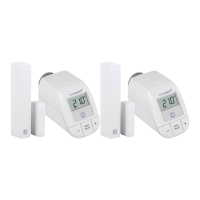
For mounting the window / door contact with the supplied adhesive
strip, please proceed as follows:
• Attach the large double-sided adhesive strip to the back side of
the bracket (H) (see fig. 7) and press the device onto the desired
position.
• Place the magnet in the bracket at the back side and place the
back side into the housing of the magnetic contact.
When using the spacer (J), fasten the smaller adhesive strip at
the back side of the spacer (see figure 7) and attach it to the
desired position on the wall. Afterwards, place the magnet
contact on to the spacer.
• Attach the small double-sided adhesive strip to the back side of
the magnet contact (I) (see fig. 7) and press the magnet contact
onto the desired position of the window.
5.3.3 Screw mounting
Do not yet assemble the magnet contact before screw
mounting.
For screw mounting, please proceed as follows:
• Pre-drill the screw holes in the brackets (H) using an appropriate
drill.
• Mark the screw holes for the electronic unit (K) according to the
bracket on the window.
• Mark the screw holes for the magnet contact (I) or, if required, for
the spacer (J) on the window.
• If you are working with hard surfaces you should pre-drill the
 Loading...