EAGLEHAWK NX CONTROLLER – INSTALLATION & COMMISSIONING INSTRUCTIONS
19 EN1Z-1039GE51 R1218
MOUNTING/DISMOUNTING
Before Installation
IMPORTANT
To allow the evaporation of any condensation resulting from low shipping / storage temperatures, keep the controller at
room temperature for at least 24 h before applying power.
US requirement, only: This device must be installed in a UL-listed enclosure offering adequate space to maintain the
segregation of line voltage field wiring and Class 2 field wiring.
In the case of vertical mounting on DIN rails, the EAGLEHAWK NX controller should be secured in place using a commercially-
available stopper. See also the EAGLEHAWK NX - Mounting Instructions (MU1Z-1039GE51).
Dimensions
110
215.5
5245
24V-0
24V~
1 2
49.5
57.5
J1 J8
24 25 26 27 28 29 30 31 32
GND1
485-1+
485-1-
n.a.
n.a.
GND2
485-2+
485-2-
n.a.
RS232
RS485-1
END
BIAS
MID
BI1
BI2
BI3
BI4
GND
UI1
UI2
UI3
UI4
UI5
UI6
UI7
33 34 35 36 37 38 39 40 41 42 43 44 45 46
UI8
47
UI9
UI10
21
DO1
DO2
DO3
IN
IN4
DO4
DO5
IN5
IN6
DO6
DO7
IN7
IN8
DO8
5 6 7 8 9 10 1112131415161718
GND
AO1
AO2
AO3
19 20 21 22
AO4
23
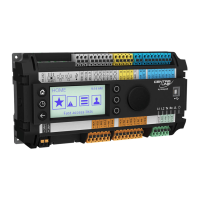
Fig. 20. EAGLEHAWK NX controller (w/o HMI but with RJ45 socket for connection of portable HMI, and with full
complement of onboard I/Os), dimensions (in mm)
147
57.5
215.5
J1 J8
52
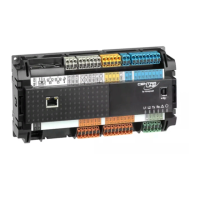
Fig. 21. EAGLEHAWK NX controller with covers, dimensions (in mm)
NOTE: Use of the covers (MVC-80-AC1) obstructs access to the Ethernet and USB 2.0 Host Interfaces and RS232 socket.

 Loading...