REQUIRED TOOLS AND SOFTWARE
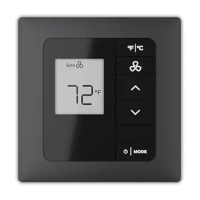
INNCOM e7
Installation Requirements
READ ME FIRST
Required Installation Hardware:
• Four #6/32, 1" Philip's Pan Head Screws
• e7 Smart Wall Mounting Plate
• e7 Power and HVAC signal Harness
• Phillips Screw driver
• Wire cutters / strippers
• Orange wire nuts
Optional Installation Hardware:
• e7 Spacer Ring
• 3 wires for low voltage / S5bus in-room communications (typically CAT-5 or CAT-3 wiring)
• Door, window, balcony switch and harness (wired to H2); see property specific documentation for
remote door, window and balcony switch requirements
• Remote thermistor (04-1096.FL, wired to H2)
Required Installation Software
DO NOT THROW THIS UNIT AWAY: One PC-503 USB Commissioning Tool and USB cable per property /
project is shipped to the site.
This tool is used in conjunction with Honeywell's engINN commissioning software when advanced commissioning of
the e7 is required by a trained and certified INNCOM technician. DO NOT THROW THIS UNIT AWAY. Contact
Honeywell technical support for more information.
PC-503 USB Commissioning Tool and Cable