3.
P
u
ll
off
the
i
n
d
e
x
c
o
v
e
r.
•
It
h
e
l
p
s
to rock
it
s
li
g
h
t
l
y
.
•
Be
c
a
r
e
f
u
l
not to
damage
the
m
a
s
k
i
n
g
p
l
a
t
e
a
n
d
i
n
d
e
x
when
r
e
m
o
v
i
n
g
the
c
o
v
e
r.
4.
C
a
r
e
f
u
ll
y
p
u
ll
off
the
i
n
d
e
x
m
a
s
k
i
n
g
p
l
a
t
e
[
Fi
g
u
r
e
1
2
]
.
Fi
g
u
r
e
1
0
.
I
n
d
e
x
Fi
g
u
r
e
1
2
.
I
n
d
e
x
m
a
s
k
i
n
g
plate
c
)
How to
“
C
l
o
c
k
”
a
M
e
t
e
r
5. Remove the three index retaining screws using a
T
20
d
r
i
v
e
r
[
Fi
g
u
r
e
1
3
]
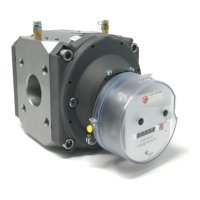
The odometer index can be used to calculate the
instantaneous flow rate by using the right-most digit (test
dial). Each number on this dial represents one (1) cubic
foot, and one complete revolution of this dial represents
ten (10) cubic feet. You will need a stop watch or a watch
with a sweep second hand to calculate flow rate.
1.
Measure the
t
i
m
e
,
i
n
seconds, that
it
takes the test
d
i
a
l
to make one
c
o
m
p
l
e
t
e
r
e
v
o
l
u
t
i
on
(
1
0
c
u
b
i
c
f
ee
t
)
.
2. Use the
f
o
ll
o
w
i
n
g
f
o
r
m
u
l
a
to
c
a
l
c
u
l
a
t
e
f
l
o
w
r
a
t
e
:
Fl
o
w
R
a
t
e
(
a
c
f
h
)
=
(
1
0
÷
“
t
i
m
e
”
)
x
3600
Note that the
o
d
o
m
e
t
e
r
i
n
d
e
x does not
compensate
f
o
r
e
l
e
v
a
t
e
d
p
r
e
ss
u
r
e
o
r
t
e
m
p
e
r
a
t
u
r
e
.
C
o
rr
e
c
t
i
o
n
f
a
c
t
o
r
s
w
ill
need to be
a
pp
li
e
d
to
a
d
j
u
s
t
the
f
l
o
w
r
a
t
e
to
s
t
a
n
d
a
r
d c
o
n
d
i
t
i
o
n
s
(
s
c
f
h
)
.
d
)
R
e
mo
v
a
l
,
I
n
s
t
a
ll
a
t
i
on
and
R
e
p
l
a
c
e
m
e
n
t
S
t
e
p
s
to
r
e
p
l
a
c
e
the
RABO
meter
i
n
d
e
x
:
SUPPORT
HOLE
INDEX
RETAINING
SCREW
Fi
g
u
r
e
1
3
.
I
n
d
e
x
r
e
t
a
i
n
i
n
g
s
c
r
e
w
s
INDEX
RETAINING
SCREW
INDEX
RETAINING
SCREW
1.
Cut the
s
e
a
l
w
i
r
e
s
and remove
f
r
o
m
the
ho
l
e
s
[
Fi
g
u
r
e
11
]
.
2.
R
e
m
o
v
e
(
un
s
c
r
e
w
)
the two brass screws on the
s
i
d
e
s
o
f
the
i
n
d
e
x
cover
[
Fi
g
u
r
e
11
]
.
SEALS
Fi
g
u
r
e
11
.
I
n
d
e
x
cover
s
e
a
l
s
6. Carefully remove the index
•
Pay
a
tt
e
n
t
i
on
to the
d
r
i
v
e
n
magnet —
it
i
s
s
u
pp
o
r
t
e
d
by the
i
n
d
e
x
.
•
L
e
a
v
e
the magnet on the
m
e
t
e
r.
7.
T
r
a
n
s
f
e
r
the
change
gear
f
r
o
m
the
damaged
i
n
d
e
x
to
t
h
e
r
e
p
l
a
c
e
m
e
n
t
[
Fi
g
u
r
e
s
1
4
and
1
5
]
.
•
R
e
m
o
v
e
the
change
gear on the
damaged
i
n
d
e
x
.
•
Pry the
l
o
c
k
i
n
g
c
o
ll
a
r
off
w
i
t
h
a
k
n
i
f
e
b
l
a
d
e
or
o
t
h
e
r
sharp
o
b
j
e
c
t
.
•
Unscrew the
change g
e
a
r.
!
W
ARNING
E
a
c
h m
e
t
e
r
s
i
z
e
uses a common
i
n
d
e
x that
h
a
s
un
i
q
u
e
c
o
l
o
r
e
d
g
e
a
r
s
.
I
n
t
e
r
c
h
a
n
g
i
n
g
c
o
l
o
r
e
d
g
e
a
r
s
will
r
e
s
u
l
t
in
i
n
a
cc
u
r
a
t
e
r
e
a
d
i
n
g
s
.
E
n
s
u
r
e
the
r
e
p
l
a
c
e
m
e
n
t
i
n
d
e
x has
the same
c
o
l
o
r
g
e
a
r
s
.
[
R
e
f
e
r
to
T
a
b
l
e
1
]
•
If
the
r
e
p
l
a
c
e
m
e
n
t
i
n
d
e
x
has a
change
gear,
r
e
m
o
v
e
and
d
i
s
c
a
r
d
i
t
.
•
Attach the
change
gear
f
r
o
m
the
damaged
i
n
d
e
x
to the same
s
h
a
f
t
on the
r
e
p
l
a
c
e
m
e
n
t
i
n
d
e
x
.
•
S
e
c
u
r
e
gear on
s
h
a
f
t
.
•
Snap on the locking collar.
 Loading...