3 32-00156-03
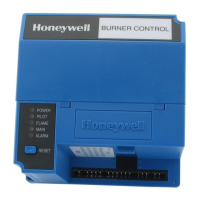
RM7895A,B,C,D/EC7895A,C; RM7896A,C,D7800 SERIES Relay Modules
2. Select a location on a wall, burner or electrical panel. The
Q7800 can be mounted directly in the control cabinet. Be
sure to allow adequate clearance for servicing, installation,
access or removal of the relay module, Expanded Annunci-
ator, Keyboard Display Module, flame amplifier, flame am-
plifier signal voltage probes, Run/Test Switch, electrical
signal voltage probes and electrical field connections.
3. For surface mounting, use the back of the subbase as a
template to mark the four screw locations. Drill the pilot
holes.
4. Securely mount the subbase using four no. 6 screws.
Wiring Subbase
NOTE: There are several different subbase models that can
be purchased. It is important to note which subbase
is compatible with the relay module when purchasing
repair or replacement parts.
Series 1000 Subbase
All relay product codes that start with a 1 (example:
RM7840G1014/U) can be used with existing subbase
Q7800A1005/U. These relays can also be used on the Series
2000 subbase noted below.
Series 2000 Subbase
All relay product codes that start with a 2 (example:
RM7840G2014/U) can be used with subbase Q7800A-
2005/U.
Subbase Compatibility
Any relay module in the 1000 series is fully backward
compatible with any subbase already installed in the field
(Q7800A1005/U, Q7800B1003/U, Q7800A2005/U,
Q7800B2003/U).
Any relay module in the new 2000 series will only be able to be
installed on subbase Q7800A2005/U, and will not be back-
ward compatible with any Q7800A1005/U legacy subbases
already installed in the field.
IMPORTANT
Make sure to check the relay model number and check the
subbase compatibly prior to ordering or attempting a new
installation or field upgrade.
If you attempt to place a 2000 series relay on a non-compati-
ble 1000 series subbase, you will receive an error code of 101.
This indicates that you must a) change out the subbase to a
Q7800A2005/U or b) choose a compatible 1000 series relay
module.
WARNING
Electric Shock Hazard.
Can cause serious injury, death or equipment damage.
Disconnect power supply before beginning
installation.
The internal block diagram of the RM7895A,B,C,D/
EC7895A,C; RM7896A,B,C,D is shown in Fig. 1.
1. For proper subbase wiring and sequence chart, refer to Fig.
2 and 3.
2. For remote wiring of the Keyboard Display Module, refer to
the Specifications for the 2-line VFD KDM (65-0090), the
4-line LCD KDM (32-00110), Data ControlBus™ Module
(65-0091) or Extension Cable Assembly (65-0131).
3. Disconnect the power supply from the main disconnect
before beginning installation to prevent electrical shock
and equipment damage. More than one disconnect can be
required.
4. All wiring must comply with all applicable electrical codes,
ordinances and regulations. Wiring, where required, must
comply with NEC, Class 1 (Line Voltage) wiring.
5. For recommended wire size and type, see Table 1.
6. For recommended grounding practices, see Table 2.
 Loading...