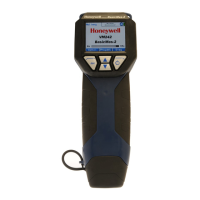
OPERATING INSTRUCTIONS VM242A BASICMES-2
Honeywell • All rights reserved 3 MU2H-1054GE25 R0411
Item
Spare part
ordering number
Carry case with foam insert VMS242A007
2.4 Names of the Components
Table 2. Names of the components
1 Mode
2 Time and date
3 Battery status
4 Measured value
5 Selected valve and valve setting
6 Menu bar
7 Power on/off / enter key
8 Line up / line down keys
See
Fig. 1
9 Escape / return key
10 Screen and keyboard (details see above)
11 Device housing with rubber padding
See
Fig. 2
12
Cover for hose and temperature sensor
connections
13 Battery cover
14
Typeplate and calibration mark (attached
after first re-calibration)
See
Fig. 3
15
Cover for hose and temperature sensor
connections
See
Fig. 4
16 Socket for battery charger
17 Infrared transmitter
See
Fig. 5
18 USB socket
19 Socket T
1
for temperature sensor
20 Socket T
2
for temperature sensor
21 Connection for high pressure hose
See
Fig. 6
22 Connection for low pressure hose
2.5 Charging Batteries
Plug battery charger into line voltage power socket and
into power socket on right side of device (see Fig. 4,
item 16)
Batteries are charged. Charging is indicated by a light on
the battery charger with the following states:
Yellow: not connected or initialising
Orange: fast charge
Green/yellow: top-off charge
Green: trickle charge
Orange/green: error
Full charge of original batteries takes approx. three hours
NOTE
Use dedicated battery charger supplied with device only
Charge batteries indoors or in a sheltered environment
within specified ambient temperature (see data sheet in
appendix) only
Batteries will be exhausted if left for a long period of time
after being charged
Battery charger can be used as mains power supply for
device, e.g. during data logging, if device is equipped with
rechargeable batteries
Device does not work when not equipped with batteries.
Also not when battery charger is connected
WARNING
Battery charger must NOT be used when device is
equipped with non rechargeable batteries
2.6 Replacing Batteries
The lid of the battery compartment is opposite the display.
Remove lid by pushing down tab on topside of device and
sliding lid off
Remove old batteries. Pull ribbon to remove lower two
batteries
Insert new batteries. Pay attention to correct polarity as
indicated in battery compartment. Place ribbon below
lower batteries
Replace lid. Ensure tab snaps back into place
NOTE: Instead of rechargeable batteries four standard AA
size dry batteries can be used alternatively. Never
try to recharge standard dry batteries. Never mix
standard dry batteries with rechargeable batteries
2.7 Setup
2.7.1 Setting Device Clock
To set or change time and date proceed as follows:
Operation Command Key
Switch on device — ON
Device carries out zero calibration and then automatically
switches to measuring mode
Stop ongoing measurement Stop ON
Enter main menu Menu ESC
Scroll down to menu item
“Setup”
↓ DOWN
Enter Setup menu Ok ON
“Time” is first item in setup menu
Move cursor into data field
until first digit to be changed is
highlighted
→ ON
Change value of digit ↑↓ UP/DOWN
Move to next digit → ON
Change value of digit ↑↓ UP/DOWN
Etc., when all changes are done:
Move cursor out of data field → ON
Cursor disappears and new value is stored