EasyManua.ls Logo

Honeywell WICKER PARK - User Manual

Honeywell WICKER PARK
17 pages
Print Icon
To Next Page IconTo Next Page
Loading...
WICKER PARK 48” CEILING FAN
MODEL #10268
Questions, problems, missing parts? Before returning to your retailer, call our customer
service department at 1-877-361-3883, Monday - Thursday, 8 am - 6 pm, EST and Friday,
8 am - 5 pm, EST.
Español p. 18
Question and Answer IconNeed help?

Do you have a question about the Honeywell WICKER PARK and is the answer not in the manual?

Summary

Safety Information and Warnings

Electrical Safety and Grounding

Covers wiring compliance, speed control restrictions, and grounding requirements for safe operation.

Mounting Options

Mounting Bracket Installation

Downrod and Wiring Preparation

Fan Mounting to Bracket

Electrical Wiring

Blade Installation

Light Kit Installation

Operating Instructions

Troubleshooting Common Issues

Fan Operation Problems

Steps to diagnose and fix issues like fan not moving, noise, or excessive wobble.

Light Kit and Wobble Solutions

Addresses causes and fixes for non-functioning lights and fan wobble.

Overview

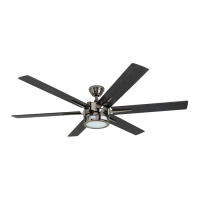
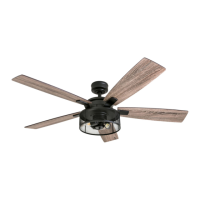
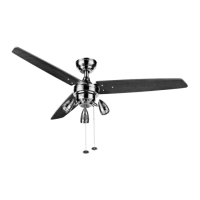
This document describes the Honeywell Wicker Park 48" Ceiling Fan, Model #10268. It provides instructions for assembly, operation, and maintenance, along with safety information and warranty details.

Function Description

The Honeywell Wicker Park 48" Ceiling Fan is designed to provide air circulation and lighting for indoor spaces. It features a 48-inch blade span and offers two mounting options: standard and angle. The fan includes a light kit with three light housings and uses halogen bulbs. It has a reverse switch to optimize performance for different seasons, allowing for downward airflow in warmer weather to create a wind chill effect and upward airflow in cooler weather to help move stagnant, hot air off the ceiling area. The fan is controlled by pull chains for both fan speed and light operation.

Important Technical Specifications

  • Model Number: #10268
  • Blade Span: 48 inches
  • Mounting Options: Standard and Angle
  • Estimated Assembly Time: Under 120 minutes
  • Fan Weight (Net): 12.16 lbs. (5.52 kg)
  • Minimum Clearance (Blades to Floor): 7 ft. (2.14 m)
  • Minimum Clearance (Blades to Obstruction): 30 in. (76 cm)
  • Maximum Ceiling Angle for Angle Mount: 16°
  • Light Kit: Includes three light housings and uses halogen bulbs.
  • Maximum Light Wattage: Limited to 190W.
  • Power Supply: Designed for connection to standard household electrical wiring.
  • Support Requirement: Must be mounted to an outlet box marked "ACCEPTABLE FOR FAN SUPPORT" and capable of supporting at least 35 lbs. (15.88 kg) of moving weight.
  • Control: Pull chains for fan and light operation.
  • Reverse Switch: Located on the side of the switch housing for seasonal performance optimization.

Usage Features

  • Seasonal Performance Optimization: A reverse switch allows users to change the direction of blade rotation. In warmer weather, the fan can be set to create downward airflow for a wind chill effect. In cooler weather, it can be set to create upward airflow to help circulate warm air.
  • Two Mounting Options: The fan can be installed using either a standard mount for ceilings 8 ft. or higher, or an angle mount for angled or vaulted ceilings (up to 16°).
  • Integrated Lighting: The fan includes a light kit with three light housings, providing ambient illumination.
  • Pull Chain Control: Separate pull chains are provided for controlling the fan speed and the light.
  • Energy Savings: Using the ceiling fan can help reduce energy consumption by allowing users to adjust their thermostat settings (raise in summer, lower in winter) without sacrificing comfort. Turning off the fan when no one is in the room further maximizes savings.
  • Optional Separate Light/Fan Control: If a second hot power wire is available from the outlet box, the fan can be wired for separate control of the fan and light functions.

Maintenance Features

  • Regular Inspection: At least twice a year, the canopy should be lowered to check the downrod assembly, and all screws on the fan should be tightened.
  • Cleaning: The motor housing should be cleaned with only a soft brush or lint-free cloth to avoid scratching the finish. The blades should be cleaned with a lint-free cloth.
  • No Water for Cleaning: It is explicitly stated not to use water or a damp cloth to clean the ceiling fan.
  • Power Disconnection: Before beginning any maintenance tasks, the main power supply to the fan must be shut off by removing fuses or turning off circuit breakers.
  • Blade Care: Occasionally, a light coat of furniture polish can be applied to wood blades for added protection.
  • Troubleshooting Guide: The manual includes a troubleshooting section to help diagnose and resolve common issues such as the fan not moving, being noisy, excessive wobbling, or lights not working. This guide provides steps like checking power, connections, screws, and blade balance.

Safety Information

  • Power Disconnection: Always disconnect power before installation or maintenance.
  • Electrical Codes: All electrical connections must comply with local codes, ordinances, the National Electrical Code, and ANSI/NFPA 70-199.
  • Qualified Electrician: Consult a qualified electrician if unfamiliar with electrical wiring.
  • Outlet Box Requirements: The fan must be mounted to an outlet box marked "ACCEPTABLE FOR FAN SUPPORT" that can support at least 35 lbs. (15.88 kg).
  • Grounding: Ensure the outlet box is properly grounded.
  • No Solid-State Speed Controls: Do not use the fan with solid-state speed-control devices or full-range dimmer switches.
  • Blade Safety: Do not bend blade arms during installation, balancing, or cleaning. Do not insert objects between rotating blades.
  • Downrod Alignment: Ensure the slot in the downrod ball aligns with the tab in the mounting bracket to prevent the fan from falling.
  • Wiring Safety: Incorrect wiring can damage the fan or cause fire/injury. Ensure black and white wire connections are on opposite sides of the outlet box.
  • Reverse Switch Operation: Wait for the fan to stop before moving the reverse switch, and ensure it is fully engaged to the left or right for proper operation.

Honeywell WICKER PARK Specifications

General IconGeneral
BrandHoneywell
ModelWICKER PARK
CategoryFan
LanguageEnglish

Related product manuals