The Ampero Control is a Bluetooth MIDI controller designed to provide flexible control over musical gear. It allows users to send MIDI messages wirelessly from a mobile device, offering a comprehensive solution for managing and customizing MIDI commands.
Function Description
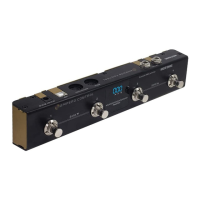
The Ampero Control serves as a central hub for MIDI control, enabling users to program and send various MIDI messages to compatible devices. It features four built-in footswitches and supports external controllers, such as expression pedals or dual footswitches, to expand its control capabilities. The core function revolves around banks, each containing user-defined data for the footswitches and external controllers. Users can create up to 100 banks (00-99), allowing for extensive customization and organization of MIDI setups.
Each footswitch can be assigned one of four modes:
- Single: Sends the same MIDI message(s) when the footswitch is pressed and released.
- Toggle: Allows for two different groups of MIDI messages (A/B) to be sent alternately with repeated presses. Messages are sent upon release.
- Momentary: Sends MIDI message(s) from group A when pressed and message(s) from group B when released.
- Hold: Sends a single MIDI message or a group of messages repeatedly at regular intervals when held. A single press sends the first MIDI message once upon release.
For each footswitch, users can add up to 16 MIDI messages. These messages can be configured with specific details:
- CH. (Channel): Sets the MIDI output channel from 1-16, or "Omni" to send via all 16 channels.
- Type: Supports four MIDI message types: Program Change (PC), Control Change (CC), Note On, and Note Off.
- Data 1/2: These values depend on the message type. For PC, Data 1 is the program number. For CC, Data 1 is the controller number and Data 2 is the controller value. For Note On/Off, Data 1 is the note number and Data 2 is the note velocity.
- Output To: Determines how the MIDI message is sent, with options for Bluetooth, USB jack, MIDI OUT jack, or any combination thereof.
External controllers, such as expression pedals, can also be configured. Expression pedals specifically support assigning up to four CC messages. Users can define the minimum and maximum Data 2 values (0-127) for the expression pedal's sweep, corresponding to the pedal being pushed all the way up or down, respectively. Seven different curves are available to customize the response of the expression pedal, with Curve 4 being the default linear option.
Usage Features
The Ampero Control is managed through a dedicated mobile application, which provides a user-friendly interface for setup and customization.
Connectivity:
- To connect, users first enable Bluetooth on their mobile device, power on the Ampero Control, and launch the app.
- Pressing and holding footswitches 2 and 3 on the Ampero Control activates Bluetooth Pair Mode, indicated by a flashing Bluetooth indicator on the unit's screen.
- The app automatically scans for nearby devices. Once "Ampero Control" appears, selecting it and tapping "Connect To The Selected Device" establishes a connection, and the Bluetooth indicator on the unit becomes solid.
- The app allows for offline mode if no device is found. The Ampero Control can only be edited by one device at a time; users can disconnect from one device to connect another.
- Users can select a bank (00-99) and then a specific footswitch (FS 1-4, CTRL 1-2) within the app.
- Footswitch modes (Single, Toggle, Momentary, Hold) are selected by tapping the "Mode" button.
- MIDI messages are added and edited by tapping the "+" button and then selecting a message to configure its channel, type, data, and output.
- The "Test" button allows users to immediately send configured MIDI messages to verify settings.
- Bank information can be edited by tapping the checkmark icon.
MIDI Templates:
- The device supports MIDI templates, which are pre-edited MIDI message groups suitable for popular musical gear.
- Users can load existing templates or create their own.
- To load a template, select a footswitch/external controller, tap the template icon, choose a group, and then select a template to import.
- Template groups can be created and managed within the Template menu, allowing for organization of custom MIDI setups.
- System templates have default MIDI channels set to 1 or Omni; users may need to adjust these if their device does not recognize imported messages.
Maintenance Features
The Ampero Control includes features for calibration and firmware updates to ensure optimal performance and compatibility.
Expression Pedal Calibration:
- This function is crucial if an expression pedal is not working correctly or has an inconsistent sweep.
- To calibrate, connect the expression pedal(s) to the EXP/CTRL jack(s).
- Hold footswitch 4 while powering up the Ampero Control; the screen will display "PdL" to indicate calibration mode.
- Fully raise and press down the pedal at least three times. The unit will automatically process and match the pedal.
- Press footswitch 4 again to exit calibration mode.
Firmware Update:
- Firmware updates can be performed via the mobile app to improve functionality and address issues.
- After pairing the unit, navigate to the "Settings" tab and select "Update Firmware."
- Users can view locally downloaded firmware files or tap "Search Firmware Files Online" to find available updates.
- Tapping on a firmware file displays detailed information and a "Download Now" button. A progress bar indicates the download status.
- Once downloaded, tapping "Update Now" initiates the update process. The Ampero Control will enter OAD (Over-the-Air Download) mode and disconnect.
- The app will then search for "Ampero Control OAD." Users must connect to this device for the firmware update to proceed automatically.
- After the update, users need to manually hold footswitches 2 and 3 on the Ampero Control to reconnect.
- Important: Do not turn off Bluetooth or unplug the power jack during an update, and keep the device and smart device within 1 meter to avoid signal interference.
Factory Reset:
- To clear all user data and restore the device to its default settings, navigate to the "Settings" tab and select "Factory Reset." This process takes several seconds.
Device Renaming:
- Users can personalize their Ampero Control by renaming it. In the "Settings" menu, tap "Device Name" and enter a new name. The default name is "Ampero Control."